Agent Runtime Guide
AI voice agents are transforming how businesses interact with customers, providing natural, conversational experiences through voice interfaces. VideoSDK's Agent Runtime feature offers a powerful no-code/low-code interface that enables you to build sophisticated AI voice agents without extensive programming knowledge.
Prerequisites
Before you begin, ensure you have:
- VideoSDK Account: Visit VideoSDK Dashboard to sign up for a free account and access the AI Agent builder.
Step-By-Step Guide
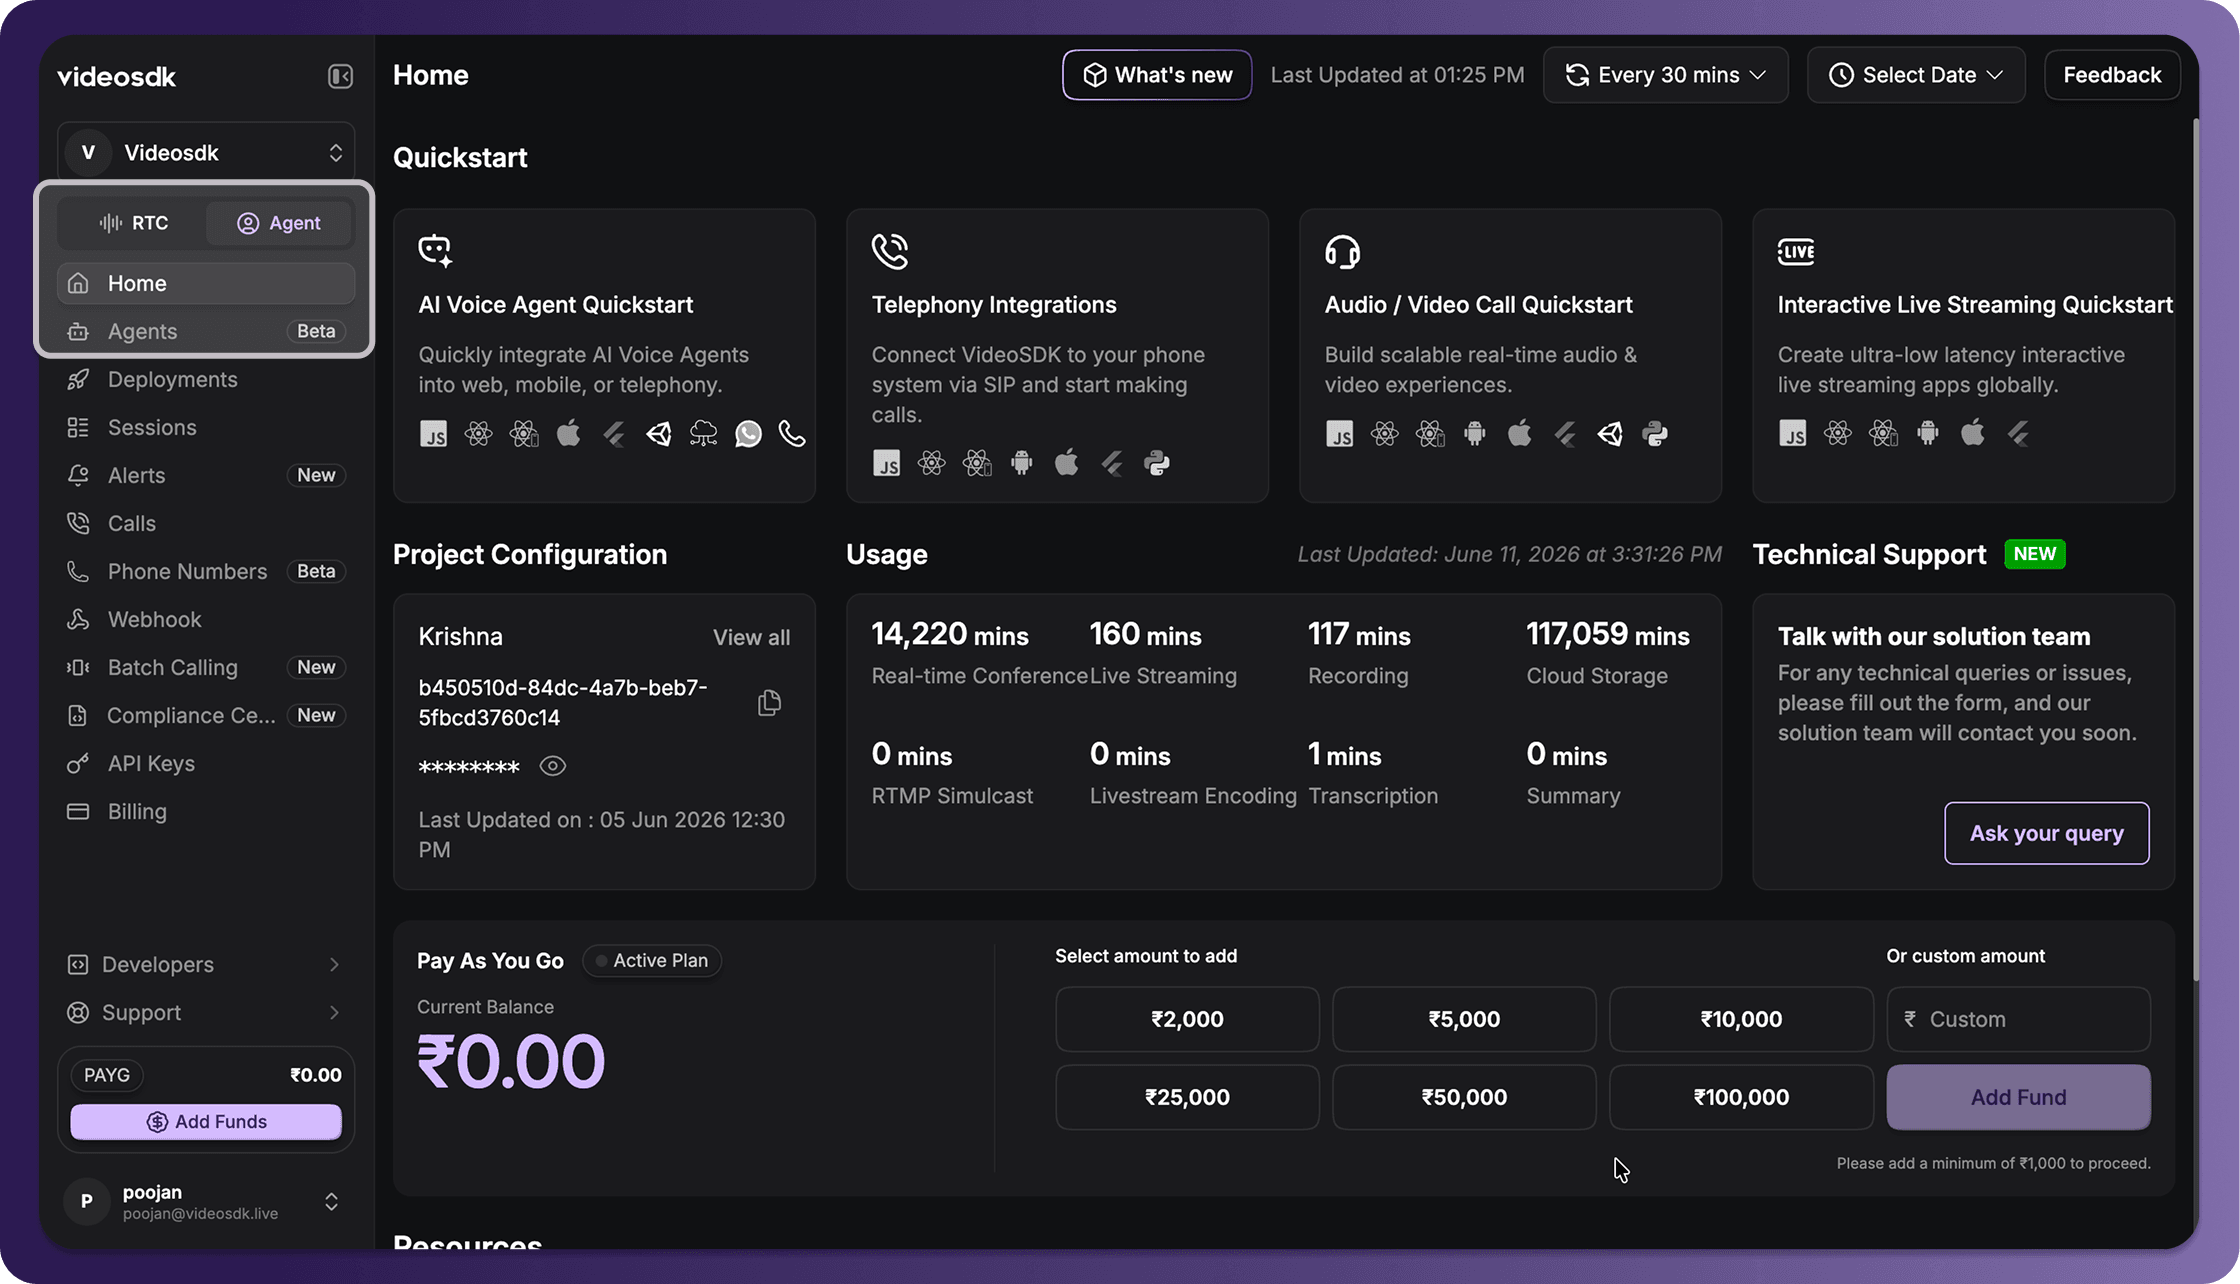
Step 1: Navigate to Agents
- Open your VideoSDK Dashboard.
- In the left sidebar, verify that the toggle at the top is set to Agent (instead of RTC).
- Click on the Agents option (under the Home menu) to open your agent workspace.
Step 2: Create a New Agent
- On the Agents overview screen, click the + New agent button in the top right corner.
- A Choose a template modal will open.
- You can either select Start with blank to configure an agent from scratch, or choose one of the pre-configured templates categorized by industry (such as BFSI, Healthcare, or Retail & E-Commerce):
- Payment Reminder Agent
- Loan Qualification Agent
- KYC Assistant
- Clinic Scheduling Agent
Select your preferred starting option to open the agent workspace.

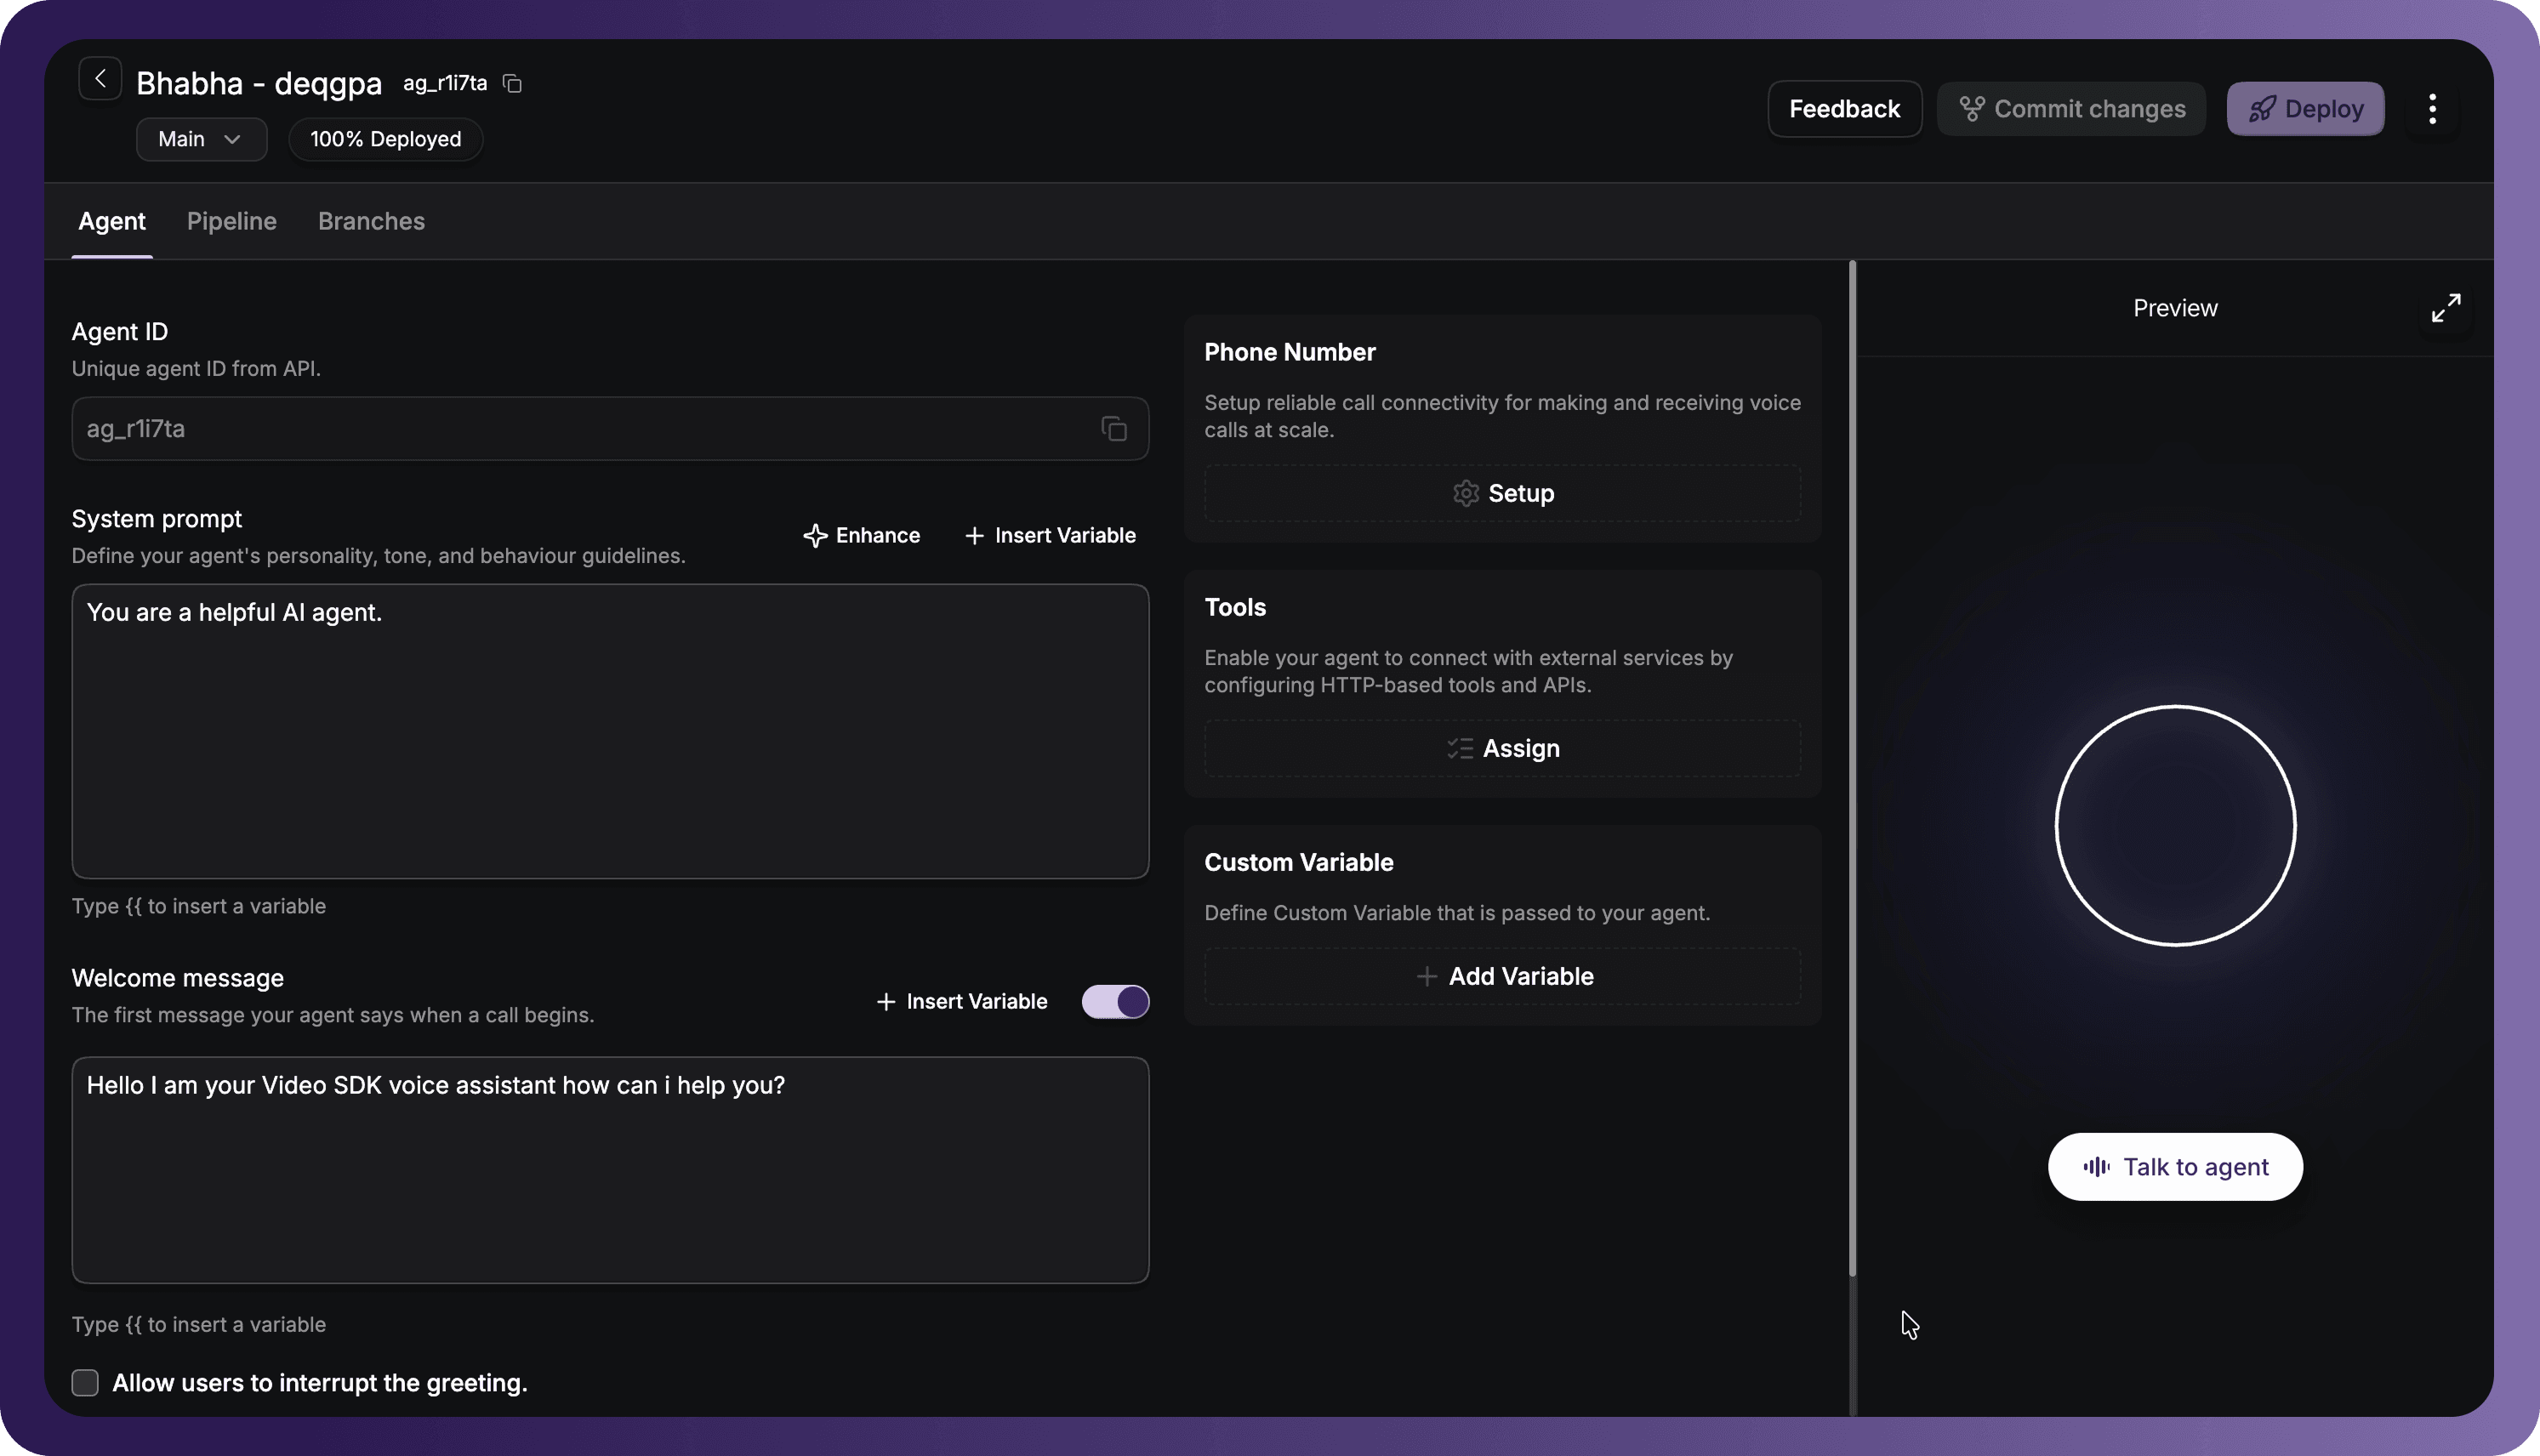
Step 3: Configure Agent Persona and Settings
In the Agent tab, define your agent's primary identity, greeting behavior, and interactive properties:
- Agent ID: View your unique agent identifier for API references.
- System Prompt: Define your agent's role, personality constraints, and instructions. Click + Enhance to let the system optimize your prompt, or use + Insert Variable to reference dynamic values.
- Welcome Message: Enter the greeting your agent says when a call connects. You can toggle this message on/off and configure options like Allow users to interrupt the greeting.
- Phone Number Integration: Open the phone drawer to assign an existing routing rule (such as Inbound or Outbound routes) to handle incoming or outgoing calls.
- Tools Library: Grant your agent access to external data or trigger systems by linking tools. Click + Add new to register HTTP-based tools (e.g. configuring a
GETrequest to trigger APIs). - Custom Variables: Click + Add Variable to pass contextual parameters into your agent. Define variables by type (Number, String, or Boolean). You can enter a local Preview value for dashboard simulator testing alongside your live production values.
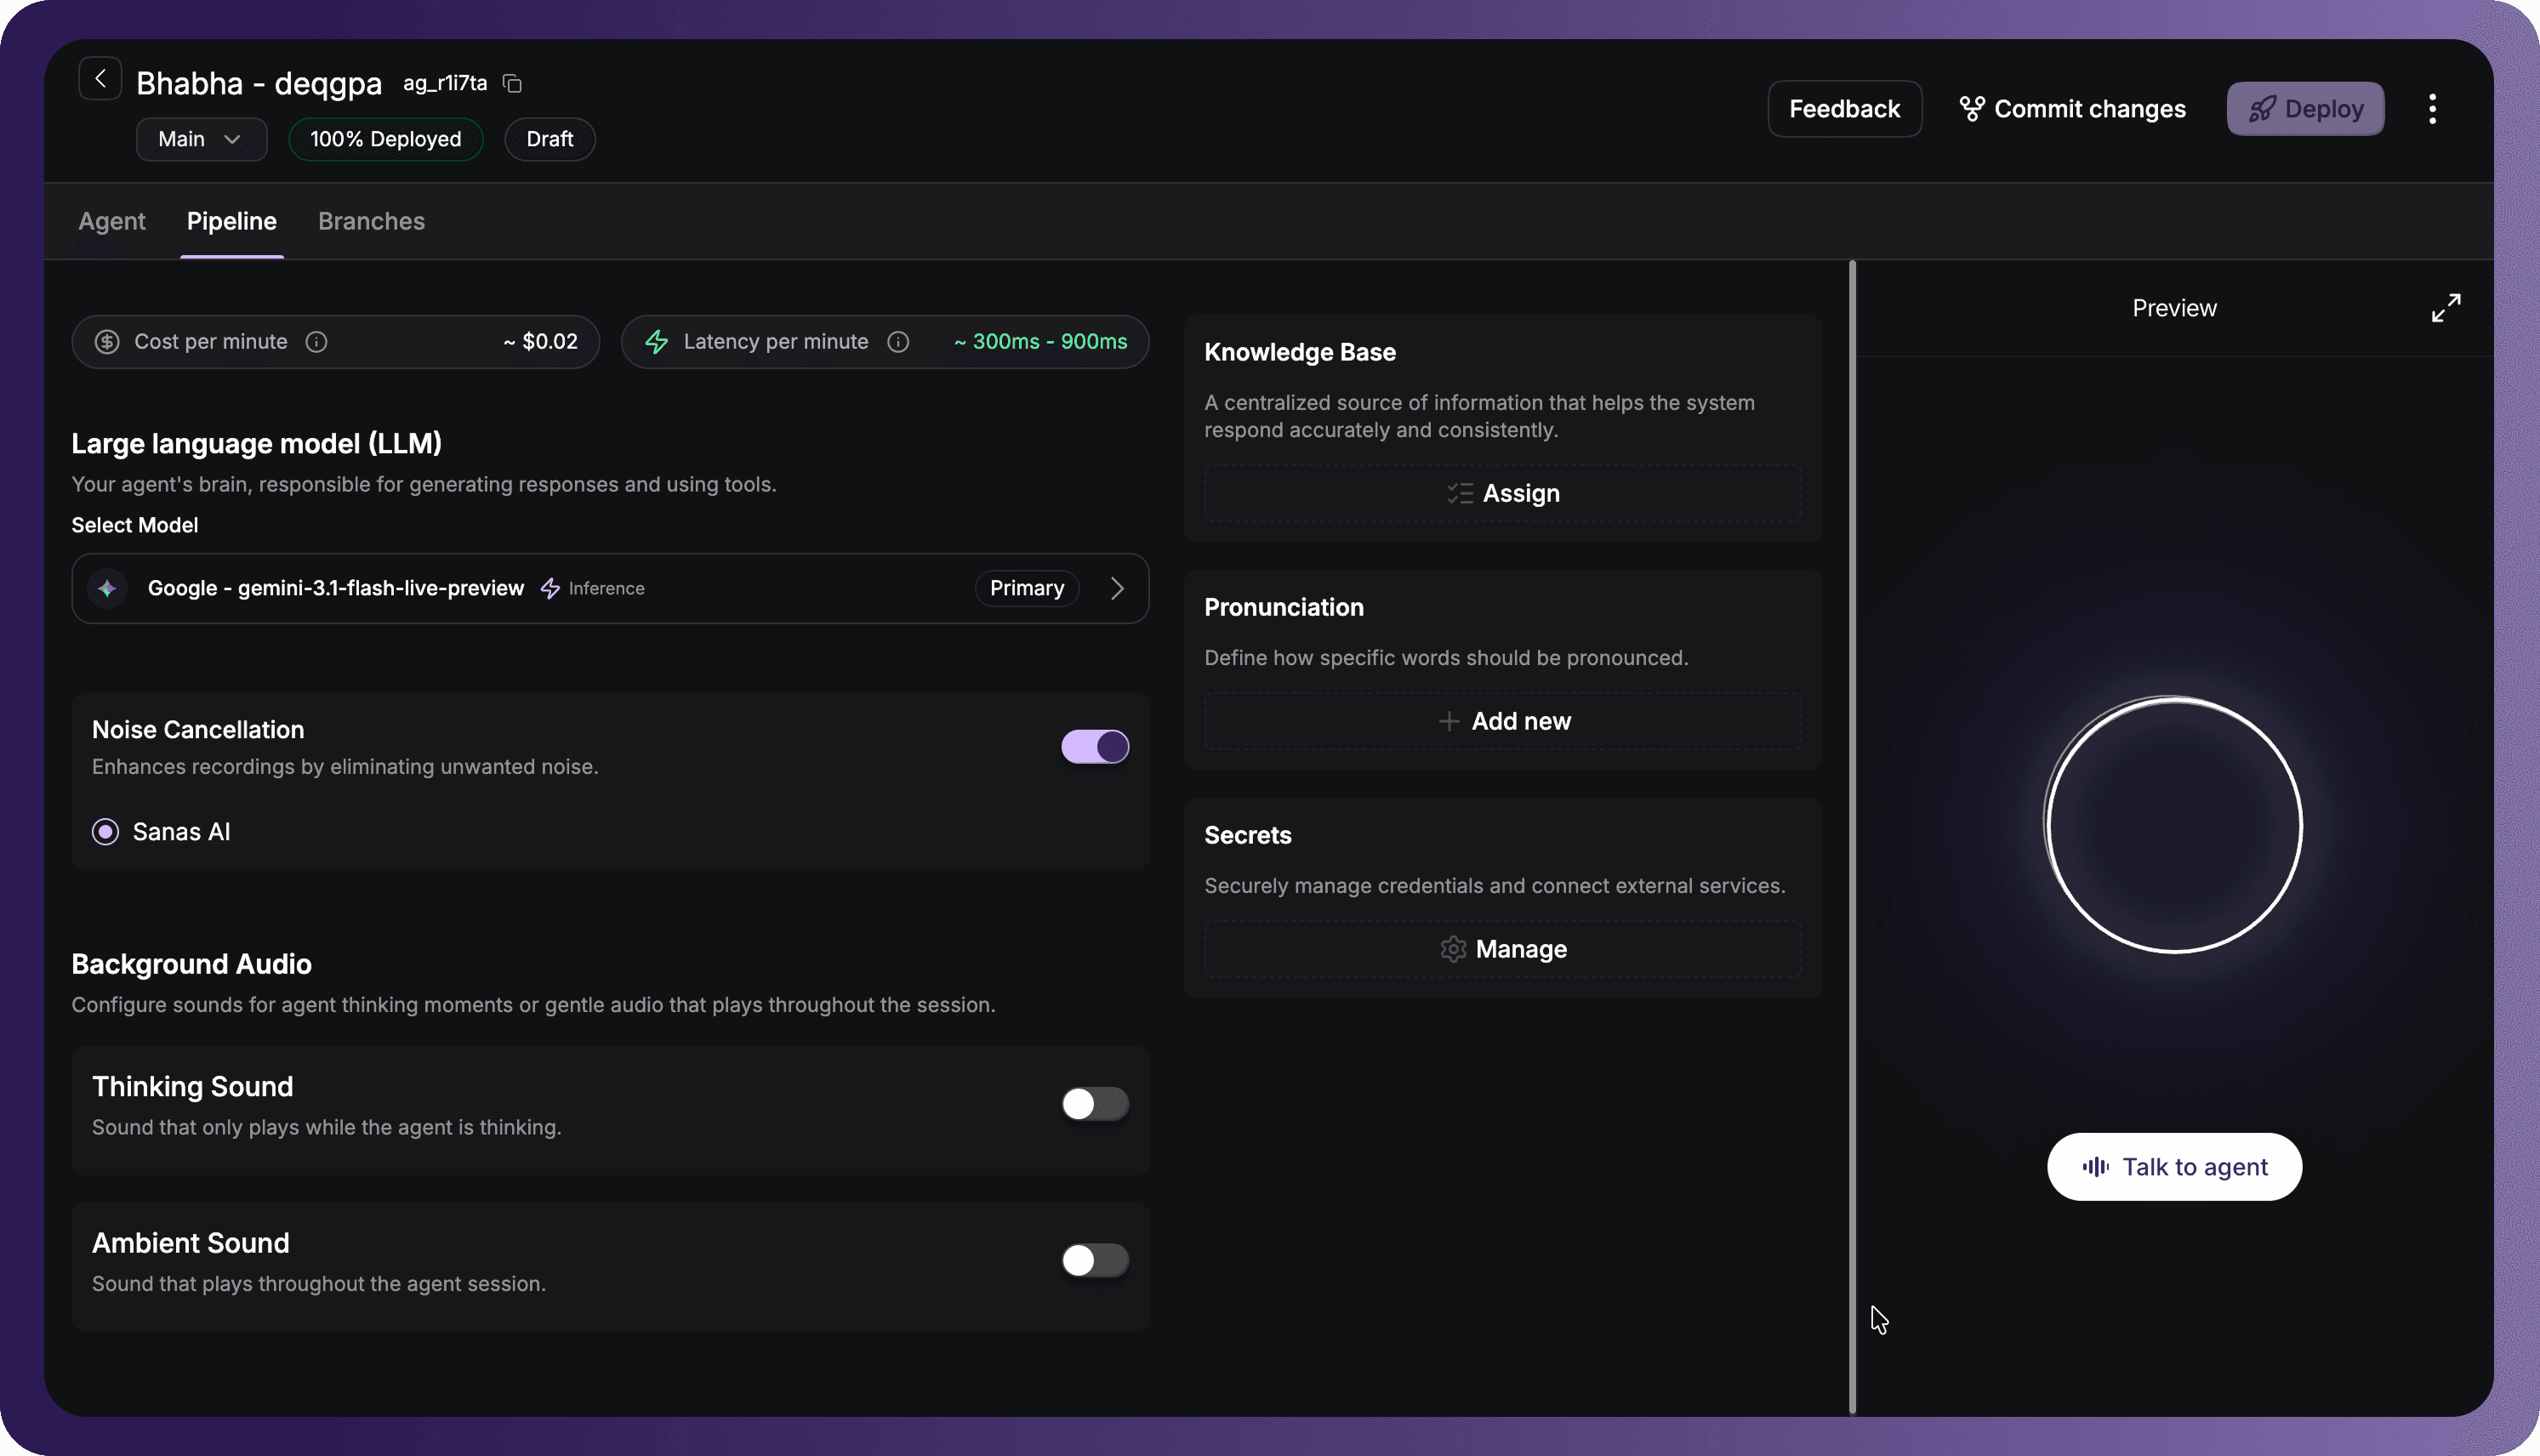
Step 4: Configure the Pipeline
Navigate to the Pipeline tab to configure your model infrastructure. This tab oversees how your agent translates speech to text, reasons, and speaks back to the user.
At the top of the workspace, check estimated ratings for Cost per minute and Latency per minute based on your current setup.
Integrations & Key Options
For each component in your pipeline, you can select from two options:
- Inference: Hosted directly by VideoSDK. No API key is required, and usage charges are deducted from your VideoSDK Balance (visible in your sidebar).
- Bring Your Own Key (BYOK): Run models using your own accounts by connecting your personal API keys in the integrations page.
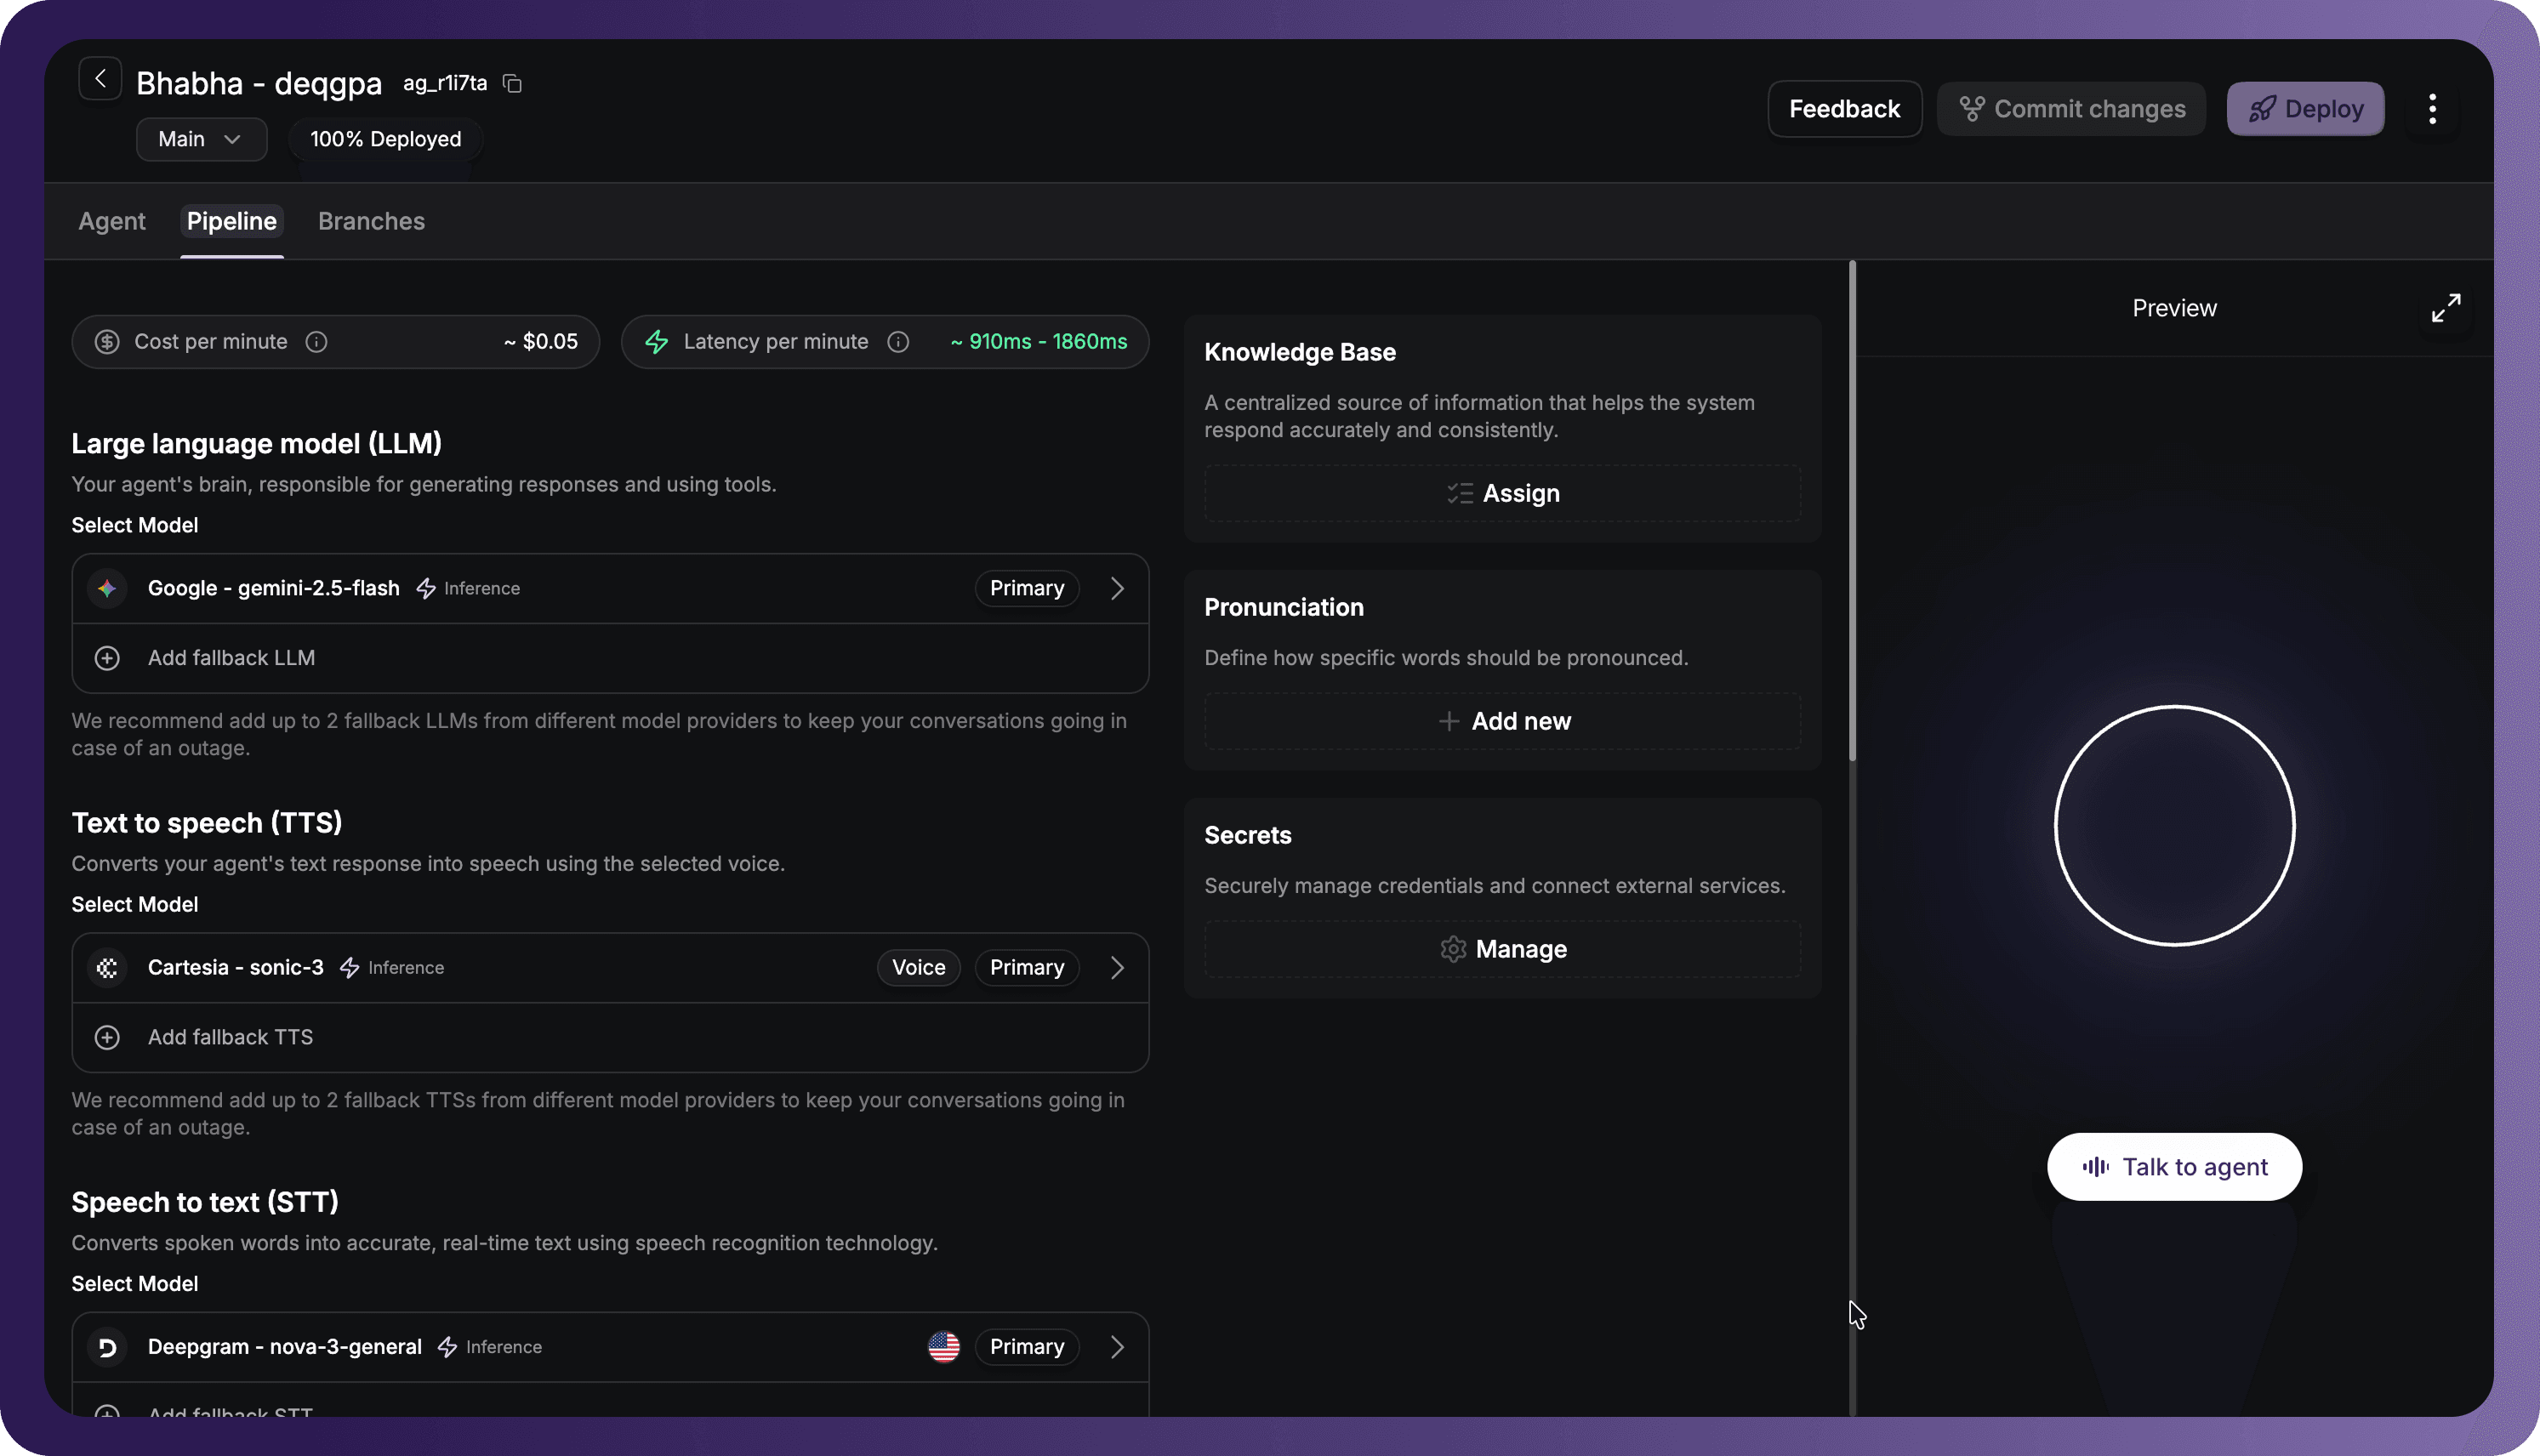
The pipeline styles are classified by their LLM behavior:
- Audio LLM
- Text LLM
An Audio LLM provides direct speech-to-speech processing with minimal latency, ideal for highly responsive conversational interactions.
- Set your model provider - either inferenced or BYOK model. If you choose BYOK, add your API key in the pipeline configuration or in Secrets Library.
A Text LLM processes audio through distinct, modular stages (STT → Text LLM → TTS), providing full control over each stage of the pipeline.
Configure your providers for STT, LLM and TTS Integrations.
Advanced Audio & Conversational Controls
Scroll down in the Pipeline configuration to refine your agent's real-time auditory behavior:
- Turn Detection: Define parameters (e.g. Turn Detector or Namo Turn Detector) to control how long the system waits for conversational pauses before responding. Use the Threshold slider (0-1) to tweak sensitivity.
- Voice Activity Detection (VAD): Distinguish human speaking patterns from environment signals. Set the threshold level and configure VAD Sensitivity (Low, Medium, High).
- Noise Cancellation: Strip ambient background pollution (such as air conditioning hum or keystrokes) by enabling processing layers like Sanas AI.
- Background Audio: Toggle ambient audios to play during processing gaps:
- Thinking Sound: Subtle acoustic cues played while the agent processes a response.
- Ambient Sound: Continuing low-level sound environments to maintain real-world calling dynamics.
Step 5: Assign Advanced Integration Resources
Use the side drawers on the right-hand side of the Pipeline panel to customize your agent’s functional environment:
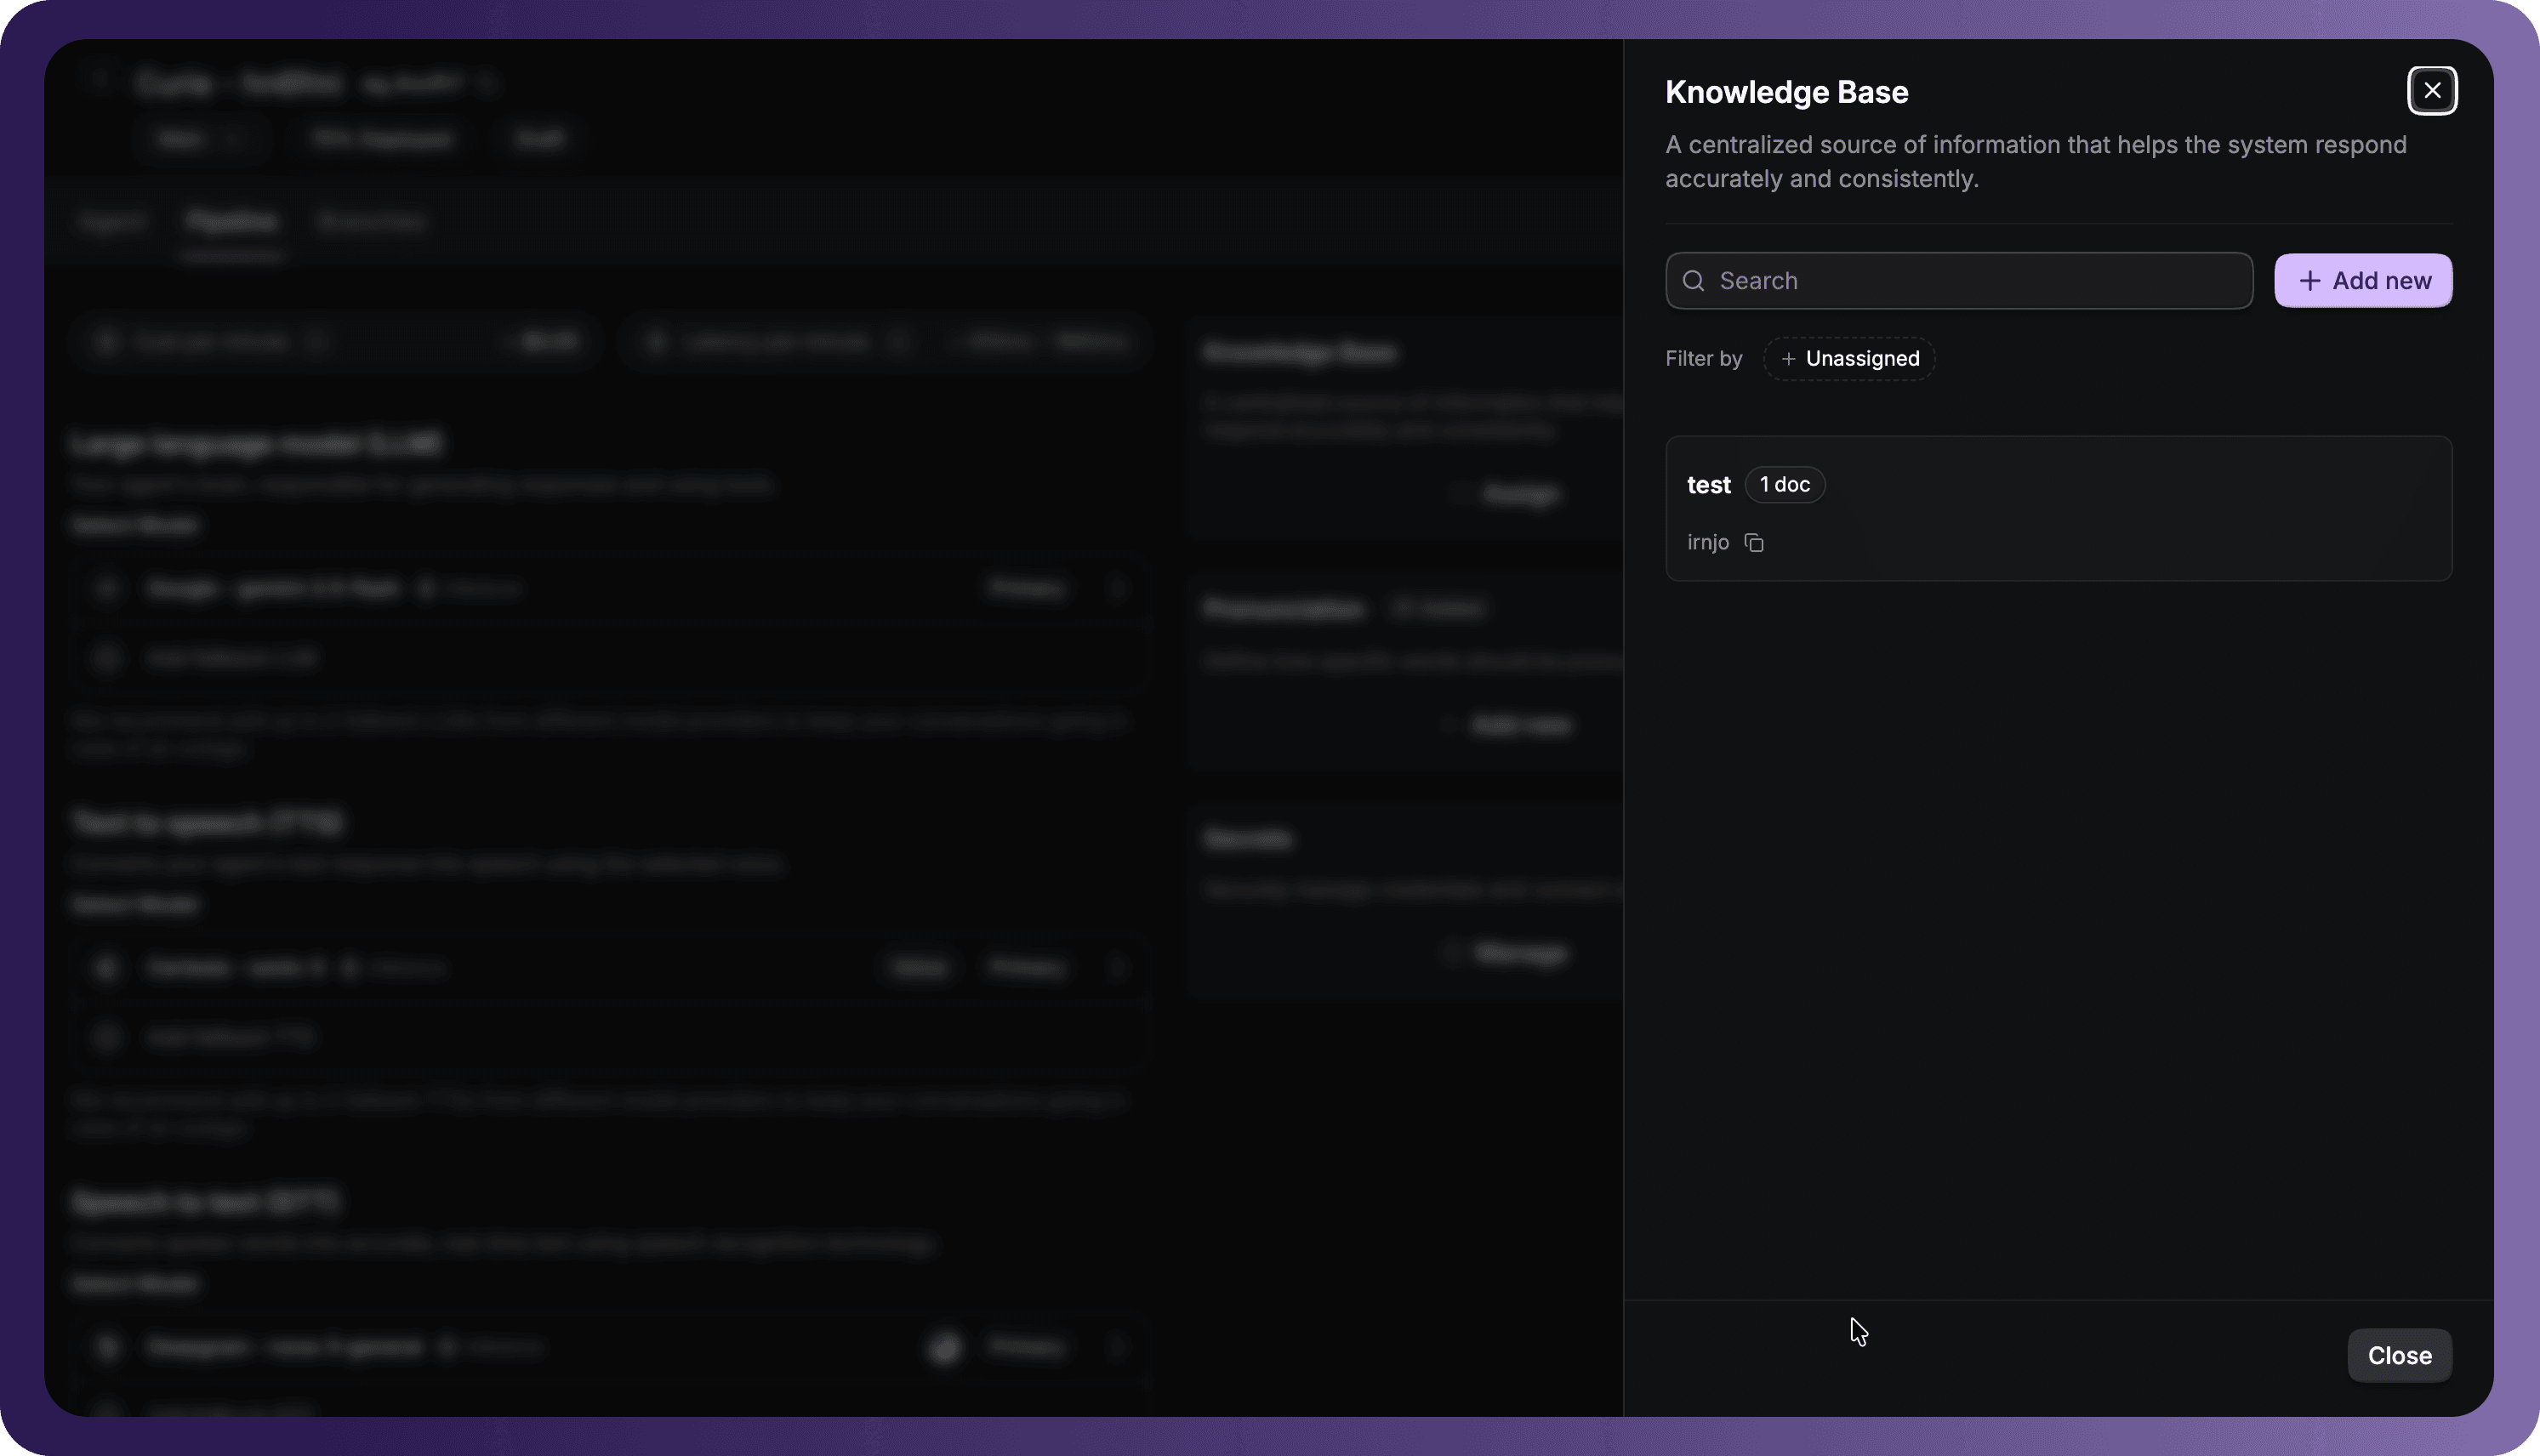
1. Knowledge Base
Supply context, guidelines, and manuals:
- Open the Knowledge Base drawer and click + Add new.
- Select your document folder or drag-and-drop resources (such as product FAQs).
- Confirm assignments so the agent references these materials during discussions.
2. Pronunciation Rules
Define pronunciation profiles for brand names, technical jargon, or acronyms:
- Open the Pronunciation drawer and click + Add New.
- Input the exact Word (e.g., "test") and its phonetic mapping in the Pronunciation input (e.g., "tae-st").
- Click Add Pronunciation to apply the rule to your text-to-speech outputs.
3. Secrets Library
Securely manage API credentials for integrated third-party platforms (like Google, Deepgram, AssemblyAI, OpenAI Cartesia, ElevenLabs, etc.):
- Click Manage on the Secrets widget to open the library drawer.
- Select your provider and click Add Secret.
- Name your secret key, paste your API token, add relevant tagging labels, and click Save Secret.
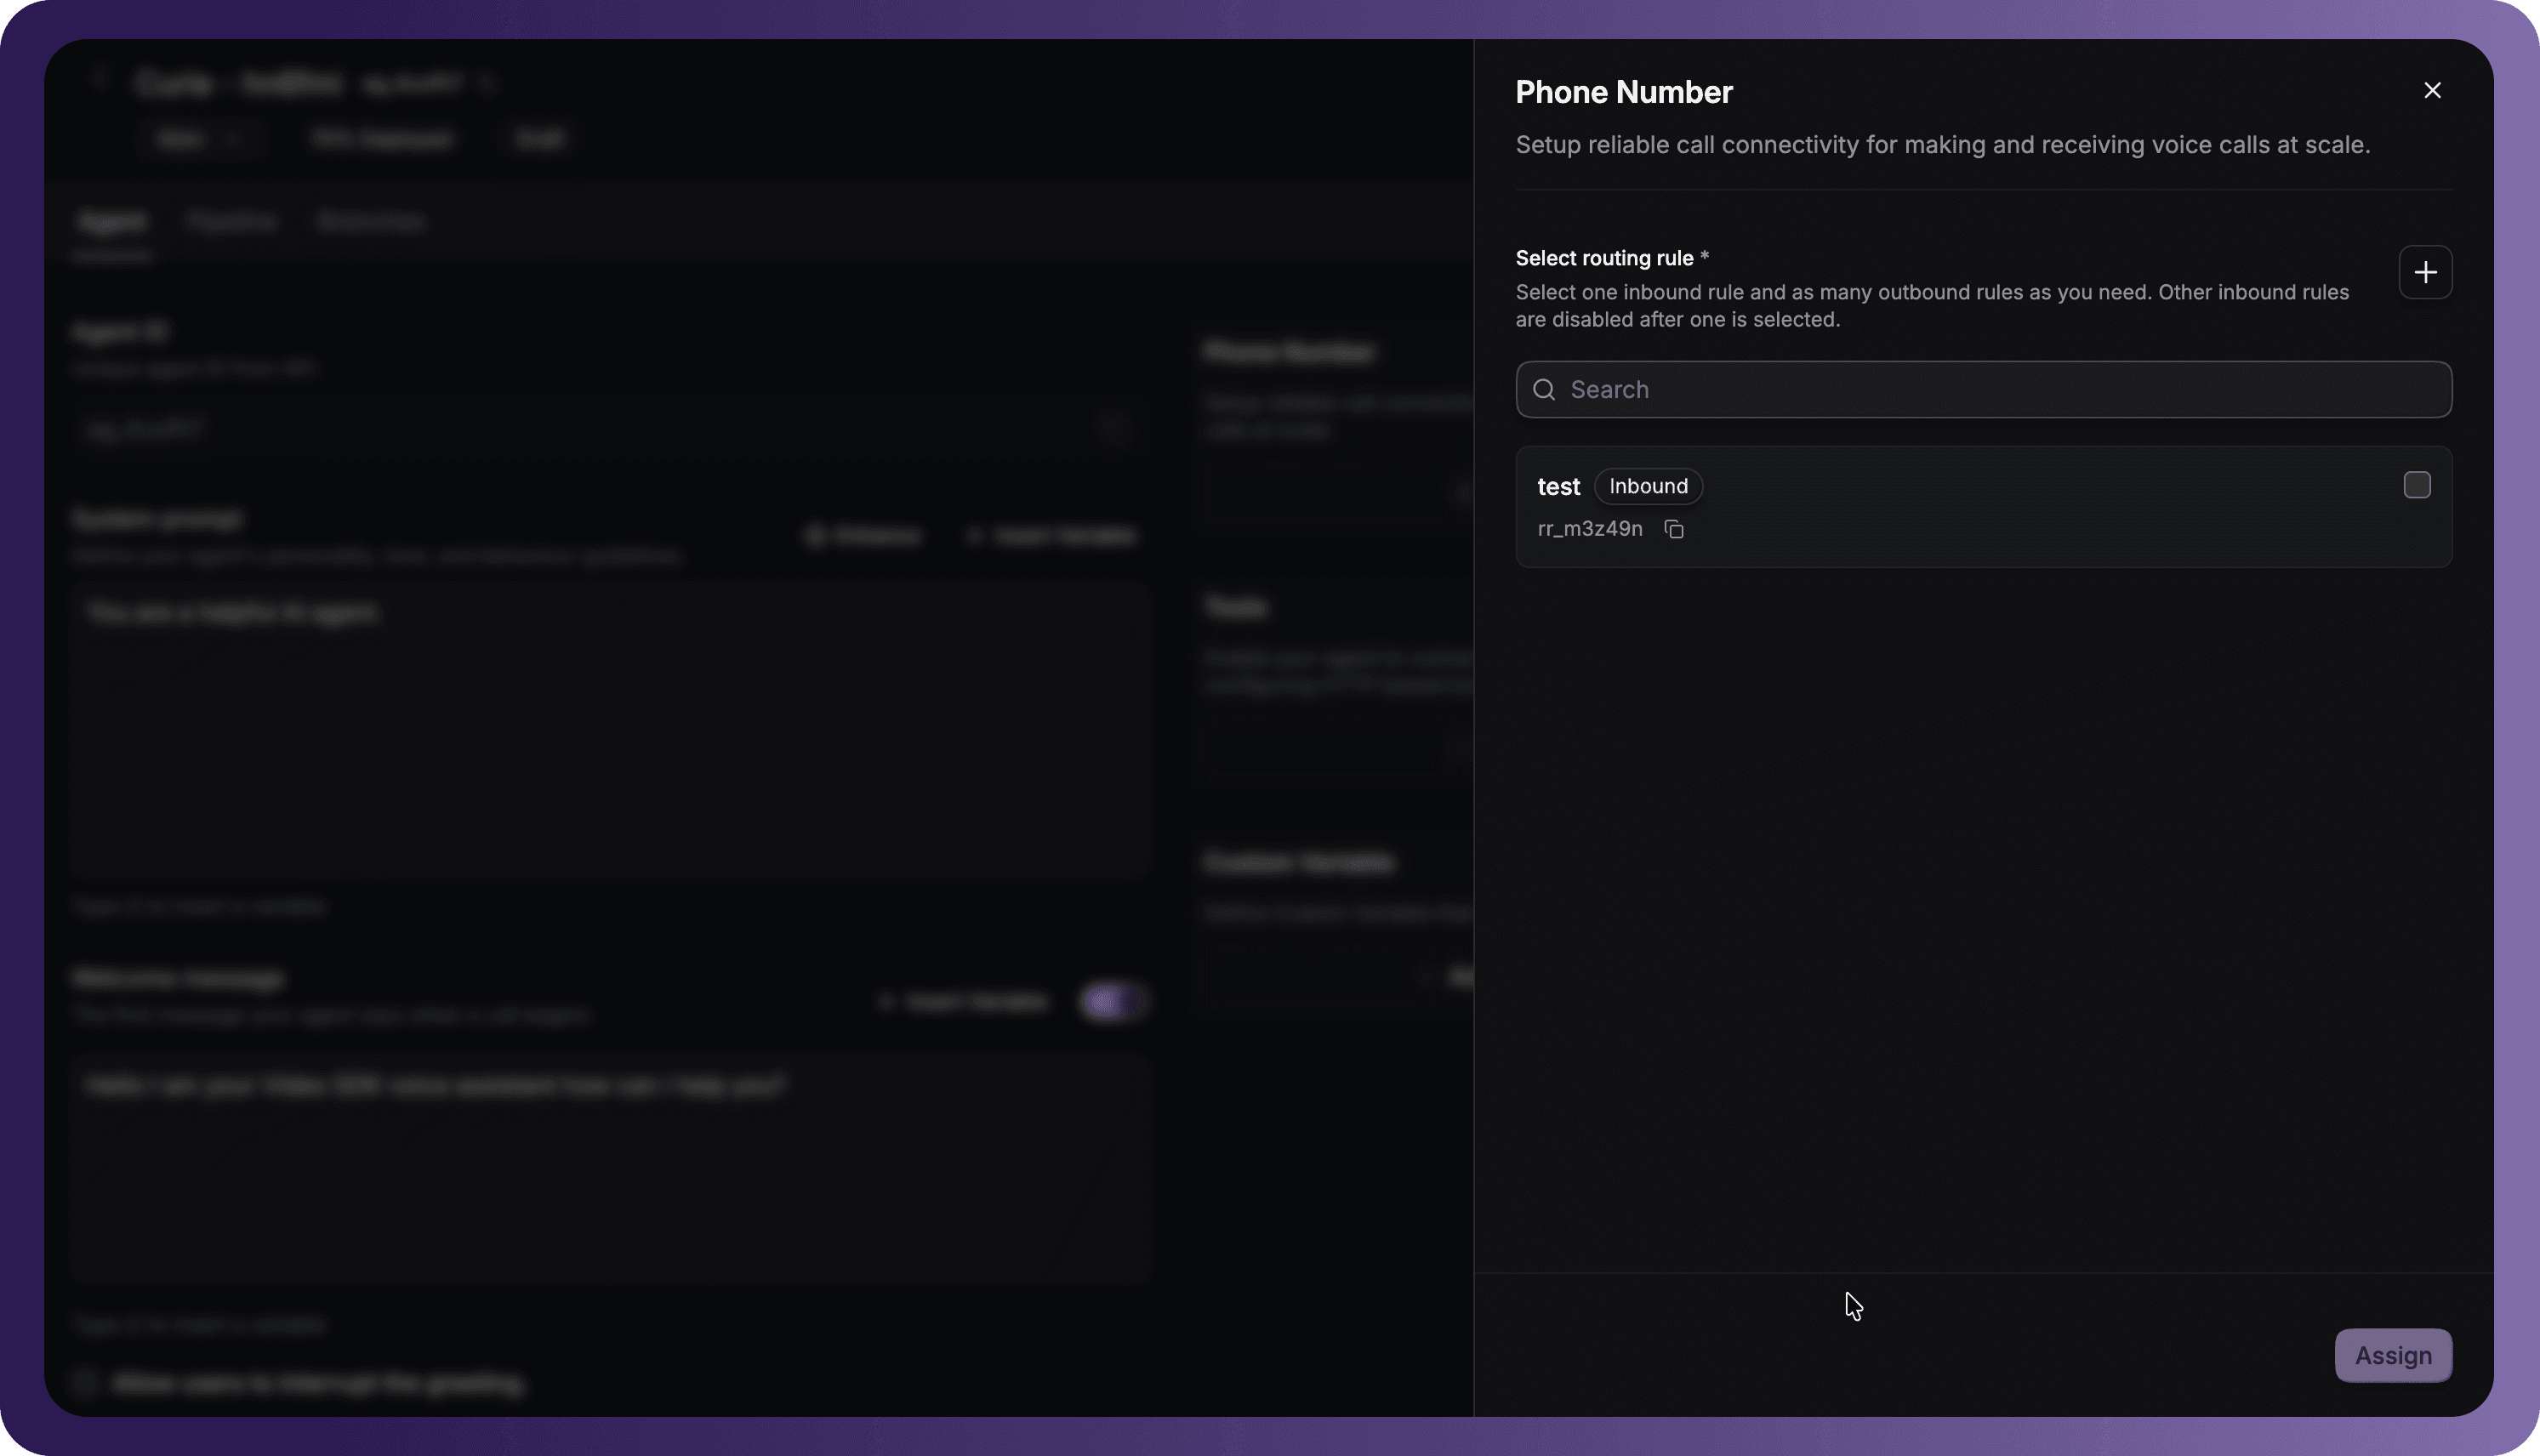
Step 6: Configure Telephony Settings
To connect your voice agent to phone networks, assign your preferred telephony rule from your pre-configured routing options:
- Under the Agent tab, navigate to the Phone Number module and click Setup.
- From the list within the drawer, select a pre-configured routing rule (such as an Inbound or Outbound rule).
- Click Assign to link this telephony route to your agent.
(Note: Creating, purchasing, or customizing phone numbers is managed separately from the Phone Numbers panel located in the main dashboard sidebar.)
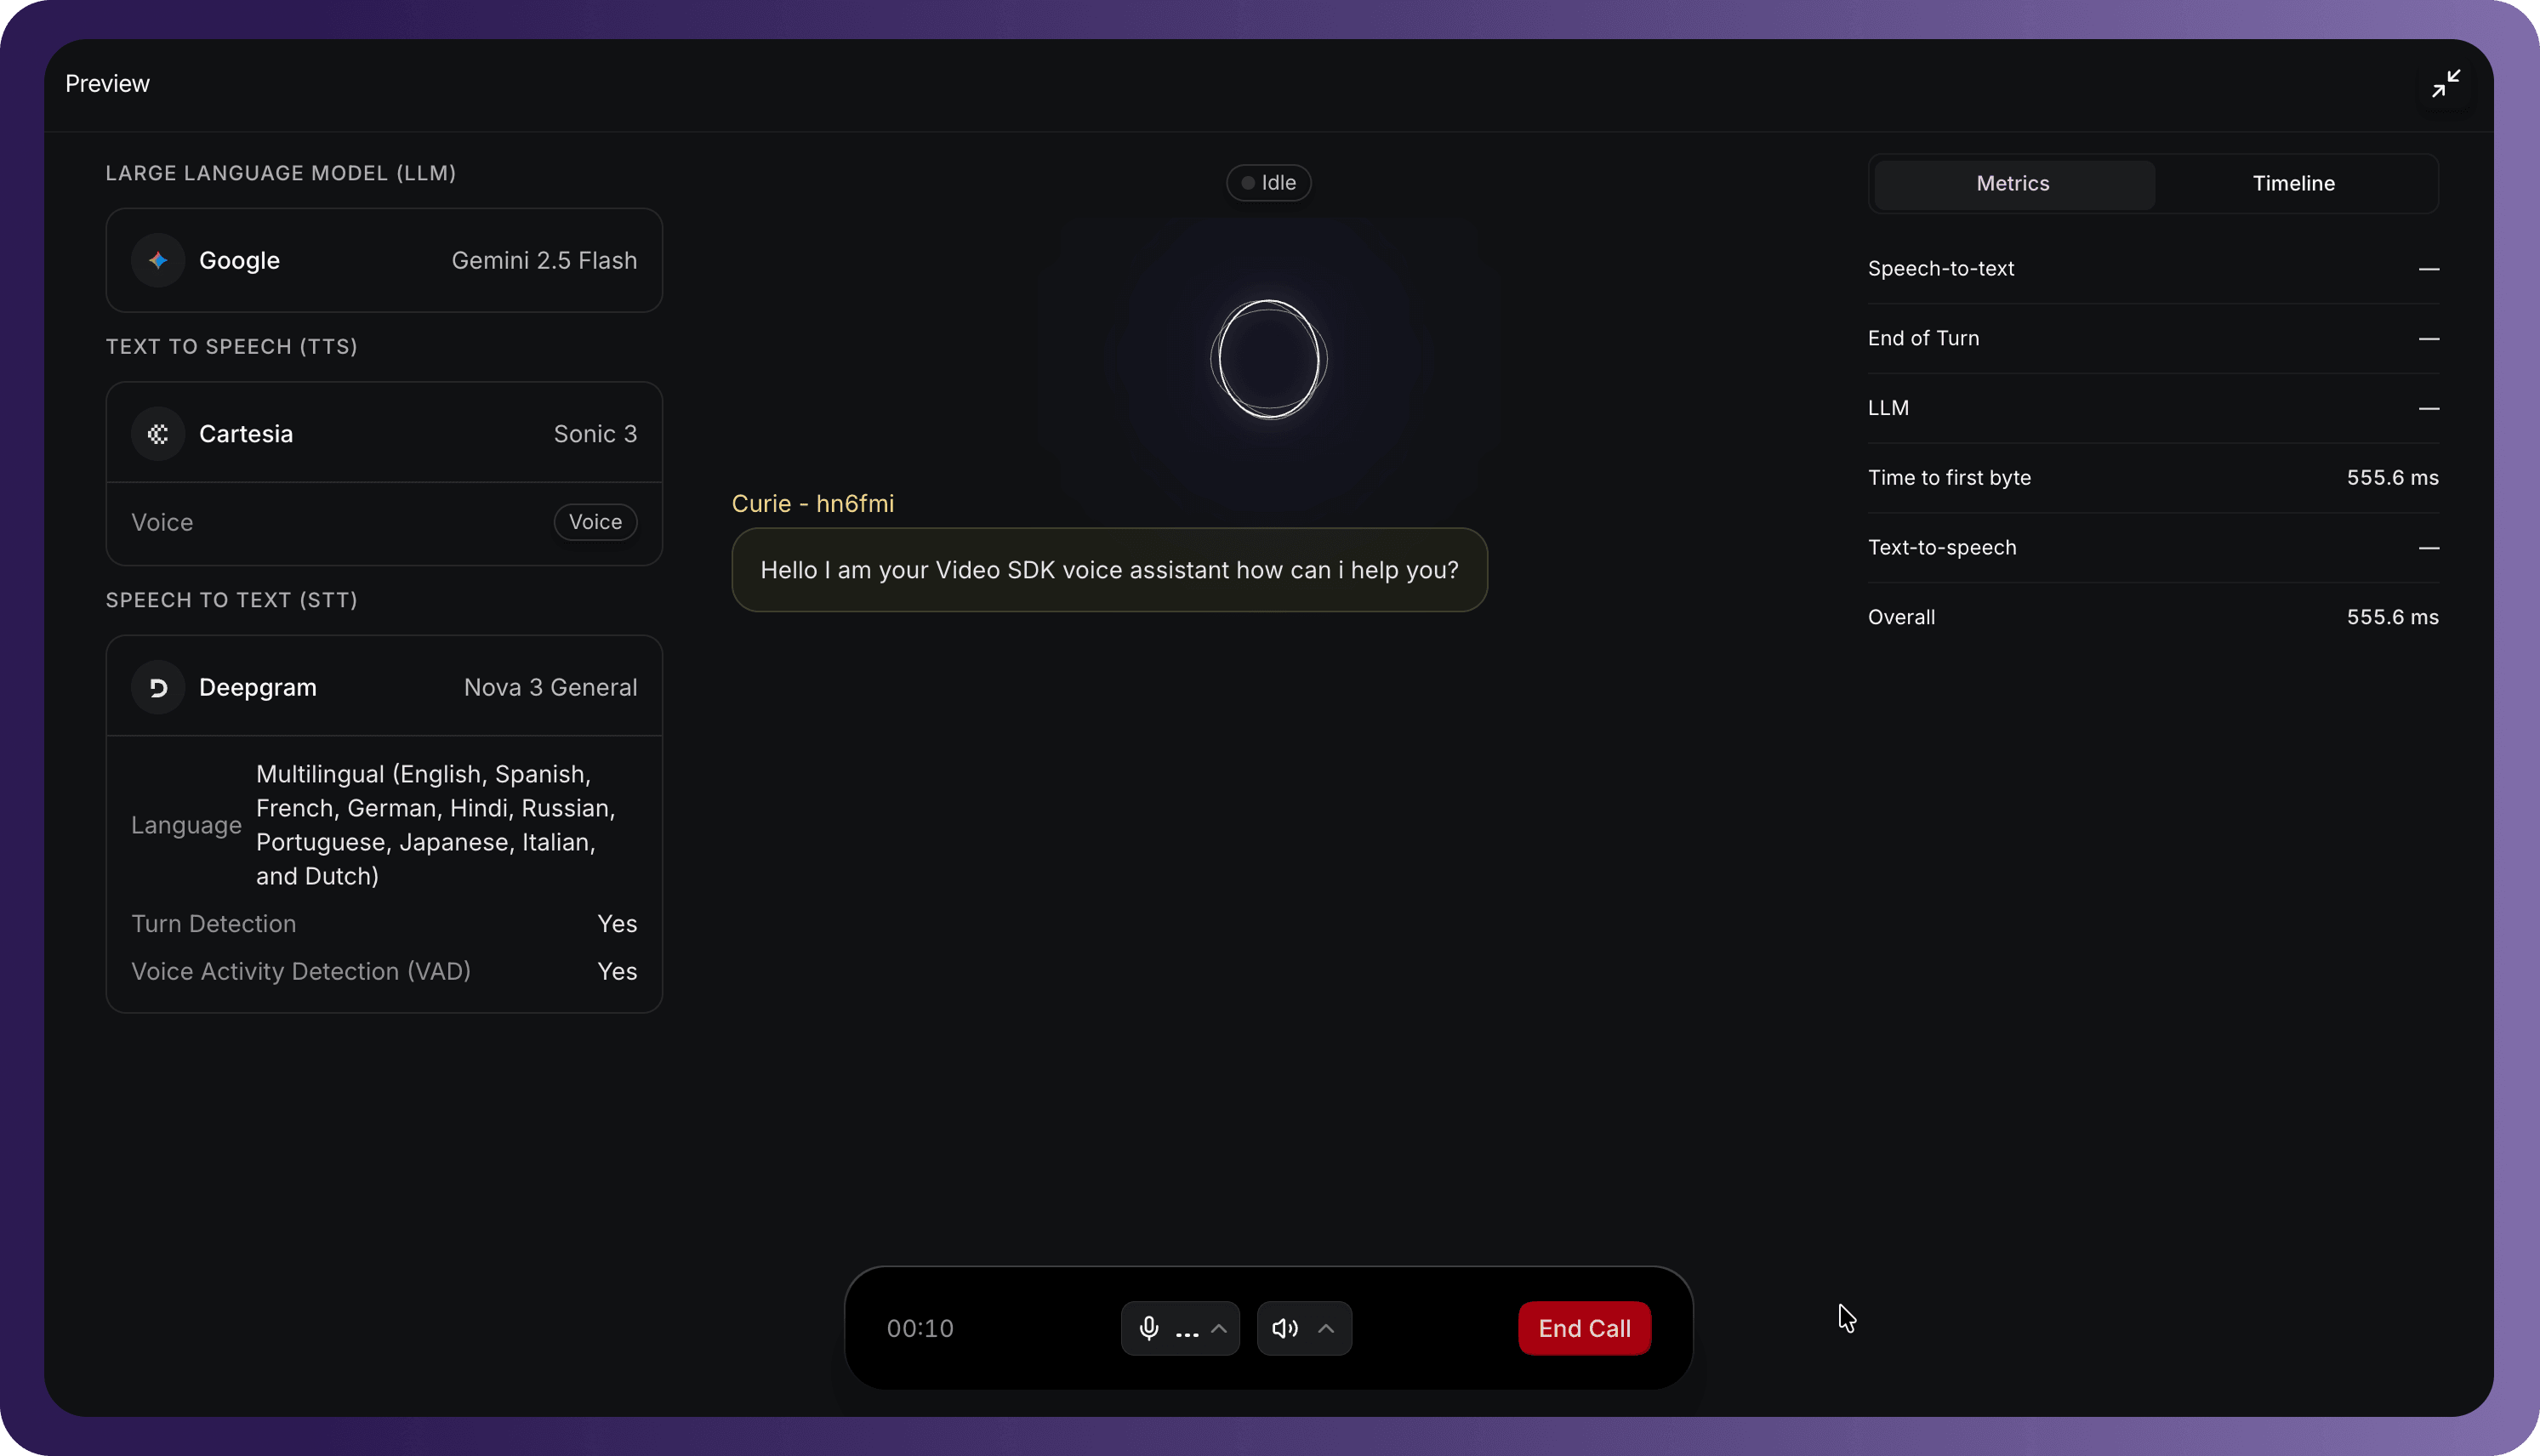
Step 7: Test Your Voice Agent
You can interact with your agent in real-time directly inside the workspace builder to analyze performance before deployment:
- Locate the built-in Preview simulator panel on the right side of the dashboard workspace.
- Click on the Talk to agent button to establish an active test session.
- Speak into your microphone to converse with your agent.
- Read the real-time text transcript of your conversation as conversational chat bubbles populate within the panel. Observe the status indicators (such as
Idleor active talking states). - Use the calling toolbar at the bottom of the Preview panel to manage the session:
- Mute/Unmute: Toggle your microphone or select specific input devices.
- Speaker Controls: Mute or adjust output speaker levels.
- Call Timer: Track the session duration.
- End Call: Click the red button to cleanly close your test session.
Step 8: Connect Voice Agent
Once your agent is configured, you can connect it to various platforms and devices:
- Web: Integrate your agent into web applications.
- Mobile: Connect to iOS and Android mobile apps.
- Telephony: Deploy to phone systems for voice calls.
- IoT Devices: Connect to Internet of Things devices.
To learn how to save your changes, set up staging branches, track commit history, and configure safe production deployments with branch traffic splits, see our comprehensive Version Control, Branching, and Deployment Guide.
Starter Apps
React Starter App
Starter Project for building interactive web apps.
Flutter Starter App
Cross-platform apps from one codebase.
iOS Starter App
Mobile apps for Apple devices.
Android Starter App
Mobile apps for Android devices.
Next Steps
Congratulations! You've successfully created your AI voice agent. Here are the next steps:
- Test Your Agent: Use the built-in test simulator to verify your agent's behavior and responses.
- Deploy to Production: Connect your agent to production environments and real user interactions.
- Monitor Performance: Track agent performance, user satisfaction, and conversation quality.
- Iterate and Improve: Refine your agent's prompts, knowledge base, and configuration based on real-world usage.
Keep refining your agent's configuration to build a powerful voice AI solution tailored to your specific business needs.
Got a Question? ![]() Ask us on discord
Ask us on discord

