Agent Runtime with Flutter
VideoSDK empowers you to seamlessly integrate AI agents with real-time voice interaction into your Flutter application within minutes. This guide shows you how to connect a Flutter frontend with an AI agent created and configured entirely from the VideoSDK dashboard.
Prerequisites
Before proceeding, ensure that your development environment meets the following requirements:
- Video SDK Developer Account (Not having one, follow Video SDK Dashboard)
- Flutter installed on your device
- Familiarity with creating a no-code voice agent. If you're new to this, please follow our guide on how to Build a Custom Voice AI Agent in Minutes first.
You need a VideoSDK account to generate a token and an agent from the dashboard. Visit the VideoSDK dashboard to generate a token.
Project Structure
Your project structure should look like this:
  root
   ├── android
   ├── ios
   ├── lib
   │    ├── api_call.dart
   │    ├── join_screen.dart
   │    ├── main.dart
   │    ├── meeting_controls.dart
   │    ├── meeting_screen.dart
   │    └── participant_tile.dart
   ├── macos
   ├── web
   └── windows
You will be working on the following files:
join_screen.dart: Responsible for the user interface to join a meeting.meeting_screen.dart: Displays the meeting interface and handles meeting logic.api_call.dart: Handles API calls for creating meetings and dispatching agents.
1. Flutter Frontend
Step 1: Getting Started
Follow these steps to create the environment necessary to add AI agent functionality to your app.
Create a New Flutter App
Create a new Flutter app using the following command:
$ flutter create videosdk_ai_agent_flutter_app
Install VideoSDK
Install the VideoSDK using the following Flutter command. Make sure you are in your Flutter app directory before you run this command.
$ flutter pub add videosdk
$ flutter pub add http
Step 2: Configure Project
For Android
- Update the
/android/app/src/main/AndroidManifest.xmlfor the permissions we will be using to implement the audio and video features.
    <uses-feature android:name="android.hardware.camera" />
    <uses-feature android:name="android.hardware.camera.autofocus" />
    <uses-permission android:name="android.permission.CAMERA" />
    <uses-permission android:name="android.permission.RECORD_AUDIO" />
    <uses-permission android:name="android.permission.ACCESS_NETWORK_STATE" />
    <uses-permission android:name="android.permission.CHANGE_NETWORK_STATE" />
    <uses-permission android:name="android.permission.MODIFY_AUDIO_SETTINGS" />
    <uses-permission android:name="android.permission.INTERNET"/>
- If necessary, in the
build.gradleyou will need to increaseminSdkVersionofdefaultConfigup to23(currently default Flutter generator set it to16).
For iOS
- Add the following entries which allow your app to access the camera and microphone to your
/ios/Runner/Info.plistfile :
<key>NSCameraUsageDescription</key>
<string>$(PRODUCT_NAME) Camera Usage!</string>
<key>NSMicrophoneUsageDescription</key>
<string>$(PRODUCT_NAME) Microphone Usage!</string>
- Uncomment the following line to define a global platform for your project in
/ios/Podfile:
platform :ios, '12.0'
For MacOS
- Add the following entries to your
/macos/Runner/Info.plistfile which allow your app to access the camera and microphone.
<key>NSCameraUsageDescription</key>
<string>$(PRODUCT_NAME) Camera Usage!</string>
<key>NSMicrophoneUsageDescription</key>
<string>$(PRODUCT_NAME) Microphone Usage!</string>
- Add the following entries to your
/macos/Runner/DebugProfile.entitlementsfile which allow your app to access the camera, microphone and open outgoing network connections.
<key>com.apple.security.network.client</key>
<true/>
<key>com.apple.security.device.camera</key>
<true/>
<key>com.apple.security.device.microphone</key>
<true/>
- Add the following entries to your
/macos/Runner/Release.entitlementsfile which allow your app to access the camera, microphone and open outgoing network connections.
<key>com.apple.security.network.server</key>
<true/>
<key>com.apple.security.network.client</key>
<true/>
<key>com.apple.security.device.camera</key>
<true/>
<key>com.apple.security.device.microphone</key>
<true/>
Step 3: Configure Environment and Credentials
Create a meeting room using the VideoSDK API:
curl -X POST https://api.videosdk.live/v2/rooms \
  -H "Authorization: YOUR_JWT_TOKEN_HERE" \
  -H "Content-Type: application/json"
Copy the roomId from the response and configure it in lib/api_call.dart along with your agent credentials.
import 'dart:convert';
import 'package:http/http.dart' as http;

//Auth token we will use to generate a meeting and connect to it
const token = 'YOUR_VIDEOSDK_AUTH_TOKEN';
const agentId = 'YOUR_AGENT_ID';
const versionId = 'YOUR_VERSION_ID';

// API call to create meeting
Future<String> createMeeting() async {
  final http.Response httpResponse = await http.post(
    Uri.parse('https://api.videosdk.live/v2/rooms'),
    headers: {'Authorization': token},
  );

  //Destructuring the roomId from the response
  return json.decode(httpResponse.body)['roomId'];
}

// API call to connect agent
Future<void> connectAgent(String meetingId) async {
  final http.Response httpResponse = await http.post(
    Uri.parse('https://api.videosdk.live/v2/agent/general/dispatch'),
    headers: {
      'Authorization': token,
      'Content-Type': 'application/json',
    },
    body: json.encode({
      'agentId': agentId,
      'meetingId': meetingId,
      'versionId': versionId,
    }),
  );

  if (httpResponse.statusCode != 200) {
    throw Exception('Failed to connect agent');
  }
}
Step 4: Design the User Interface (UI)
Update the UI files to add the "Connect Agent" button and connect the logic.
import 'package:flutter/material.dart';
import 'api_call.dart';
import 'meeting_screen.dart';

class JoinScreen extends StatelessWidget {
  final _meetingIdController = TextEditingController();

  JoinScreen({super.key});

  void onJoinButtonPressed(BuildContext context) {
    // check meeting id is not null or invaild
    // if meeting id is vaild then navigate to MeetingScreen with meetingId,token
    Navigator.of(context).push(
      MaterialPageRoute(
        builder:
            (context) =>
                MeetingScreen(meetingId: "YOUR_MEETING_ID", token: token),
      ),
    );
  }

  @override
  Widget build(BuildContext context) {
    return Scaffold(
      appBar: AppBar(title: const Text('VideoSDK QuickStart')),
      body: Padding(
        padding: const EdgeInsets.all(12.0),
        child: Center(
          child: ElevatedButton(
            onPressed: () => onJoinButtonPressed(context),
            child: const Text('Join Meeting'),
          ),
        ),
      ),
    );
  }
}
import 'package:flutter/material.dart';
import 'package:videosdk/videosdk.dart';
import 'participant_tile.dart';
import 'meeting_controls.dart';
import 'api_call.dart';

class MeetingScreen extends StatefulWidget {
  final String meetingId;
  final String token;

  const MeetingScreen({
    super.key,
    required this.meetingId,
    required this.token,
  });

  @override
  State<MeetingScreen> createState() => _MeetingScreenState();
}

class _MeetingScreenState extends State<MeetingScreen> {
  late Room _room;
  var micEnabled = true;
  var camEnabled = true;
  bool _isAgentConnected = false;

  Map<String, Participant> participants = {};

  @override
  void initState() {
    // create room
    _room = VideoSDK.createRoom(
      roomId: widget.meetingId,
      token: widget.token,
      displayName: "John Doe",
      micEnabled: micEnabled,
      camEnabled: false,
      defaultCameraIndex:
          1, // Index of MediaDevices will be used to set default camera
    );

    setMeetingEventListener();

    // Join room
    _room.join();

    super.initState();
  }

  // listening to meeting events
  void setMeetingEventListener() {
    _room.on(Events.roomJoined, () {
      setState(() {
        participants.putIfAbsent(
          _room.localParticipant.id,
          () => _room.localParticipant,
        );
      });
    });

    _room.on(Events.participantJoined, (Participant participant) {
      setState(
        () => participants.putIfAbsent(participant.id, () => participant),
      );
    });

    _room.on(Events.participantLeft, (String participantId) {
      if (participants.containsKey(participantId)) {
        setState(() => participants.remove(participantId));
      }
    });

    _room.on(Events.roomLeft, () {
      participants.clear();
      Navigator.popUntil(context, ModalRoute.withName('/'));
    });
  }

  void _connectAgent() async {
    try {
      await connectAgent(widget.meetingId);
      setState(() {
        _isAgentConnected = true;
      });
      ScaffoldMessenger.of(context).showSnackBar(
        const SnackBar(content: Text('Agent connected successfully!')),
      );
    } catch (e) {
      ScaffoldMessenger.of(context).showSnackBar(
        SnackBar(content: Text('Failed to connect agent: ${e.toString()}')),
      );
    }
  }

  // onbackButton pressed leave the room
  Future<bool> _onWillPop() async {
    _room.leave();
    return true;
  }

  @override
  Widget build(BuildContext context) {
    return WillPopScope(
      onWillPop: () => _onWillPop(),
      child: Scaffold(
        appBar: AppBar(title: const Text('VideoSDK QuickStart')),
        body: Padding(
          padding: const EdgeInsets.all(8.0),
          child: Column(
            children: [
              Text(widget.meetingId),
              //render all participant
              Expanded(
                child: Padding(
                  padding: const EdgeInsets.all(8.0),
                  child: GridView.builder(
                    gridDelegate:
                        const SliverGridDelegateWithFixedCrossAxisCount(
                          crossAxisCount: 2,
                          crossAxisSpacing: 10,
                          mainAxisSpacing: 10,
                          mainAxisExtent: 300,
                        ),
                    itemBuilder: (context, index) {
                      return ParticipantTile(
                        key: Key(participants.values.elementAt(index).id),
                        participant: participants.values.elementAt(index),
                      );
                    },
                    itemCount: participants.length,
                  ),
                ),
              ),
              MeetingControls(
                onToggleMicButtonPressed: () {
                  micEnabled ? _room.muteMic() : _room.unmuteMic();
                  micEnabled = !micEnabled;
                },
                onLeaveButtonPressed: () => _room.leave(),
                onConnectAgentButtonPressed: _isAgentConnected ? null : _connectAgent,
              ),
            ],
          ),
        ),
      ),
    );
  }
}
import 'package:flutter/material.dart';

class MeetingControls extends StatelessWidget {
  final void Function() onToggleMicButtonPressed;
  final void Function() onLeaveButtonPressed;
  final void Function()? onConnectAgentButtonPressed;

  const MeetingControls({
    super.key,
    required this.onToggleMicButtonPressed,
    required this.onLeaveButtonPressed,
    required this.onConnectAgentButtonPressed,
  });

  @override
  Widget build(BuildContext context) {
    return Row(
      mainAxisAlignment: MainAxisAlignment.spaceEvenly,
      children: [
        ElevatedButton(
          onPressed: onLeaveButtonPressed,
          child: const Text('Leave'),
        ),
        ElevatedButton(
          onPressed: onToggleMicButtonPressed,
          child: const Text('Toggle Mic'),
        ),
        ElevatedButton(
          onPressed: onConnectAgentButtonPressed,
          child: const Text('Connect Agent'),
        ),
      ],
    );
  }
}
2. Creating the AI Agent from Dashboard (No-Code)
You can create and configure a powerful AI agent directly from the VideoSDK dashboard.
Step 1: Create Your Agent
First, follow our detailed guide to Build a Custom Voice AI Agent in Minutes. This will walk you through creating the agent's persona, configuring its pipeline (Realtime or Cascading), and testing it directly from the dashboard.
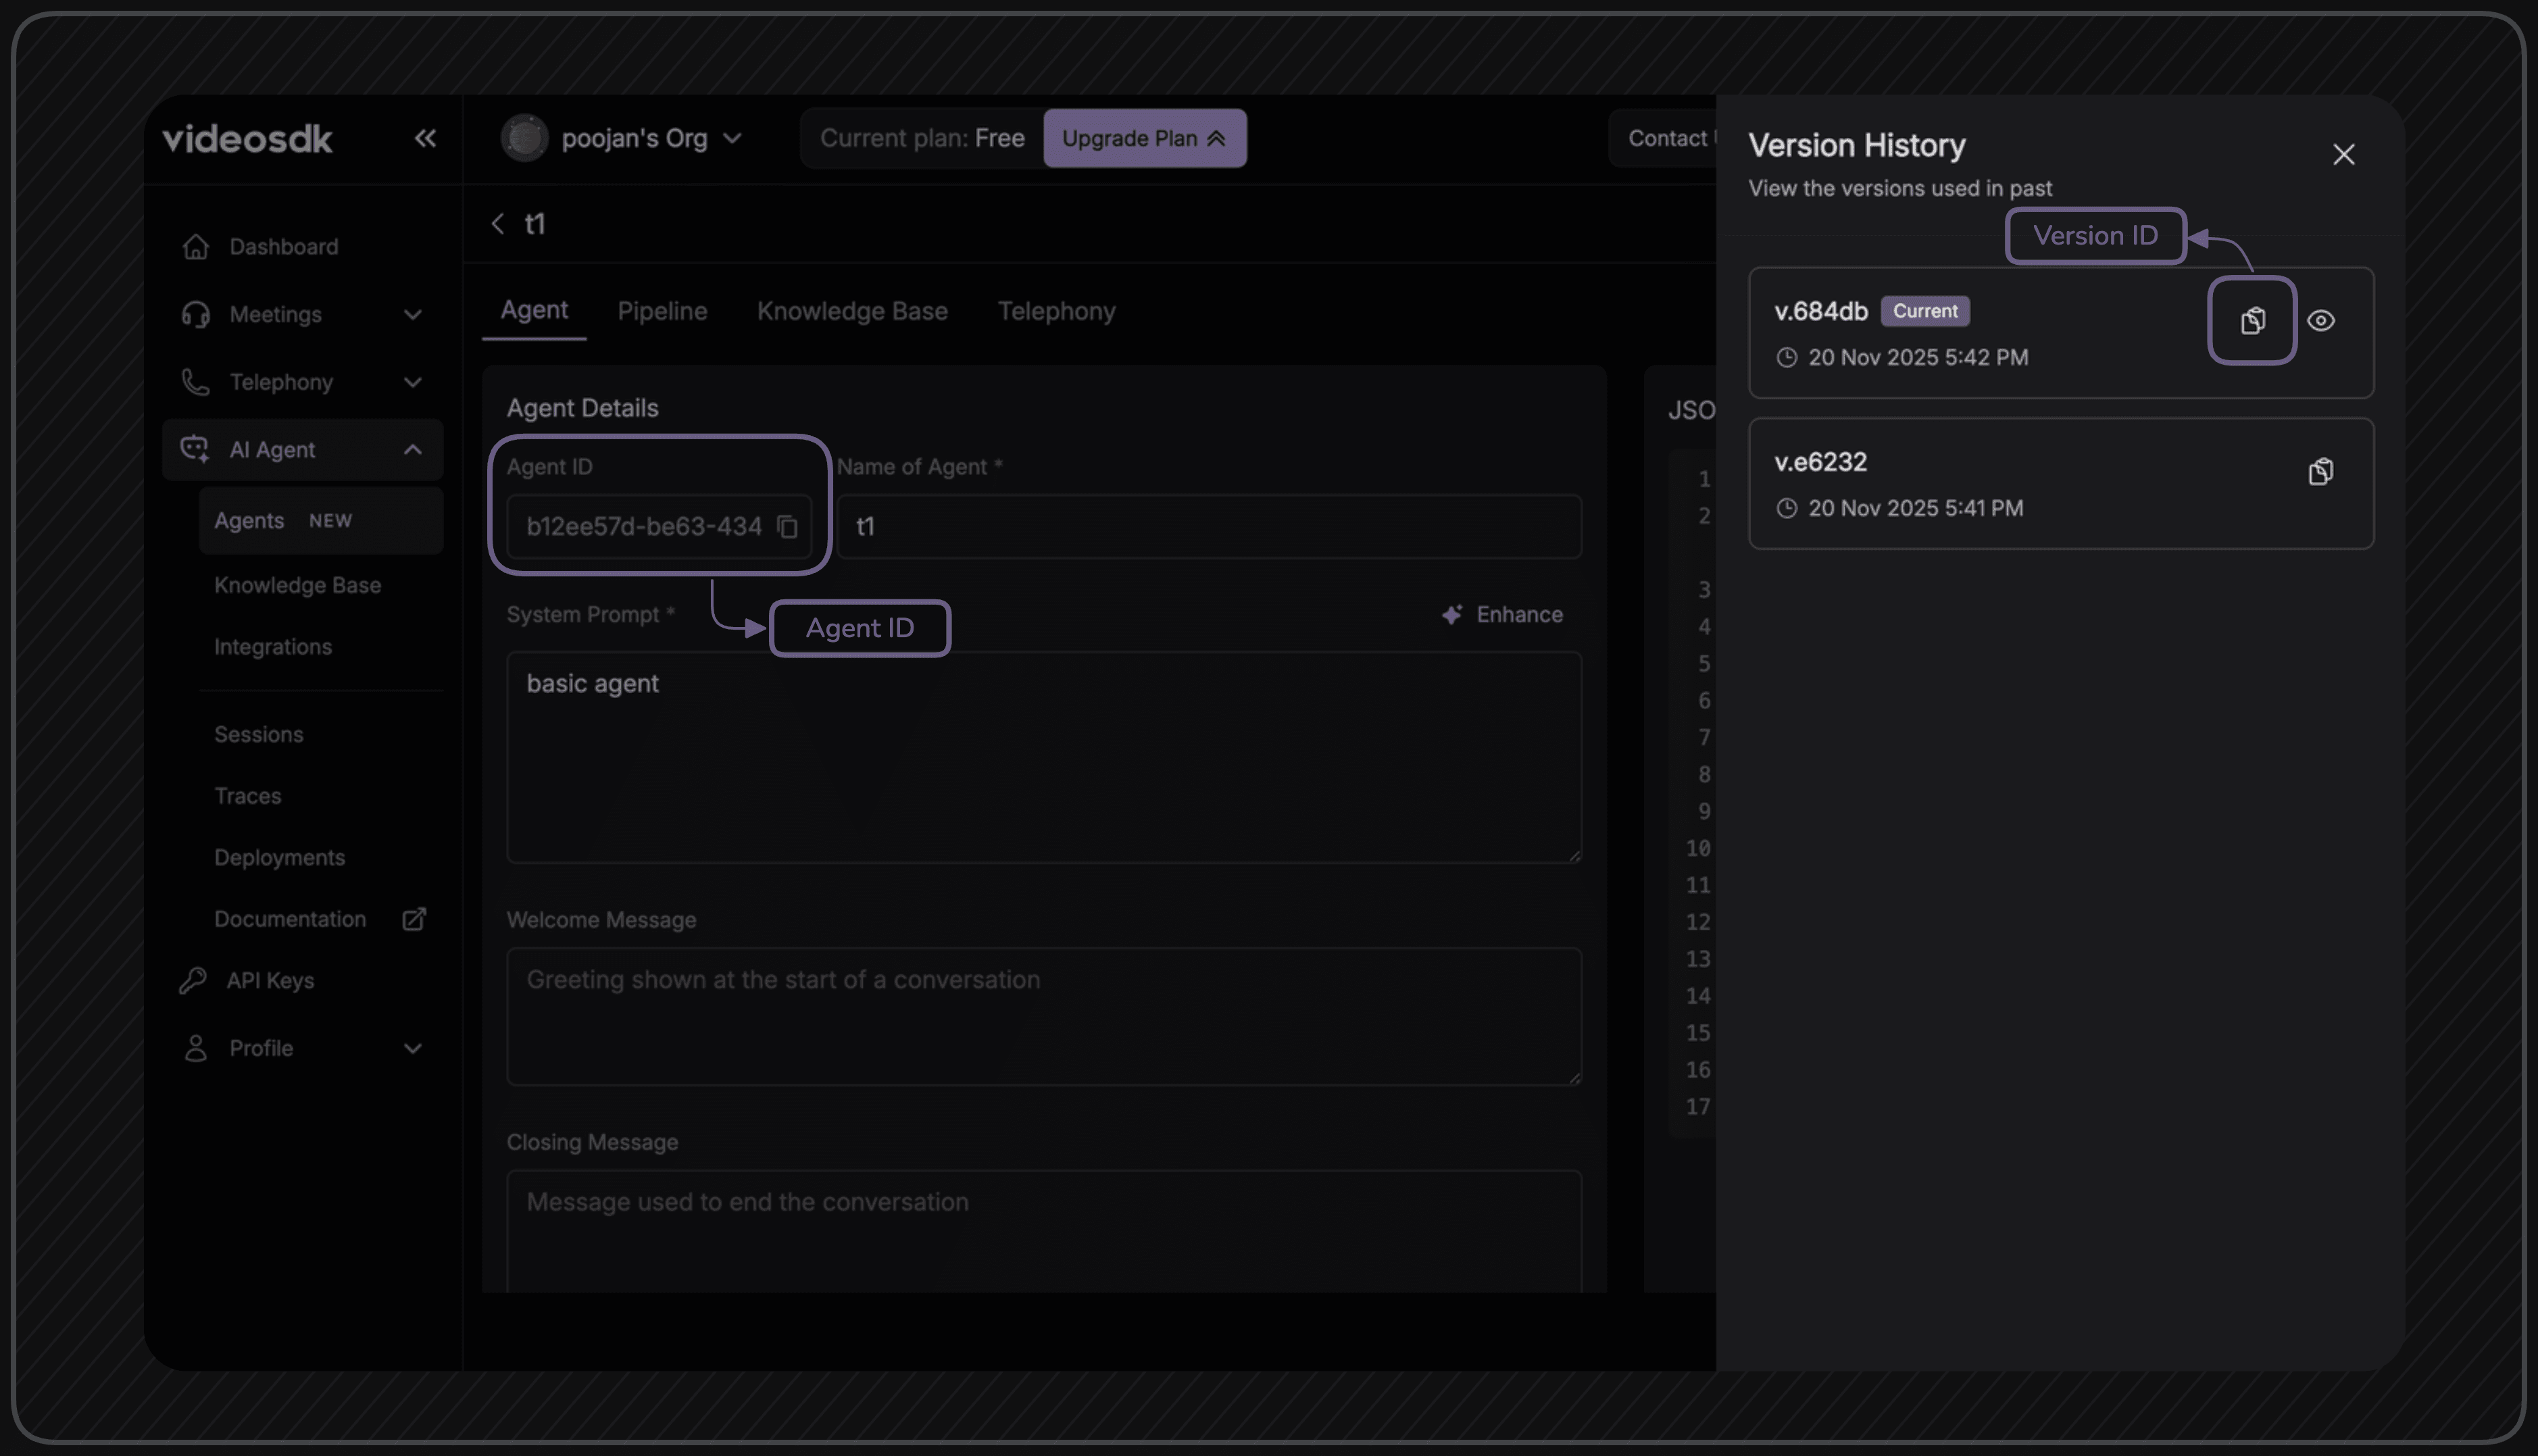
Step 2: Get Agent and Version ID
Once your agent is created, you need to get its agentId and versionId to connect it to your frontend application.
-
After creating your agent, go to the agent's page and find the JSON editor on right side. Copy the
agentId. -
To get the
versionId, click on 3 dots besides Deploy button and click on "Version History" in it. Copy the version id via copy button of the version you want.
Step 3: Configure IDs in Frontend
Now, update your lib/api_call.dart file with these IDs.
const token = 'your_videosdk_auth_token_here';
const agentId = 'paste_your_agent_id_here';
const versionId = 'paste_your_version_id_here';
3. Run the Application
Step 1: Run the Frontend
Once you have completed all the steps mentioned above, start your Flutter application:
flutter run
Step 2: Connect and Interact
-
Join the meeting from the Flutter app:
- Click the "Join Meeting" button.
- Allow microphone permissions when prompted.
-
Connect the agent:
- Once you join, click the "Connect Agent" button.
- You should see a confirmation that the agent was connected.
- The AI agent will join the meeting and greet you.
-
Start playing:
- Interact with your AI agent using your microphone.
Troubleshooting
Common Issues:
-
Agent not joining:
- Check that the
roomId,agentId, andversionIdare correctly set. - Verify your VideoSDK token is valid and has the necessary permissions.
- Check that the
-
Audio not working:
- Check device permissions for microphone access.
-
"Failed to connect agent" error:
- Verify your
agentIdandversionIdare correct. - Check the debug console for any network errors.
- Verify your
-
Flutter build issues:
- Ensure your Flutter version is compatible.
- Try cleaning the build:
flutter clean. - Delete
pubspec.lockand runflutter pub get.
Got a Question? ![]() Ask us on discord
Ask us on discord

