Agent Runtime with React Native
VideoSDK empowers you to integrate an AI voice agent into your React Native app (Android/iOS) within minutes. This guide shows you how to connect a React Native frontend with an AI agent created and configured entirely from the VideoSDK dashboard.
Prerequisites
- VideoSDK Developer Account (get token from the dashboard)
- Node.js and a working React Native environment (Android Studio and/or Xcode)
- Familiarity with creating a no-code voice agent. If you're new to this, please follow our guide on how to Build a Custom Voice AI Agent in Minutes first.
You need a VideoSDK token and an agent from the dashboard. Generate your VideoSDK token from the dashboard.
Project Structure
First, create an empty project using mkdir folder_name on your preferable location for the React Native Frontend. Your final project structure should look like this:
  root
   ├── android/
   ├── ios/
   ├── App.js
   ├── constants.js
   └── index.js
You will work on:
android/: Contains the Android-specific project files.ios/: Contains the iOS-specific project files.App.js: The main React Native component, containing the UI and meeting logic.constants.js: To store token, meetingId, and agent credentials for the frontend.index.js: The entry point of the React Native application, where VideoSDK is registered.
Building the React Native Frontend
Step 1: Create App and Install SDKs
Create a React Native app and install the VideoSDK RN SDK:
npx react-native init videosdkAiAgentRN
cd videosdkAiAgentRN

# Install VideoSDK
npm install "@videosdk.live/react-native-sdk"
Step 2: Configure the Project
Android Setup
<manifest
  xmlns:android="http://schemas.android.com/apk/res/android"
>
    <uses-permission android:name="android.permission.INTERNET" />
    <uses-permission android:name="android.permission.ACCESS_NETWORK_STATE" />
    <uses-permission
        android:name="android.permission.BLUETOOTH"
        android:maxSdkVersion="30" />
    <uses-permission
        android:name="android.permission.BLUETOOTH_ADMIN"
        android:maxSdkVersion="30" />

    <uses-permission android:name="android.permission.BLUETOOTH_CONNECT" />

    <uses-permission android:name="android.permission.CAMERA" />
    <uses-permission android:name="android.permission.MODIFY_AUDIO_SETTINGS" />
    <uses-permission android:name="android.permission.RECORD_AUDIO" />
    <uses-permission android:name="android.permission.WAKE_LOCK" />
</manifest>
  dependencies {
   implementation project(':rnwebrtc')
  }
include ':rnwebrtc'
project(':rnwebrtc').projectDir = new File(rootProject.projectDir, '../node_modules/@videosdk.live/react-native-webrtc/android')
import live.videosdk.rnwebrtc.WebRTCModulePackage

class MainApplication : Application(), ReactApplication {
  override val reactNativeHost: ReactNativeHost =
      object : DefaultReactNativeHost(this) {
        override fun getPackages(): List<ReactPackage> {
          val packages = PackageList(this).packages.toMutableList()
          packages.add(WebRTCModulePackage())
          return packages
        }
        // ...
      }
}
/* This one fixes a weird WebRTC runtime problem on some devices. */
android.enableDexingArtifactTransform.desugaring=false
-keep class org.webrtc.** { *; }
buildscript {
  ext {
      minSdkVersion = 23
  }
}
iOS Setup
To update CocoaPods, you can reinstall the gem using the following command:
$ sudo gem install cocoapods
pod ‘react-native-webrtc’, :path => ‘../node_modules/@videosdk.live/react-native-webrtc’
You need to change the platform field in the Podfile to 12.0 or above because react-native-webrtc doesn't support iOS versions earlier than 12.0. Update the line: platform : ios, ‘12.0’.
After updating the version, you need to install the pods by running the following command:
pod install
Add the following lines to your info.plist file located at (project folder/ios/projectname/info.plist):
<key>NSCameraUsageDescription</key>
<string>Camera permission description</string>
<key>NSMicrophoneUsageDescription</key>
<string>Microphone permission description</string>
Step 3: Register Service and Configure
Register VideoSDK services in your root index.js file for the initialization service.
import { AppRegistry } from "react-native";
import App from "./App";
import { name as appName } from "./app.json";
import { register } from "@videosdk.live/react-native-sdk";

register();

AppRegistry.registerComponent(appName, () => App);
Create a constants.js file to store your token, meeting ID, and agent credentials.
export const token = "YOUR_VIDEOSDK_AUTH_TOKEN";
export const meetingId = "YOUR_MEETING_ID";
export const name = "User Name";
export const agentId = "YOUR_AGENT_ID";
export const versionId = "YOUR_VERSION_ID";
Step 4: Build UI and wire up MeetingProvider
import React, { useState } from 'react';
import {
  SafeAreaView,
  TouchableOpacity,
  Text,
  View,
  FlatList,
  Alert,
} from 'react-native';
import {
  MeetingProvider,
  useMeeting,
} from '@videosdk.live/react-native-sdk';
import { meetingId, token, name, agentId, versionId } from './constants';

const Button = ({ onPress, buttonText, backgroundColor }) => {
  return (
    <TouchableOpacity
      onPress={onPress}
      style={{
        backgroundColor: backgroundColor,
        justifyContent: 'center',
        alignItems: 'center',
        padding: 12,
        borderRadius: 4,
      }}>
      <Text style={{ color: 'white', fontSize: 12 }}>{buttonText}</Text>
    </TouchableOpacity>
  );
};

function ControlsContainer({ join, leave, toggleMic }) {
  const [connected, setConnected] = useState(false);

  const connectAgent = async () => {
    try {
      const response = await fetch("https://api.videosdk.live/v2/agent/general/dispatch", {
        method: "POST",
        headers: {
          "Content-Type": "application/json",
          Authorization: token,
        },
        body: JSON.stringify({ agentId: agentId, meetingId: meetingId, versionId: versionId }),
      });
      if (response.ok) {
        Alert.alert("Agent connected successfully!");
        setConnected(true);
      } else {
        Alert.alert("Failed to connect agent.");
      }
    } catch (error) {
      console.error("Error connecting agent:", error);
      Alert.alert("An error occurred while connecting the agent.");
    }
  };

  return (
    <View
      style={{
        padding: 24,
        flexDirection: 'row',
        justifyContent: 'space-between',
      }}>
      <Button
        onPress={() => {
          join();
        }}
        buttonText={'Join'}
        backgroundColor={'#1178F8'}
      />
      <Button
        onPress={() => {
          toggleMic();
        }}
        buttonText={'Toggle Mic'}
        backgroundColor={'#1178F8'}
      />
      {!connected && (
        <Button
          onPress={connectAgent}
          buttonText={'Connect Agent'}
          backgroundColor={'#1178F8'}
        />
      )}
      <Button
        onPress={() => {
          leave();
        }}
        buttonText={'Leave'}
        backgroundColor={'#FF0000'}
      />
    </View>
  );
}

function ParticipantView({ participantDisplayName }) {
  return (
    <View
      style={{
        backgroundColor: 'grey',
        height: 300,
        justifyContent: 'center',
        alignItems: 'center',
        marginVertical: 8,
        marginHorizontal: 8,
      }}>
      <Text style={{ fontSize: 16 }}>Participant: {participantDisplayName}</Text>
    </View>
  );
}

function ParticipantList({ participants }) {
  return participants.length > 0 ? (
    <FlatList
      data={participants}
      renderItem={({ item }) => {
        return <ParticipantView participantDisplayName={item.displayName} />;
      }}
    />
  ) : (
    <View
      style={{
        flex: 1,
        backgroundColor: '#F6F6FF',
        justifyContent: 'center',
        alignItems: 'center',
      }}>
      <Text style={{ fontSize: 20 }}>Press Join button to enter meeting.</Text>
    </View>
  );
}

function MeetingView() {
  const { join, leave, toggleMic, participants, meetingId } = useMeeting({});

  const participantsList = [...participants.values()].map(participant => ({
    displayName: participant.displayName,
  }));

  return (
    <View style={{ flex: 1 }}>
      {meetingId ? (
        <Text style={{ fontSize: 18, padding: 12 }}>Meeting Id : {meetingId}</Text>
      ) : null}
      <ParticipantList participants={participantsList} />
      <ControlsContainer
        join={join}
        leave={leave}
        toggleMic={toggleMic}
      />
    </View>
  );
}

export default function App() {
  if (!meetingId || !token) {
    return (
      <SafeAreaView style={{ flex: 1, backgroundColor: '#F6F6FF' }}>
        <View style={{ flex: 1, justifyContent: 'center', alignItems: 'center' }}>
          <Text style={{ fontSize: 20, textAlign: 'center' }}>
            Please add a valid Meeting ID and Token in the `constants.js` file.
          </Text>
        </View>
      </SafeAreaView>
    );
  }

  return (
    <SafeAreaView style={{ flex: 1, backgroundColor: '#F6F6FF' }}>
      <MeetingProvider
        config={{
          meetingId,
          micEnabled: true,
          webcamEnabled: false,
          name,
        }}
        token={token}>
        <MeetingView />
      </MeetingProvider>
    </SafeAreaView>
  );
}
Creating the AI Agent from Dashboard (No-Code)
You can create and configure a powerful AI agent directly from the VideoSDK dashboard.
Step 1: Create Your Agent
First, follow our detailed guide to Build a Custom Voice AI Agent in Minutes. This will walk you through creating the agent's persona, configuring its pipeline (Realtime or Cascading), and testing it directly from the dashboard.
Step 2: Get Agent and Version ID
Once your agent is created, you need to get its agentId and versionId to connect it to your frontend application.
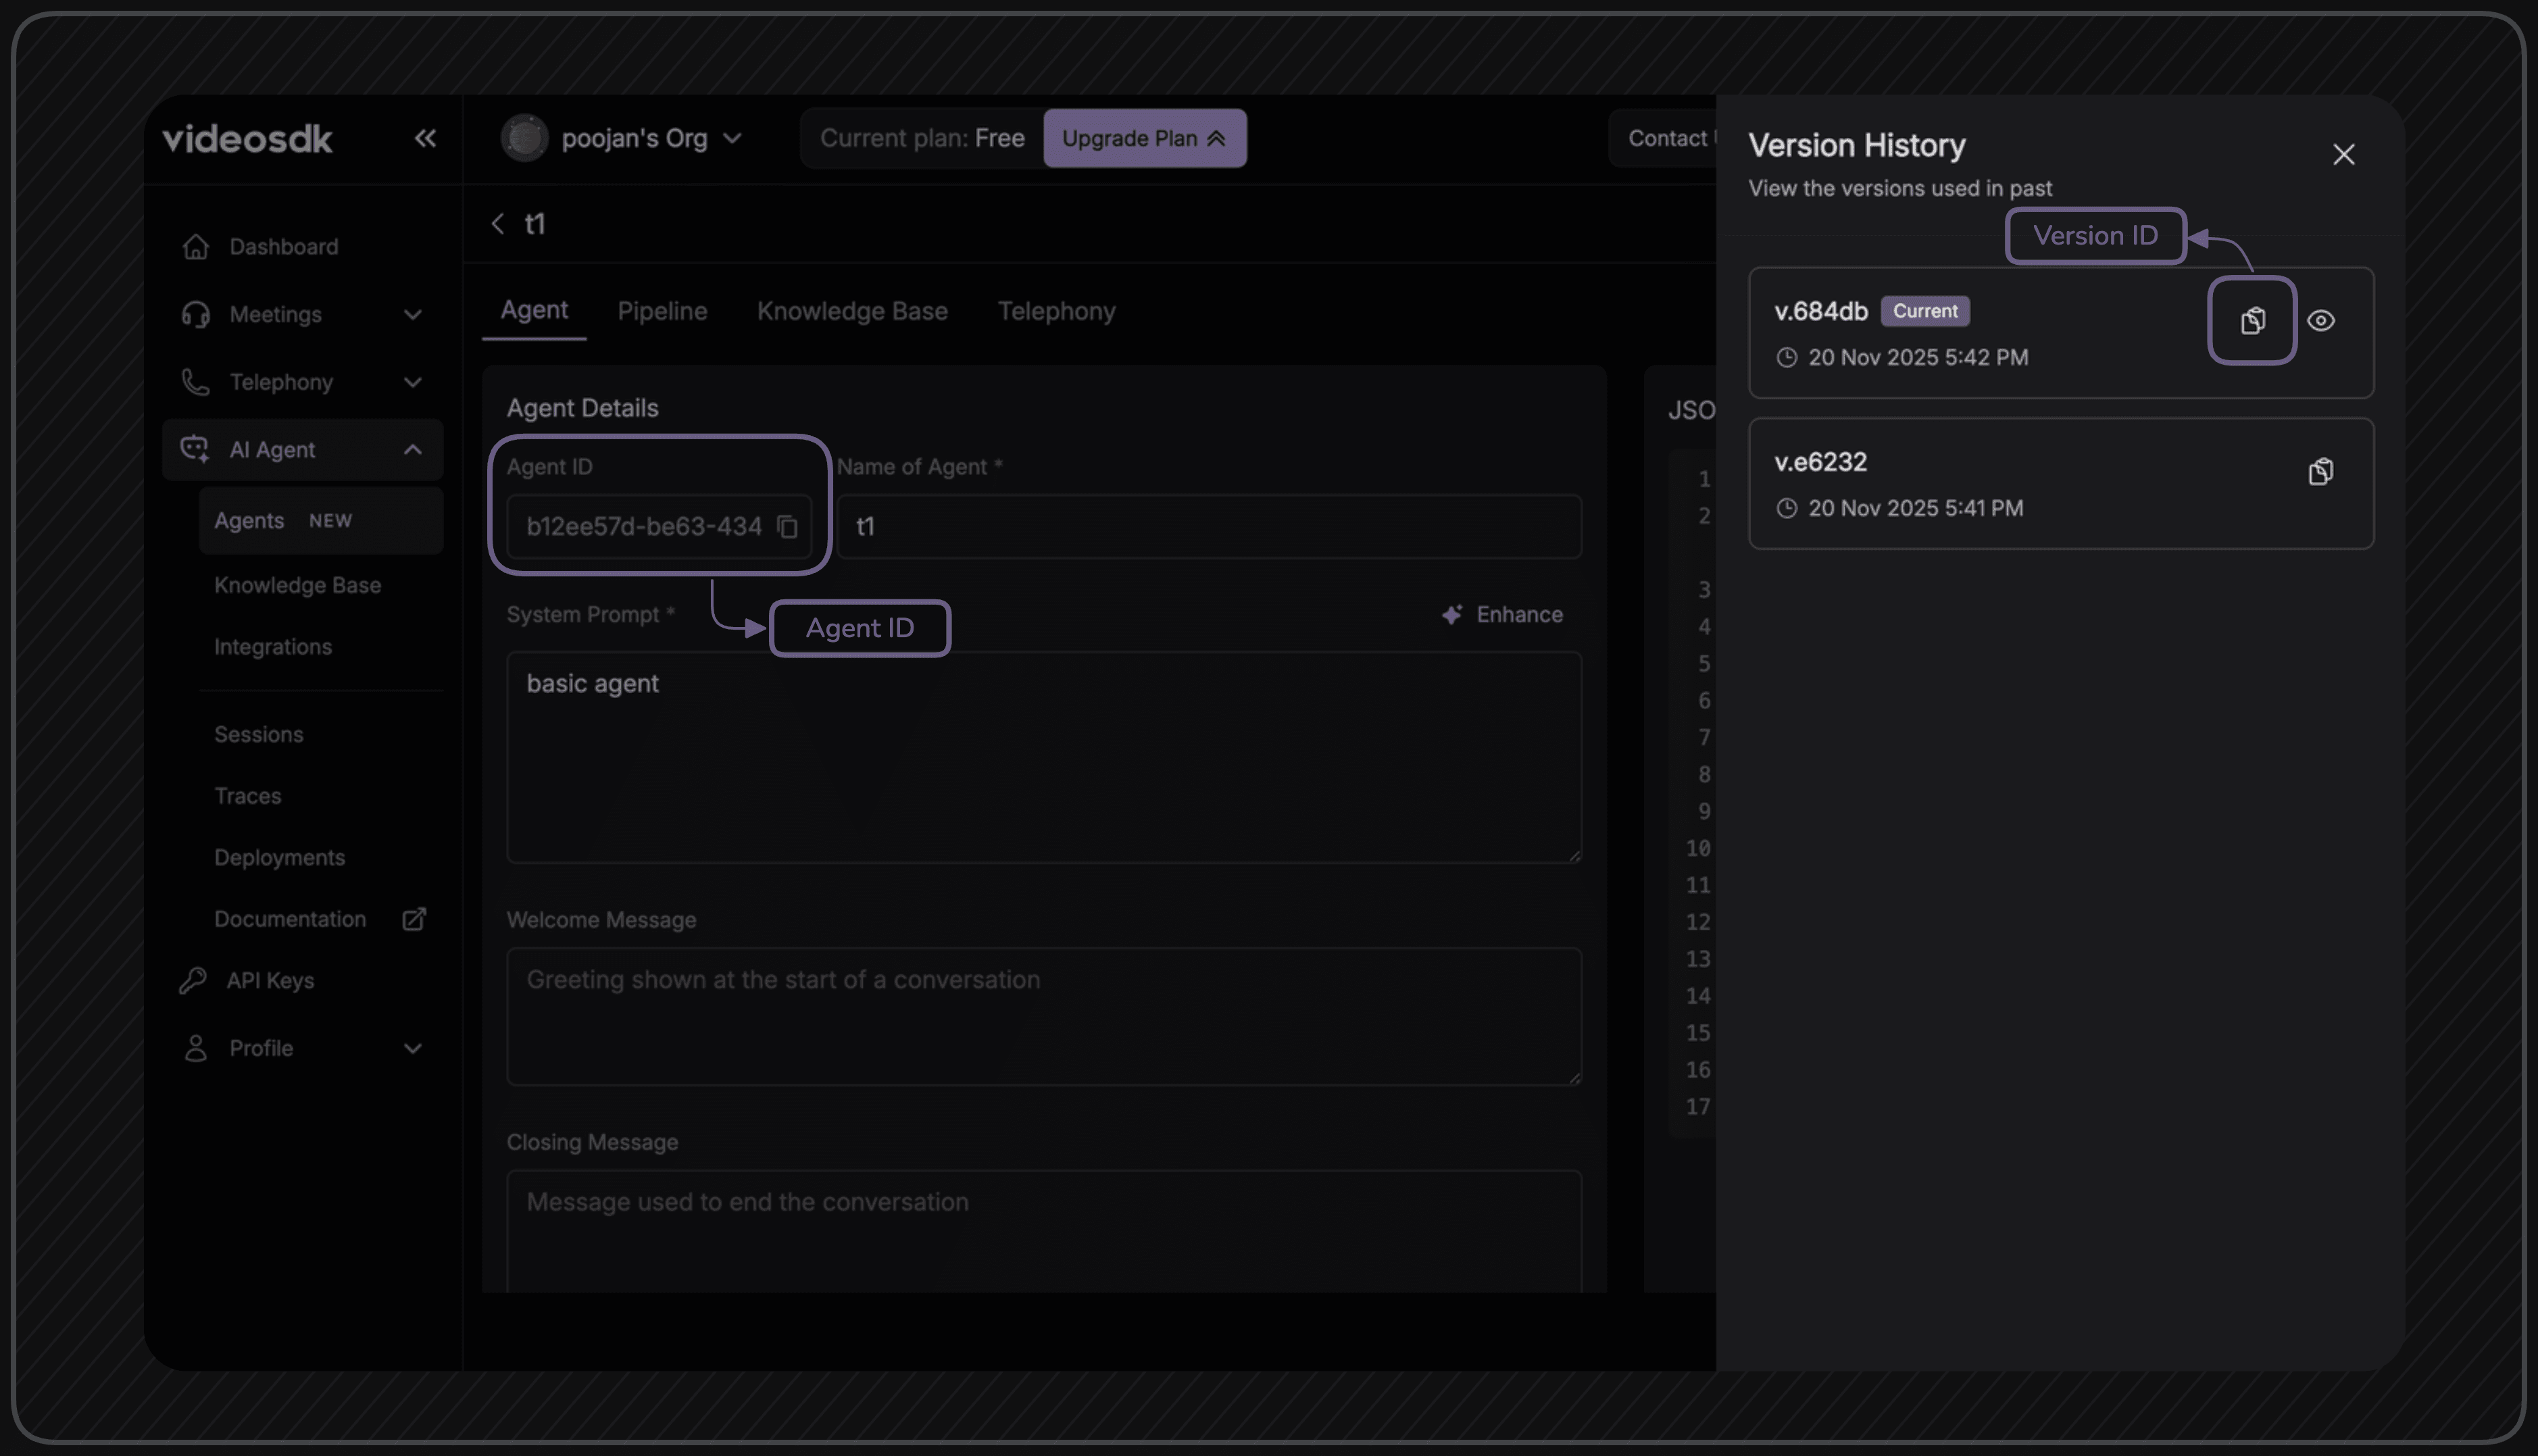
-
After creating your agent, go to the agent's page and find the JSON editor on right side. Copy the
agentId. -
To get the
versionId, click on 3 dots besides Deploy button and click on "Version History" in it. Copy the version id via copy button of the version you want.
Step 3: Configure IDs in Frontend
Now, update your constants.js file with these IDs.
export const token = "your_videosdk_auth_token_here";
export const meetingId = "YOUR_MEETING_ID";
export const name = "User Name";
export const agentId = "paste_your_agent_id_here";
export const versionId = "paste_your_version_id_here";
Run the Application
1) Start the React Native app
npm install

# Android
npm run android

# iOS (macOS only)
cd ios && pod install && cd ..
npm run ios
2) Connect and interact
- Join the meeting from the app and allow microphone permissions.
- When you join, click the "Connect Agent" button to call the agent into the meeting.
- Talk to the agent in real time.
Troubleshooting
- Ensure the same
meetingIdis used and theagentIdandversionIdare correct inconstants.js. - Verify microphone permissions on the device/simulator.
- Confirm your VideoSDK token is valid.
- If audio is silent, check device output volume.
Got a Question? ![]() Ask us on discord
Ask us on discord

