Agent Runtime with React
VideoSDK empowers you to seamlessly integrate AI agents with real-time voice interaction into your React application within minutes. This guide shows you how to connect a React frontend with an AI agent created and configured entirely from the VideoSDK dashboard.
Prerequisites
Before proceeding, ensure that your development environment meets the following requirements:
- Video SDK Developer Account (Not having one, follow Video SDK Dashboard)
- Node.js installed on your device
- Familiarity with creating a no-code voice agent. If you're new to this, please follow our guide on how to Build a Custom Voice AI Agent in Minutes first.
You need a VideoSDK account to generate a token and an agent from the dashboard. Visit the VideoSDK dashboard to generate a token.
Project Structure
Your project structure should look like this.
  root
   ├── node_modules
   ├── public
   ├── src
   │    ├── config.js
   │    ├── App.js
   │    └── index.js
   └── .env
You will be working on the following files:
App.js: Responsible for creating a basic UI for joining the meetingconfig.js: Responsible for storing the token, room ID, and agent credentialsindex.js: This is the entry point of your React application.
Part 1: React Frontend
Step 1: Getting Started with the Code!
Create new React App
Create a new React App using the below command.
$ npx create-react-app videosdk-ai-agent-react-app
Install VideoSDK
Install the VideoSDK using the below-mentioned npm command. Make sure you are in your react app directory before you run this command.
$ npm install "@videosdk.live/react-sdk"
Step 2: Configure Environment and Credentials
Create a meeting room using the VideoSDK API:
curl -X POST https://api.videosdk.live/v2/rooms \
  -H "Authorization: YOUR_JWT_TOKEN_HERE" \
  -H "Content-Type: application/json"
Copy the roomId from the response and configure it in src/config.js. You will get the Agent and Version IDs in the next section.
export const TOKEN = "YOUR_VIDEOSDK_AUTH_TOKEN";
export const ROOM_ID = "YOUR_MEETING_ID";
export const AGENT_ID = "YOUR_AGENT_ID";
export const VERSION_ID = "YOUR_VERSION_ID";
Step 3: Design the user interface (UI)
Create the main App component with audio-only interaction in src/App.js. This includes the "Connect Agent" button.
import React, { useEffect, useRef, useState } from "react";
import { MeetingProvider, MeetingConsumer, useMeeting, useParticipant } from "@videosdk.live/react-sdk";
import { TOKEN, ROOM_ID, AGENT_ID, VERSION_ID } from "./config";

function ParticipantAudio({ participantId }) {
  const { micStream, micOn, isLocal, displayName } = useParticipant(participantId);
  const audioRef = useRef(null);

  useEffect(() => {
    if (!audioRef.current) return;
    if (micOn && micStream) {
      const mediaStream = new MediaStream();
      mediaStream.addTrack(micStream.track);
      audioRef.current.srcObject = mediaStream;
      audioRef.current.play().catch(() => {});
    } else {
      audioRef.current.srcObject = null;
    }
  }, [micStream, micOn]);

  return (
    <div>
      <p>Participant: {displayName} | Mic: {micOn ? "ON" : "OFF"}</p>
      <audio ref={audioRef} autoPlay muted={isLocal} />
    </div>
  );
}

function Controls() {
  const { leave, toggleMic } = useMeeting();
  const [connected, setConnected] = useState(false);

  const connectAgent = async () => {
    try {
      const response = await fetch("https://api.videosdk.live/v2/agent/general/dispatch", {
        method: "POST",
        headers: {
          "Content-Type": "application/json",
          Authorization: TOKEN,
        },
        body: JSON.stringify({ agentId: AGENT_ID, meetingId: ROOM_ID, versionId: VERSION_ID }),
      });
      if (response.ok) {
        alert("Agent connected successfully!");
        setConnected(true);
      } else {
        alert("Failed to connect agent.");
      }
    } catch (error) {
      console.error("Error connecting agent:", error);
      alert("An error occurred while connecting the agent.");
    }
  };

  return (
    <div>
      <button onClick={() => leave()}>Leave</button>
      <button onClick={() => toggleMic()}>Toggle Mic</button>
      {!connected && <button onClick={connectAgent}>Connect Agent</button>}
    </div>
  );
}

function MeetingView({ meetingId, onMeetingLeave }) {
  const [joined, setJoined] = useState(null);
  const { join, participants } = useMeeting({
    onMeetingJoined: () => setJoined("JOINED"),
    onMeetingLeft: onMeetingLeave,
  });

  const joinMeeting = () => {
    setJoined("JOINING");
    join();
  };

  return (
    <div>
      <h3>Meeting Id: {meetingId}</h3>
      {joined === "JOINED" ? (
        <div>
          <Controls />
          {[...participants.keys()].map((pid) => (
            <ParticipantAudio key={pid} participantId={pid} />
          ))}
        </div>
      ) : joined === "JOINING" ? (
        <p>Joining the meeting...</p>
      ) : (
        <button onClick={joinMeeting}>Join</button>
      )}
    </div>
  );
}

export default function App() {
  const [meetingId] = useState(ROOM_ID);

  const onMeetingLeave = () => {
    // no-op; simple sample
  };

  return (
    <MeetingProvider
      config={{
        meetingId,
        micEnabled: true,
        webcamEnabled: false,
        name: "Agent React User",
        multiStream: false,
      }}
      token={TOKEN}
    >
      <MeetingConsumer>
        {() => <MeetingView meetingId={meetingId} onMeetingLeave={onMeetingLeave} />}
      </MeetingConsumer>
    </MeetingProvider>
  );
}
Part 2: Creating the AI Agent from Dashboard (No-Code)
You can create and configure a powerful AI agent directly from the VideoSDK dashboard.
Step 1: Create Your Agent
First, follow our detailed guide to Build a Custom Voice AI Agent in Minutes. This will walk you through creating the agent's persona, configuring its pipeline (Realtime or Cascading), and testing it directly from the dashboard.
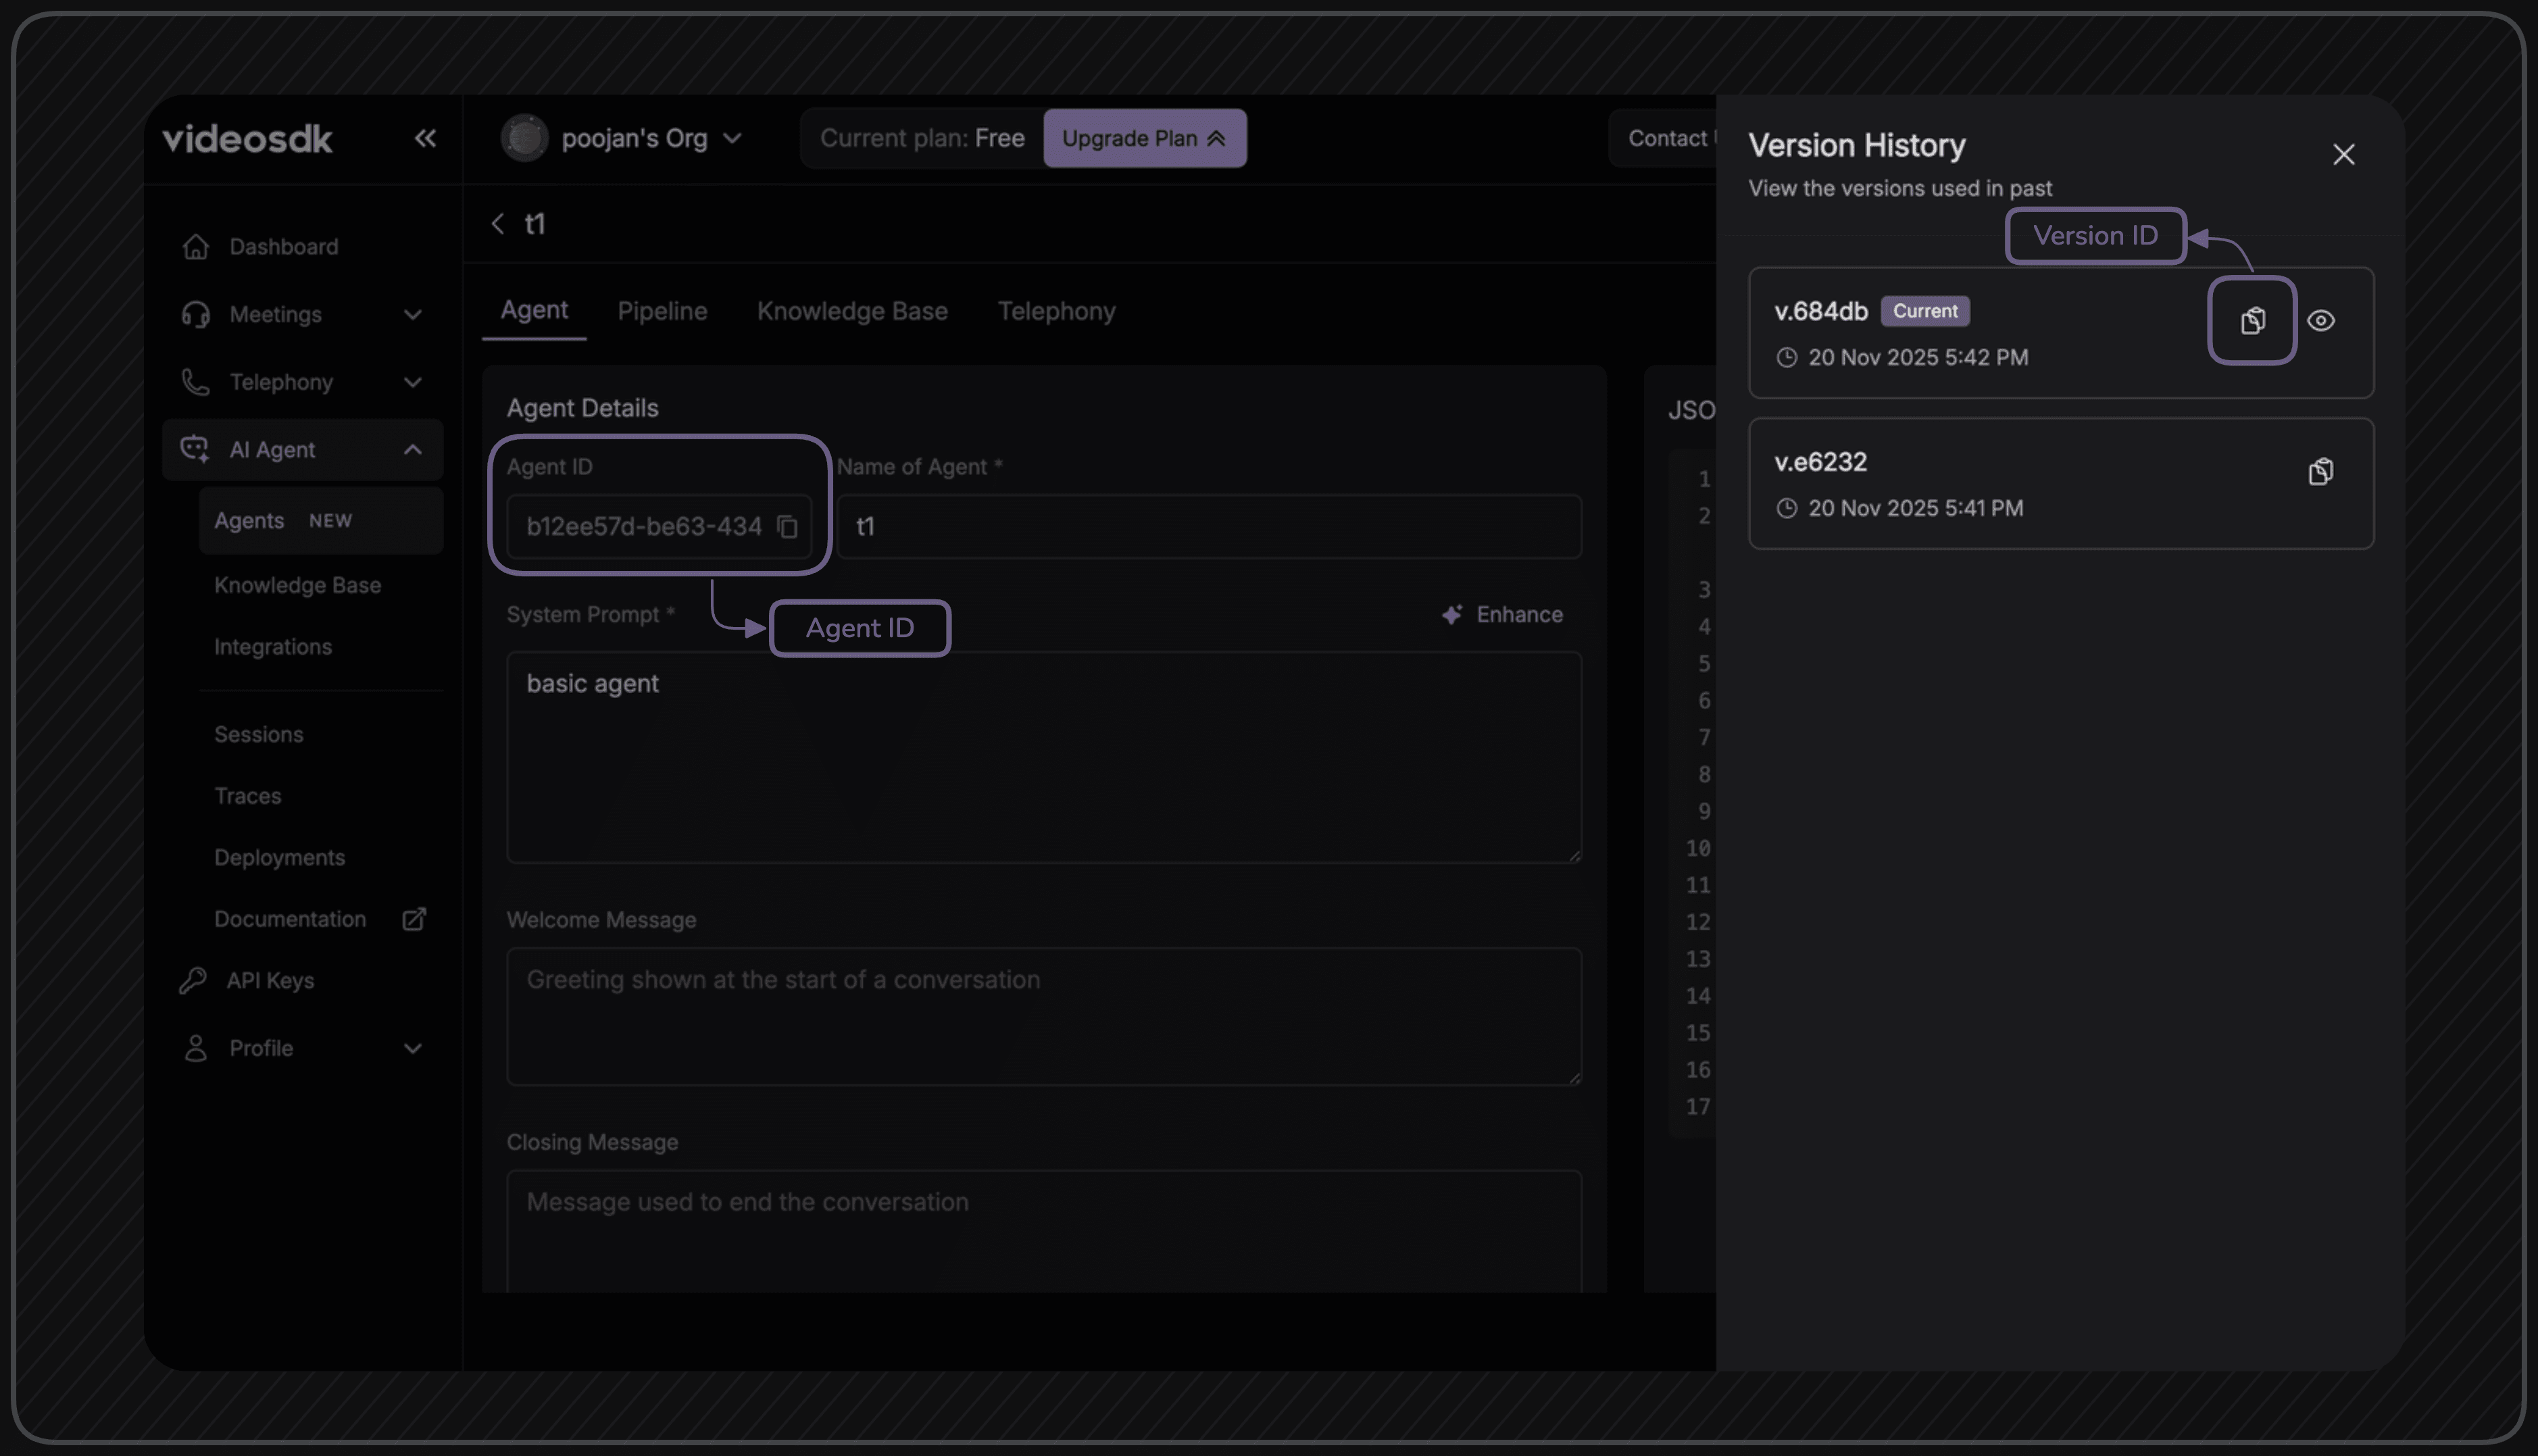
Step 2: Get Agent and Version ID
Once your agent is created, you need to get its agentId and versionId to connect it to your frontend application.
-
After creating your agent, go to the agent's page and find the JSON editor on right side. Copy the
agentId. -
To get the
versionId, click on 3 dots besides Deploy button and click on "Version History" in it. Copy the version id via copy button of the version you want.
Step 3: Configure IDs in Frontend
Now, update your src/config.js file with these IDs.
export const TOKEN = "your_videosdk_auth_token_here";
export const ROOM_ID = "YOUR_MEETING_ID";
export const AGENT_ID = "paste_your_agent_id_here";
export const VERSION_ID = "paste_your_version_id_here";
Part 3: Run the Application
Step 1: Run the Frontend
Once you have completed all the steps mentioned above, start your React application:
# Install dependencies
npm install

# Start the development server
npm start
Open http://localhost:3000 in your web browser.
Step 2: Connect and Interact
-
Join the meeting from the React app:
- Click the "Join" button in your browser
- Allow microphone permissions when prompted
-
Connect the agent:
- Once you join, click the "Connect Agent" button.
- You should see an alert confirming the agent was connected.
- The AI agent will join the meeting and greet you.
-
Start playing:
- Interact with your AI agent using your microphone.
Final Output
You have completed the implementation of an AI agent with real-time voice interaction using VideoSDK and a no-code agent from the dashboard in React.
Troubleshooting
Common Issues:
-
Agent not joining:
- Check that the
ROOM_ID,AGENT_ID, andVERSION_IDare correctly set insrc/config.js. - Verify your VideoSDK token is valid and has the necessary permissions.
- Check that the
-
Audio not working:
- Check browser permissions for microphone access.
-
"Failed to connect agent" error:
- Verify your
AGENT_IDandVERSION_IDare correct. - Check the browser's developer console for any network errors.
- Verify your
-
React build issues:
- Ensure Node.js version is compatible
- Try clearing npm cache:
npm cache clean --force - Delete
node_modulesand reinstall:rm -rf node_modules && npm install
Got a Question? ![]() Ask us on discord
Ask us on discord

