How to integrate Banuba SDK with Android Video SDK?
The Banuba SDK is a software development kit that enables developers to integrate advanced augmented reality (AR) features, such as real-time face filters and effects, into their apps. It is widely used for creating engaging video experiences in applications like video conferencing, live streaming, and social media platforms.

To integrate the Banuba SDK with Android Video SDK, follow these steps:
Step 1: Get Banuba Token
- To begin working with the Banuba SDK in your project, you'll need Banuba's client token.
- You can obtain this token by following the instructions in Banuba's documentation at banuba.com
Step 2: Add Banuba SDK dependencies
- Add custom maven repo to your
settings.gradle:
settings.gradle
dependencyResolutionManagement {
    repositoriesMode.set(RepositoriesMode.FAIL_ON_PROJECT_REPOS)
    repositories {
        google()
        mavenCentral()
        maven {
            name = "GitHubPackages"
            url = uri("https://maven.pkg.github.com/sdk-banuba/banuba-sdk-android")
            credentials {
                username = "sdk-banuba"
                password = "\u0067\u0068\u0070\u005f\u004a\u0067\u0044\u0052\u0079\u0049\u0032\u006d\u0032\u004e\u0055\u0059\u006f\u0033\u0033\u006b\u0072\u0034\u0049\u0069\u0039\u0049\u006f\u006d\u0077\u0034\u0052\u0057\u0043\u0064\u0030\u0052\u0078\u006d\u0045\u0069"
            }
        }
        maven { url 'https://jitpack.io' }
        maven { url "https://maven.aliyun.com/repository/jcenter" }
}}
- Add Banuba SDK and VideoSDK dependencies in
app/build.gradlefile.
app/build.gradle
dependencies {
  // Banuba SDK dependencies
    implementation "com.banuba.sdk:banuba_sdk:1+"
  // Video SDK dependencies
    implementation 'live.videosdk:rtc-android-sdk:0.3.0'
  // other app dependencies
  }
Step 3: Initialization of Banuba SDK
-
Create a
MainApplicationclass that extendsandroid.app.Application. -
Within the
MainApplicationclass, create a KEY field to store the token you generated from Banuba. This token will be used to initialize theBanubaSdkManager.
- Kotlin
- Java
MainApplication.kt
class MainApplication : Application() {
    override fun onCreate() {
        super.onCreate()

        //...
        val key = "Banuba Client Token"
        BanubaSdkManager.initialize(requireNonNull(applicationContext), key)
    }

    override fun onTerminate() {
        BanubaSdkManager.deinitialize()
        super.onTerminate()
    }
}
MainApplication.java
public class MainApplication extends Application {
    @Override
    public void onCreate() {
        super.onCreate();

        //...
        String KEY ="Banuba Client Token";
        BanubaSdkManager.initialize(requireNonNull(getApplicationContext()), KEY);
    }
    @Override
    public void onTerminate() {
        BanubaSdkManager.deinitialize();
        super.onTerminate();
    }
}
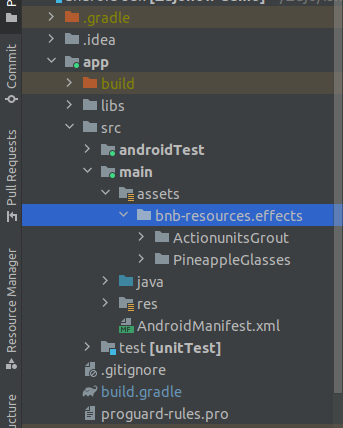
Step 4: Add effects into your project
- Create an effects folder under the assets directory in your project and add the filters you want to use. You can download test filters from here Effects
Step 5: Integration of BanubaProcessor
- The
BanubaProcessorclass will implement theVideoFrameProcessorinterface from VideoSDK. - The
VideoFrameProcessorinterface providesonFrameCaptured()method, which is invoked when a new video frame is captured. - The
onFrameCaptured()method is used to manipulate theVideoFramein order to achieve the desired effects.
- Kotlin
- Java
BanubaProcessor.kt
class BanubaProcessor : VideoFrameProcessor {
    private var mPlayer: Player = Player()
    private var mFrameOutput: FrameOutput? = null
    private val eglContext: EglBase.Context = EglBase.create().eglBaseContext
    private var mSurfaceTextureHelper: SurfaceTextureHelper? = null
    private var videoFrame: VideoFrame? = null
    private val streamInput: StreamInput = StreamInput()

    init {
        mSurfaceTextureHelper = SurfaceTextureHelper.create("CaptureThread", eglContext, false)
    }

    // set a visual effect in the Banuba Player
    fun setEffect(effect: String) {
        mPlayer.loadAsync("effects/$effect")
        mPlayer.play()
    }

    // remove any applied effects
    fun removeEffect() {
        mPlayer.loadAsync("")
    }

    fun removePlayer() {
        // close the player when it's no longer needed
        mPlayer.close()
    }

    // method to initialize the frame output for video processing
    private fun initOutput(): VideoFrame? {
        val handler = mSurfaceTextureHelper!!.handler
        mFrameOutput = FrameOutput { iOutput, framePixelBuffer ->
            handler.post {
                val i420Buffer = JavaI420Buffer.wrap(
                    framePixelBuffer.width,
                    framePixelBuffer.height,
                    framePixelBuffer.getPlane(0),
                    framePixelBuffer.getBytesPerRowOfPlane(0),
                    framePixelBuffer.getPlane(1),
                    framePixelBuffer.getBytesPerRowOfPlane(1),
                    framePixelBuffer.getPlane(2),
                    framePixelBuffer.getBytesPerRowOfPlane(2),
                    null
                )
                videoFrame = VideoFrame(i420Buffer, 0, System.nanoTime())
            }
        }
        mFrameOutput!!.format = FramePixelBufferFormat.I420_BT601_FULL

        handler.postDelayed({
            mFrameOutput?.close()
        }, 2000)

        // attach the FrameOutput to the player for rendering
        mPlayer.use(mFrameOutput)

        // Return the processed video frame
        return videoFrame
    }

     // called whenever a new video frame is captured
    override fun onFrameCaptured(videoFrame: VideoFrame?): VideoFrame? {
        if (videoFrame != null) {
            // Determine the camera orientation based on the rotation of the video frame
            val cameraOrientation = CameraOrientation.values()[(videoFrame.rotation / 90) % 4]
            val orientation = FullImageData.Orientation(cameraOrientation, true, 0)
            val i420Buffer = videoFrame.buffer.toI420()

            // create FullImageData using the frame data and orientation
            val fullImageData = FullImageData(
                Size(i420Buffer.width, i420Buffer.height),
                i420Buffer.dataY,
                i420Buffer.dataU,
                i420Buffer.dataV,
                i420Buffer.strideY,
                i420Buffer.strideU,
                i420Buffer.strideV,
                1, 1, 1,
                orientation
            )

            val frameData = FrameData.create() ?: return null
            frameData.addFullImg(fullImageData)
            i420Buffer.release()
            streamInput.push(frameData, videoFrame.timestampNs)

            // attach the StreamInput to the player for further processing
            mPlayer.use(streamInput)

            // return the processed video frame
            return initOutput()
        }
        return null
    }
}
BanubaProcessor.java
public class BanubaProcessor implements VideoFrameProcessor {
    private Player mPlayer;
    private FrameOutput mFrameOutput;
    private final EglBase.Context eglContext = EglBase.create().getEglBaseContext();
    private SurfaceTextureHelper mSurfaceTextureHelper;
    VideoFrame videoFrame;
    final StreamInput streamInput = new StreamInput();

    public BanubaProcessor (){
        mSurfaceTextureHelper = SurfaceTextureHelper.create("CaptureThread", eglContext, false);
        mPlayer = new Player();
    }
    // set a visual effect in the Banuba Player
    public void setEffect(String effect)
    {
        mPlayer.loadAsync("effects/" + effect);
        mPlayer.play();
    }
    // remove any applied effects
    public void removeEffect()
    {
        mPlayer.loadAsync("");
    }
    public void removePlayer()
    {
        // close the player when it's no longer needed
        mPlayer.close();
    }
    // method to initialize the frame output for video processing
    private VideoFrame initOutput() {
        final Handler handler = mSurfaceTextureHelper.getHandler();
        mFrameOutput = new FrameOutput((iOutput, framePixelBuffer) -> {
            handler.post(() -> {

                final JavaI420Buffer i420buffer = JavaI420Buffer.wrap(
                        framePixelBuffer.getWidth(),
                        framePixelBuffer.getHeight(),
                        framePixelBuffer.getPlane(0),
                        framePixelBuffer.getBytesPerRowOfPlane(0),
                        framePixelBuffer.getPlane(1),
                        framePixelBuffer.getBytesPerRowOfPlane(1),
                        framePixelBuffer.getPlane(2),
                        framePixelBuffer.getBytesPerRowOfPlane(2),
                        null);
                videoFrame = new VideoFrame(i420buffer, 0, System.nanoTime());
            });
        });
        mFrameOutput.setFormat(FramePixelBufferFormat.I420_BT601_FULL);

        handler.postDelayed(() -> {
            mFrameOutput.close();
        },2000);

        // attach the FrameOutput to the player for rendering
        mPlayer.use(mFrameOutput);

        // return the processed video frame
        return videoFrame;
    }
    // called whenever a new video frame is captured
    @Override
    public VideoFrame onFrameCaptured(VideoFrame videoFrame) {
        if(videoFrame != null) {
            // determine the camera orientation based on the rotation of the video frame
            final CameraOrientation cameraOrientation = CameraOrientation.values()[(videoFrame.getRotation() / 90) % 4];
            final FullImageData.Orientation orientation = new FullImageData.Orientation(cameraOrientation, true, 0);
            final VideoFrame.I420Buffer i420Buffer = videoFrame.getBuffer().toI420();
            // create FullImageData using the frame data and orientation
            final FullImageData fullImageData = new FullImageData(
                    new Size(i420Buffer.getWidth(), i420Buffer.getHeight()),
                    i420Buffer.getDataY(),
                    i420Buffer.getDataU(),
                    i420Buffer.getDataV(),
                    i420Buffer.getStrideY(),
                    i420Buffer.getStrideU(),
                    i420Buffer.getStrideV(),
                    1, 1, 1,
                    orientation);
            final FrameData frameData = Objects.requireNonNull(FrameData.create());
            frameData.addFullImg(fullImageData);
            i420Buffer.release();
            streamInput.push(frameData, videoFrame.getTimestampNs());
            // attach the StreamInput to the player for further processing
            mPlayer.use(streamInput);
            // return the processed video frame
            return initOutput();
        }
        return null;
    }
}
Step 5: Use filters in the Meeting
- First, create an instance of
BanubaProcessorclass and pass it to theapplyVideoProcessor()method ofVideoSDKclass. - Next, use the
setEffectmethod on the instance ofBanubaProcessorclass apply the desired effect. - To apply video filters from the beginning of the meeting, you can call
setEffectmethod inonMeetingJoinedevent.
- Kotlin
- Java
MainActivity.kt
private val meetingEventListener = object : MeetingEventListener {
    override fun onMeetingJoined() {
        val banubaProcessor = BanubaProcessor()
        VideoSDK.applyVideoProcessor(banubaProcessor)
        //here you can pass any effect that you want to apply
        banubaProcessor.setEffect("PineappleGlasses")
    }
}
MainActivity.java
private final MeetingEventListener meetingEventListener = new MeetingEventListener() {
    @Override
    public void onMeetingJoined() {
        BanubaProcessor banubaProcessor = new BanubaProcessor();
        VideoSDK.applyVideoProcessor(banubaProcessor);
        //here you can pass any effect that you want to apply
        banubaProcessor.setEffect("PineappleGlasses");
    }
};
tip
Stuck anywhere? Check out this Code Sample of Banuba Intergation with Android-SDK on GitHub
Got a Question? ![]() Ask us on discord
Ask us on discord

