Customized Layout (Recording/ HLS / LiveStream)
-
This feature allows you to start recording / HLS / Livestream with Customized Layout by providing
templateUrl. -
templateUrlis a webpage URL of your hosted meeting.
note
- Your development
localhostURL is not considered as atemplateUrl. - SSL must be enabled on your website.
- VideoSDK recorder only supports 4 participants on the screen due to resources limitations. your template url will be assigned 1 core of cpu and 2GB of memory. your recording will be ternminated if those limits are reached. So, create the template accordingly.
Lets understand how VideoSDK recordings works
- When you start recording while
- sdk method called
startRecording()startHls()startLivestream()
- Or using our rest apis to starting:
- Videosdk server basically creates a new bot participant and let that bot participant join into the same sessions from where the recording was started. The bot participant opens a webpage into server and renders a Web-Application in which the VideoSDK is installed, that web-application will have its own UI for displaying the participants in a grid manner. By default Videosdk will open a Prebuilt SDK as a web-application and render whole UI inside that webpage.
- After the page is rendered, it will join the meeting directly without any click for join button / join screen.
- For example, in VideoSDK's React Package there is a prop called
joinWithoutUserInteractioninsideMeetingProvider, by this prop when when theMeetingProvideris rendered it will join automatically whiout calling thejoin()method. This is needed because the bot participant will not click any button to join the meeting. However whie testing in our local environment browser click is improtant for rendering and auto-playing the video streams or audio streams. We will talk aboutjoinWithoutUserInteractionlater in this documentation. - Once whole UI is rendered VideoSDK Composers will capture the whole webpage and encode into MP4 or HLS or RTMP according to the config.
- As the default UI will be a prebuilt all Recordings, HLSs, and RTMPs will have the same prebuilt UI recorded
- But, for some applications they need custom UI for their recording, in that case custom template feature comes into the picture
How to build Custom Template ?
- Custom templates should be a web application and should be hosted on internet with TLS enabled (i.e. https://example.com/web-app-template/ should be enabled for that web-application)
- Also it will require some dynamic config for joining the meeting, hence the config will be passed via url query parameters.
- Basic config parameters might be like this:
- meetingId
- token
- And the web-application should be able fetch those query parameters from url.
How to fetch URL parameters?
- Once that bot participant opens the web-application into the Server virtual tab, youw web-application code will be executed.
- While developing the web-application for custom template, you will hve to fetch the url parameters and then use those parameters while initializing the VideoSDK.
- You can use React SDK or Javascript SDK, as they support web application.
const url = new URLSearchParams(window.location.search);

const querParamsToken = url.get("token"); // get token from templateUrl queryParams
const querParamsMeetingId = url.get("meetingId"); // get meetingId from templateUrl queryParams
const querParamsParticipantId = url.get("participantId"); // get participantId from templateUrl queryParams
-
In the above code snippit you will be able to fetch the query parameters.
-
After fetching the query parameters you can pass those to initialize the SDK and render the UI according to your need.
// will use querParamsToken, querParamsMeetingId, querParamsParticipantId which was fetched from URL parameter.

window.VideoSDK.config(querParamsToken);

// Meeting Init
meeting = window.VideoSDK.initMeeting({
  meetingId: querParamsMeetingId,
  participantId: querParamsParticipantId,
  name: "Recorder",
  micEnabled: false,
  webcamEnabled: false,
});
- After initializing the VideoSDK. The whole UI is in your control hence you will have to render the UI according to the applications need. Such as grid management, custom overlay etc.
- Whatever is displayed or rendered in that web-application, it will be composed by VideoSDK Encoders and will be processed into MP4, or HLS or RTMP livestream.
- After whole UI and the Web-application is ready you will have to host that web-application on the internet publically.
Using Custom Web-Application as template UI for Recording
- After host this web-application on internet and, for example, this is the utl when that application was hosted =>
https://example.com/web-app-template/ - After the query parameters attachment that url will be like this,
https://example.com/web-app-template/?meetingId=afsd-c2l0-fml0&token=eyJhbGciOiJIUzI1NiIsInR5cCI6IkpXVCJ9.l0sImlhdCI6MTY0OTkyNjI1MCwiZXhwIjoxNjwNTMxMDUwf - This will be the url you will be using for custom template url
const startRecording = () => {
    const options = {
      method: "POST",
      headers: {
        Authorization: "$YOUR_TOKEN", // this token is for authenticate rest api
        "Content-Type": "application/json",
      },
      body: {
        roomId: "afsd-c2l0-fml0",
        // Add templateUrl here
        templateUrl:
          "https://example.com/web-app-template/?meetingId=afsd-c2l0-fml0&token=eyJhbGciOiJIUzI1NiIsInR5cCI6IkpXVCJ9.l0sImlhdCI6MTY0OTkyNjI1MCwiZXhwIjoxNjwNTMxMDUwf",
      },
    };

    const url = `https://api.videosdk.live/v2/recordings/start`;

    const response = await fetch(url, options);

    const data = await response.json();
    console.log(data);
}

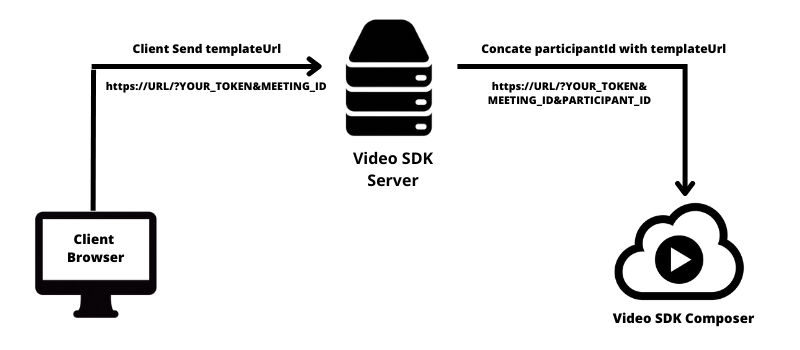
- After invoking this endpoint for starting the recording, VideoSDK servers will recieve this url and then VideoSDK server will attach another URL parameter called
participanId. participanIdshould be generated by VideoSDK servers then only VideoSDK server will know that the new joining participant is a Recorder Bot Participant, then only VideoSDK will not show this new bot participant with other joined participants.- Lets say the
participanIdgenerated by VideoSDK server is =>kmk0ljmmlml. - Hence, after attaching the
participantIdwith the url provided by you while invoking start recording, the resultant url will be like this =>https://example.com/web-app-template/?meetingId=afsd-c2l0-fml0&token=eyJhbGciOiJIUzI1NiIsInR5cCI6IkpXVCJ9.l0sImlhdCI6MTY0OTkyNjI1MCwiZXhwIjoxNjwNTMxMDUwf&participantId=kmk0ljmmlml - Now, the bot participant will be joining the above mentioned url to the web-application inside VideoSDK composition servers. And the UI created by you web-application will be rendered and will be Encoded into MP4 or HLS or RTMP Livestreaming.
note
-
During the Meeting init, you can't modify recorder
participantId, because it will affect the Video SDK Composer to record / HLS / Livestream of the meeting. -
Do make sure these changes should be in the live environment, otherwise, Video SDK Composer will not able to record / HLS / Livestream of the meeting.
- You can also follow this code sample for React JS.videosdk-custom-recording-template-react-example
Got a Question? Ask us on discord