Quick Start - Flutter
VideoSDK enables the opportunity to integrate video & audio calling to Web, Android, IOS applications. It provides Programmable SDKs and REST APIs to build scalable video conferencing applications.
This guide will get you running with the VideoSDK video & audio calling in minutes.
Prerequisites
Before proceeding, ensure that your development environment meets the following requirements:
- Video SDK Developer Account (Not having one, follow Video SDK Dashboard)
- The basic understanding of Flutter.
- Flutter Video SDK
- Have Flutter installed on your device.
One should have a VideoSDK account to generate token. Visit VideoSDK dashboard to generate token
Getting Started with the Code!
Follow the steps to create the environment necessary to add video calls into your app.
Create a new Flutter project.
Create a new Flutter App using the below command.
$ flutter create videosdk_flutter_quickstart
Install Video SDK
Install the VideoSDK using the below-mentioned flutter command. Make sure you are in your flutter app directory before you run this command.
$ flutter pub add videosdk

//run this command to add http library to perform network call to generate meetingId
$ flutter pub add http
Structure of the project
Your project structure should look like this.
    root
    ├── android
    ├── ios
    ├── lib
         ├── api.dart
         ├── join_screen.dart
         ├── main.dart
         ├── meeting_controls.dart
         ├── meeting_screen.dart
         ├── participant_tile.dart
    .
We are going to create flutter widgets (JoinScreen, MeetingScreen, MeetingControls, ParticipantTile).
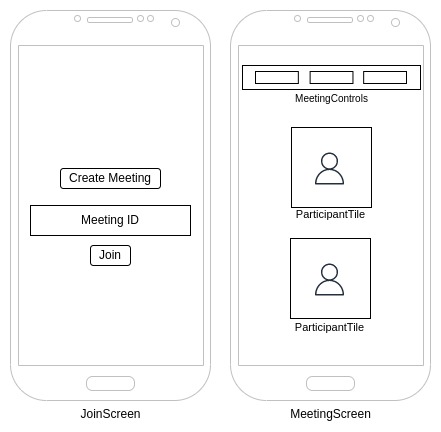
App Structure
App widget will contain JoinScreen and MeetingScreen widget. MeetingScreen will have MeetingControls and ParticipantTile widget.
Configure Project
For Android
Update the AndroidManifest.xml for the permissions we will be using to implement the audio and video features. You can find the AndroidManifest.xml file at
<project root>/android/app/src/main/AndroidManifest.xml
<uses-feature android:name="android.hardware.camera" />
<uses-feature android:name="android.hardware.camera.autofocus" />
<uses-permission android:name="android.permission.CAMERA" />
<uses-permission android:name="android.permission.RECORD_AUDIO" />
<uses-permission android:name="android.permission.ACCESS_NETWORK_STATE" />
<uses-permission android:name="android.permission.CHANGE_NETWORK_STATE" />
<uses-permission android:name="android.permission.MODIFY_AUDIO_SETTINGS" />
<uses-permission android:name="android.permission.INTERNET"/>
Also you will need to set your build settings to Java 8 because the official WebRTC jar now uses static methods in EglBase interface. Just add this to your app-level build.gradle
android {
    //...
    compileOptions {
        sourceCompatibility JavaVersion.VERSION_1_8
        targetCompatibility JavaVersion.VERSION_1_8
    }
}
If necessary, in the same build.gradle you will need to increase minSdkVersion of defaultConfig up to 23 (currently default Flutter generator set it to 16).
If necessary, in the same build.gradle you will need to increase compileSdkVersion and targetSdkVersion up to 31 (currently default Flutter generator set it to 30).
For iOS
Add the following entries which allow your app to access the camera and microphone to your Info.plist file, located in
<project root>/ios/Runner/Info.plist:
<key>NSCameraUsageDescription</key>
<string>$(PRODUCT_NAME) Camera Usage!</string>
<key>NSMicrophoneUsageDescription</key>
<string>$(PRODUCT_NAME) Microphone Usage!</string>
Step 1: Get started with api.dart
Before jumping to anything else, you will write a function to generate a unique meetingId. You will require auth token, you can generate it using either by using videosdk-rtc-api-server-examples or generate it from the Video SDK Dashboard for development.
import 'dart:convert';
import 'package:http/http.dart' as http;

String token = "<Generated-from-dashboard>";

Future<String> createMeeting() async {
  final http.Response httpResponse = await http.post(
    Uri.parse("https://api.videosdk.live/v2/rooms"),
    headers: {'Authorization': token},
  );

  return json.decode(httpResponse.body)['roomId'];
}
Step 2 : Creating the JoinScreen
Let's create join_screen.dart file in lib directory and create JoinScreen StateLessWidget.
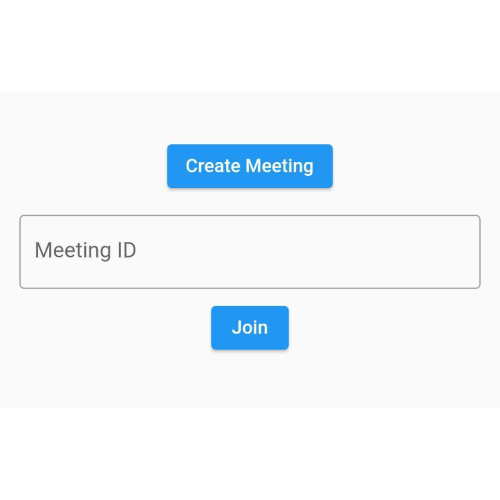
The JoinScreen will consist of:
- Create Meeting Button - This button will create a new meeting for you.
- Meeting ID TextField - This text field will contain the meeting ID, you want to join.
- Join Button - This button will join the meeting, which you have provided.
JoinScreen will accept 3 functions in constructor.
- onCreateMeetingButtonPressed - invoked when Create Meeting button pressed
- onJoinMeetingButtonPressed - invoked when Join button pressed
- onMeetingIdChanged - invoked when MeetingId TextField value changed
import 'package:flutter/material.dart';

class JoinScreen extends StatelessWidget {
  final void Function() onCreateMeetingButtonPressed;
  final void Function() onJoinMeetingButtonPressed;
  final void Function(String) onMeetingIdChanged;

  const JoinScreen({
    Key? key,
    required this.onCreateMeetingButtonPressed,
    required this.onJoinMeetingButtonPressed,
    required this.onMeetingIdChanged,
  }) : super(key: key);

  @override
  Widget build(BuildContext context) {
    return Column(
      mainAxisAlignment: MainAxisAlignment.center,
      children: [
        ElevatedButton(
            child: const Text("Create Meeting"),
            onPressed: onCreateMeetingButtonPressed),
        const SizedBox(height: 16),
        TextField(
            decoration: const InputDecoration(
              hintText: "Meeting ID",
              border: OutlineInputBorder(),
            ),
            onChanged: onMeetingIdChanged),
        const SizedBox(height: 8),
        ElevatedButton(
          child: const Text("Join"),
          onPressed: onJoinMeetingButtonPressed,
        )
      ],
    );
  }
}
Output
Step 3 : Creating the MeetingControls
Let's create meeting_controls.dart file and create MeetingControls StateLess Widget.
The MeetingControls will consist of:
- Leave Button - This button will leave the meeting.
- Toggle Mic Button - This button will enable or disable mic.
- Toggle Webcam Button - This button will enable or disable Webcam.
MeetingControls will accept 3 functions in constructor
- onLeaveButtonPressed - invoked when Leave button pressed
- onToggleMicButtonPressed - invoked when Toggle Mic button pressed
- onToggleWebcamButtonPressed - invoked when Toggle Webcam button pressed
import 'package:flutter/material.dart';

class MeetingControls extends StatelessWidget {
  final void Function() onToggleMicButtonPressed;
  final void Function() onToggleWebcamButtonPressed;
  final void Function() onLeaveButtonPressed;

  const MeetingControls({
    Key? key,
    required this.onToggleMicButtonPressed,
    required this.onToggleWebcamButtonPressed,
    required this.onLeaveButtonPressed,
  }) : super(key: key);

  @override
  Widget build(BuildContext context) {
    return Row(
      mainAxisAlignment: MainAxisAlignment.spaceAround,
      children: [
        ElevatedButton(
          child: const Text("Leave"),
          onPressed: onLeaveButtonPressed,
        ),
        ElevatedButton(
          child: const Text("Toggle Mic"),
          onPressed: onToggleMicButtonPressed,
        ),
        ElevatedButton(
          child: const Text("Toggle WebCam"),
          onPressed: onToggleWebcamButtonPressed,
        )
      ],
    );
  }
}
Output

Step 4 : Creating ParticipantTile
Let's create participant_tile.dart file and create ParticipantTile StateLess Widget.
The ParticipantTile will consist of:
- RTCVideoView - This will show remote participant video stream.
ParticipantTile will accept Stream in constructor
- stream - remote participant video stream
import 'package:flutter/material.dart';
import 'package:videosdk/rtc.dart';

class ParticipantTile extends StatelessWidget {
  final Stream stream;
  const ParticipantTile({
    Key? key, required this.stream,
  }) : super(key: key);

  @override
  Widget build(BuildContext context) {
    return Padding(
      padding: const EdgeInsets.all(8.0),
      child: SizedBox(
        height: 200,
        width: 200,
        child: RTCVideoView(
          stream.renderer!,
          objectFit: RTCVideoViewObjectFit.RTCVideoViewObjectFitCover,
        ),
      ),
    );
  }
}
Step 5 : Creating the MeetingScreen
Let's create meeting_screen.dart file and create MeetingScreen StateFul Widget.
The MeetingScreen will consist of:
- MeetingBuilder - This will build
Meetingbased on given configuration.
MeetingScreen will accept meetingId and token in constructor
- meetingId - meetingId, you want to join
- token - VideoSdk Auth token
import 'package:flutter/material.dart';
import 'package:videosdk/rtc.dart';
import 'meeting_controls.dart';
import 'participant_tile.dart';

class MeetingScreen extends StatefulWidget {
  final String meetingId;
  final String token;
  final void Function() leaveMeeting;

  const MeetingScreen(
      {Key? key,
      required this.meetingId,
      required this.token,
      required this.leaveMeeting})
      : super(key: key);

  @override
  State<MeetingScreen> createState() => _MeetingScreenState();
}

class _MeetingScreenState extends State<MeetingScreen> {
  Map<String, Stream?> participantVideoStreams = {};

  bool micEnabled = true;
  bool webcamEnabled = true;

  void setParticipantStreamEvents(Participant participant) {
    participant.on(Events.streamEnabled, (Stream stream) {
      if (stream.kind == 'video') {
        setState(() => participantVideoStreams[participant.id] = stream);
      }
    });

    participant.on(Events.streamDisabled, (Stream stream) {
      if (stream.kind == 'video') {
        setState(() => participantVideoStreams.remove(participant.id));
      }
    });
  }

  void setMeetingEventListener(Meeting _meeting) {
    setParticipantStreamEvents(_meeting.localParticipant);
    _meeting.on(
      Events.participantJoined,
      (Participant participant) => setParticipantStreamEvents(participant),
    );
    _meeting.on(Events.participantLeft, (String participantId) {
      if (participantVideoStreams.containsKey(participantId)) {
        setState(() => participantVideoStreams.remove(participantId));
      }
    });
    _meeting.on(Events.meetingLeft, () {
      participantVideoStreams.clear();
      widget.leaveMeeting();
    });
  }

  @override
  Widget build(BuildContext context) {
    return MeetingBuilder(
      meetingId: widget.meetingId,
      token: widget.token,
      micEnabled: micEnabled,
      webcamEnabled: webcamEnabled,
      displayName: "Yash Chudasama",
      notification: const NotificationInfo(
          title: "Video SDK",
          message: "Video SDK is sharing screen in the meeting",
          icon: "notification_share"),
      builder: (_meeting) {
        setMeetingEventListener(_meeting);
        return SingleChildScrollView(
          child: Column(
            crossAxisAlignment: CrossAxisAlignment.center,
            children: [
              Text("Meeting ID: ${widget.meetingId}"),
              MeetingControls(
                onToggleMicButtonPressed: () {
                  micEnabled ? _meeting.muteMic() : _meeting.unmuteMic();
                  micEnabled = !micEnabled;
                },
                onToggleWebcamButtonPressed: () {
                  webcamEnabled
                      ? _meeting.disableWebcam()
                      : _meeting.enableWebcam();
                  webcamEnabled = !webcamEnabled;
                },
                onLeaveButtonPressed: () => _meeting.leave(),
              ),
              ...participantVideoStreams.values
                  .map(
                    (e) => ParticipantTile(
                      stream: e!,
                    ),
                  )
                  .toList(),
            ],
          ),
        );
      },
    );
  }
}
Step 6 : Change main.dart
Let's change main.dart file.
Remove boilerplate code from the main.dart. Create VideoSDKQuickStart StatefulWidget and pass it to MaterialApp.
VideoSDKQuickStart widget will return MeetingScreen if meeting is active, otherwise return JoinScreen.
import 'package:flutter/material.dart';
import 'api.dart';
import 'join_screen.dart';
import 'meeting_screen.dart';

void main() {
  runApp(
    const MaterialApp(
      title: 'VideoSDK QuickStart',
      home: VideoSDKQuickStart(),
    ),
  );
}

class VideoSDKQuickStart extends StatefulWidget {
  const VideoSDKQuickStart({Key? key}) : super(key: key);

  @override
  State<VideoSDKQuickStart> createState() => _VideoSDKQuickStartState();
}

class _VideoSDKQuickStartState extends State<VideoSDKQuickStart> {
  String meetingId = "";
  bool isMeetingActive = false;

  @override
  Widget build(BuildContext context) {
    return Scaffold(
      appBar: AppBar(
        title: const Text("VideoSDK QuickStart"),
      ),
      body: Padding(
        padding: const EdgeInsets.all(16.0),
        child: isMeetingActive
            ? MeetingScreen(
                meetingId: meetingId,
                token: token,
                leaveMeeting: () {
                  setState(() => isMeetingActive = false);
                },
              )
            : JoinScreen(
                onMeetingIdChanged: (value) => meetingId = value,
                onCreateMeetingButtonPressed: () async {
                  meetingId = await createMeeting();
                  setState(() => isMeetingActive = true);
                },
                onJoinMeetingButtonPressed: () {
                  setState(() => isMeetingActive = true);
                },
              ),
      ),
    );
  }
}
Run and Test
The app is all set to test. Make sure to update the token in api.dart
Your app should look like this after the implementation.
For the tutorial purpose, we used a static token to initialize and join the meeting. But for the production version of the app, we recommend you use an Authentication Server that will generate and pass on the token to the Client App. For more details checkout how to do server setup.
Got a Question? ![]() Ask us on discord
Ask us on discord

