Share screen - Flutter iOS
iOS requires you to add a Broadcast Upload Extension to capture the screen of the device. The extension sends the screen to your app through an App Group that both of them share.
Screen share needs the same minimum iOS version as the rest of the SDK. See Supported Browser and Device OS. iOS shares the screen without audio: the withAudio option of VideoSDK.createScreenShareVideoTrack() works on Android only.
Create Broadcast Upload Extension in iOS
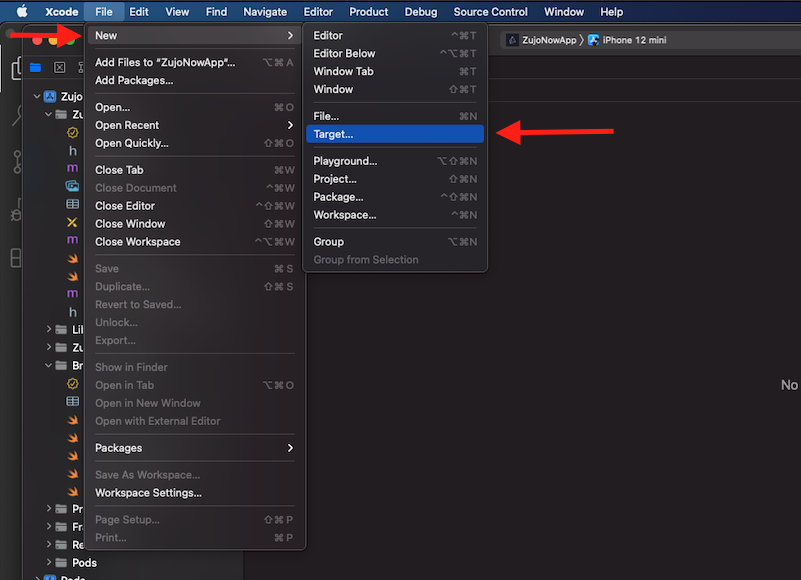
Step 1 : Open Target
Open your project with xcode, select File > New > Target in menu bar.
Step 2 : Select Target
Choose Broadcast Upload Extension, and click next.
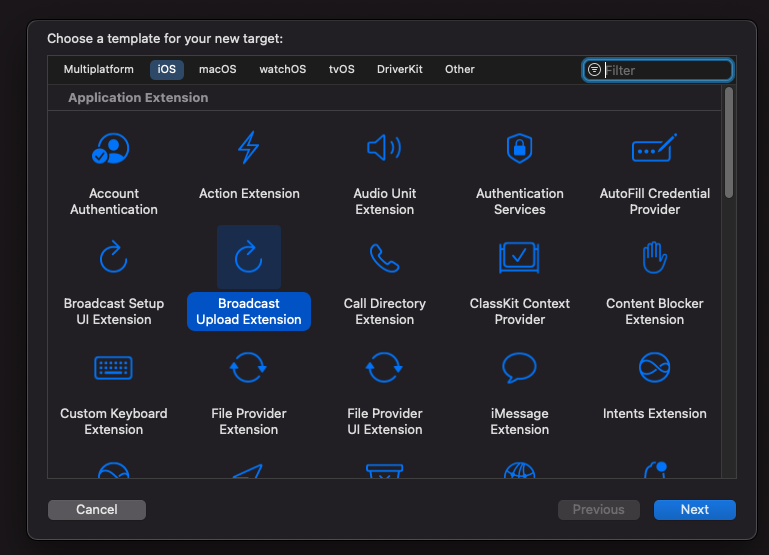
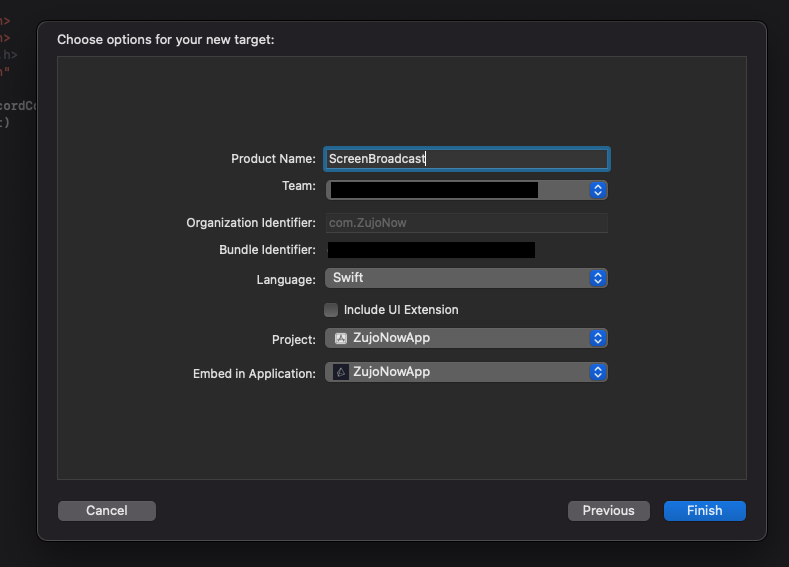
Step 3 : Configure Broadcast Upload Extension
Enter extensions name in Product Name field, choose team from dropdown, Uncheck include UI extension field and click finish.
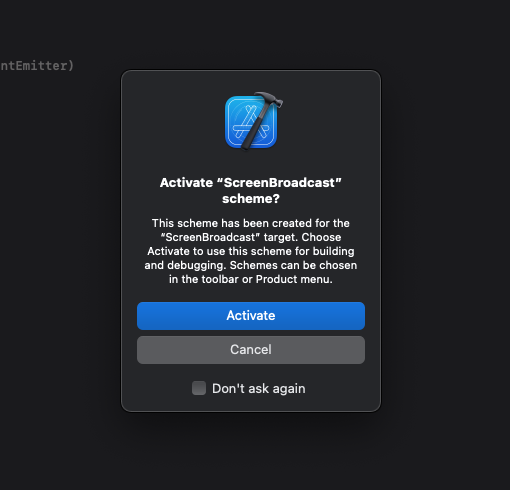
Step 4 : Activate Extension scheme
You will be prompted Activate "Your-Extension-name" scheme? pop-up, click activate.
Now, broadcast folder will appear in xcode left side bar.
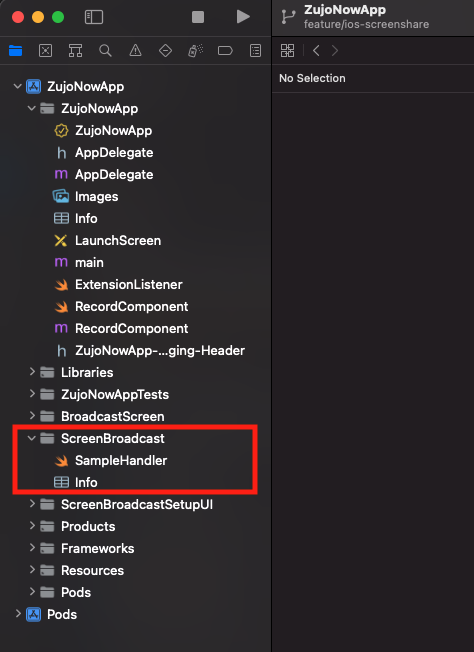
Then open the General tab of the extension target and set Minimum Deployments to the same iOS version as your Runner target.
Step 5 : Add External file in Created Extension
Open videosdk-rtc-flutter-sdk-example, Copy SampleUploader.swift, SocketConnection.swift, DarwinNotificationCenter.swift, and Atomic.swift files to your extension's folder and make sure they're added to the target.
These files send the screen to your app over a socket in the shared App Group container. An older extension built on ScreenShareRing.swift sends no video with v5.0.0.
Step 6 : Update SampleHandler.swift file
Open SampleHandler.swift and Copy SampleHandler.swift file content and paste it to your extensions SampleHandler.swift file.
When your app stops the screen share, the SDK asks the extension to end the broadcast with the iOS_StopBroadcastRequested notification. Add the following to SampleHandler.swift, so that disableScreenShare() also ends the broadcast on the device:
class SampleHandler: RPBroadcastSampleHandler {
    // ...the code you copied from the example...

    private let finishLock = NSLock()
    private var finishing = false

    override func broadcastStarted(withSetupInfo setupInfo: [String: NSObject]?) {
        // ...the existing code...
        observeStopRequest()
    }

    override func broadcastFinished() {
        CFNotificationCenterRemoveEveryObserver(
            CFNotificationCenterGetDarwinNotifyCenter(),
            Unmanaged.passUnretained(self).toOpaque())
        // ...the existing code...
    }

    // Ends the broadcast when your app stops the screen share.
    private func observeStopRequest() {
        CFNotificationCenterAddObserver(
            CFNotificationCenterGetDarwinNotifyCenter(),
            Unmanaged.passUnretained(self).toOpaque(),
            { _, observer, _, _, _ in
                guard let observer = observer else { return }
                Unmanaged<SampleHandler>.fromOpaque(observer).takeUnretainedValue().finishOnce()
            },
            "iOS_StopBroadcastRequested" as CFString,
            nil,
            .deliverImmediately)
    }

    // The request can arrive more than once, so finish only once.
    private func finishOnce() {
        finishLock.lock()
        let alreadyFinishing = finishing
        finishing = true
        finishLock.unlock()
        guard !alreadyFinishing else { return }
        finishBroadcastWithError(NSError(
            domain: RPRecordingErrorDomain,
            code: 10001,
            userInfo: [NSLocalizedDescriptionKey: "Screen sharing stopped"]))
    }
}
Step 7 : Add Capability in App
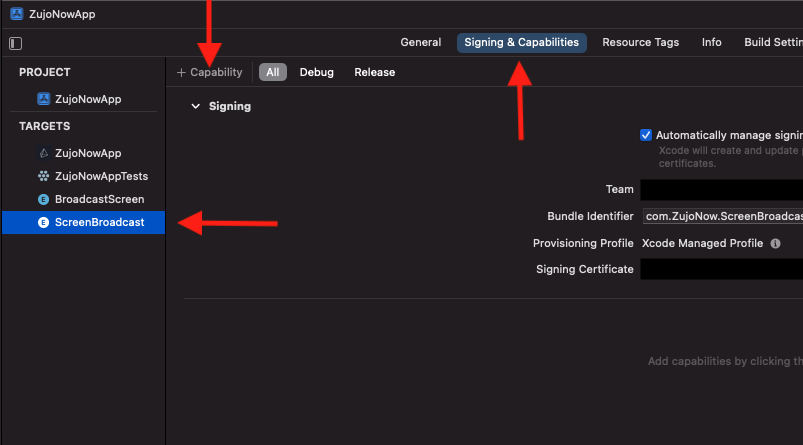
In Xcode, go to YourappName > Signing & Capabilities. and click on +Capability to configure app group.
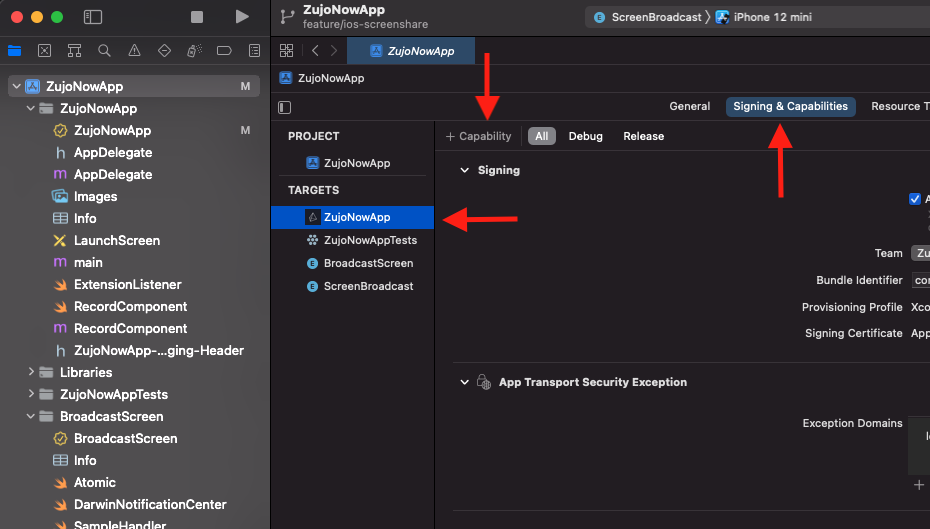
Select App Groups from list
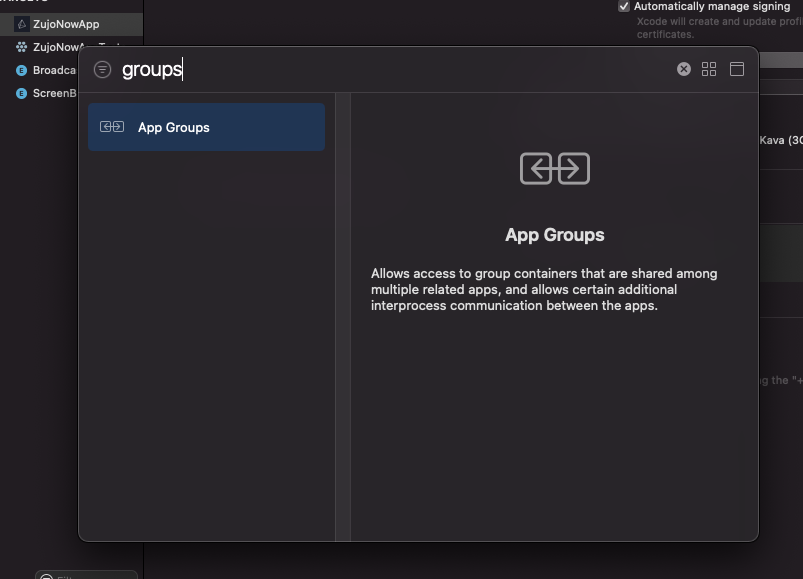
After that, you have to select or add generated app group id which you have created before.
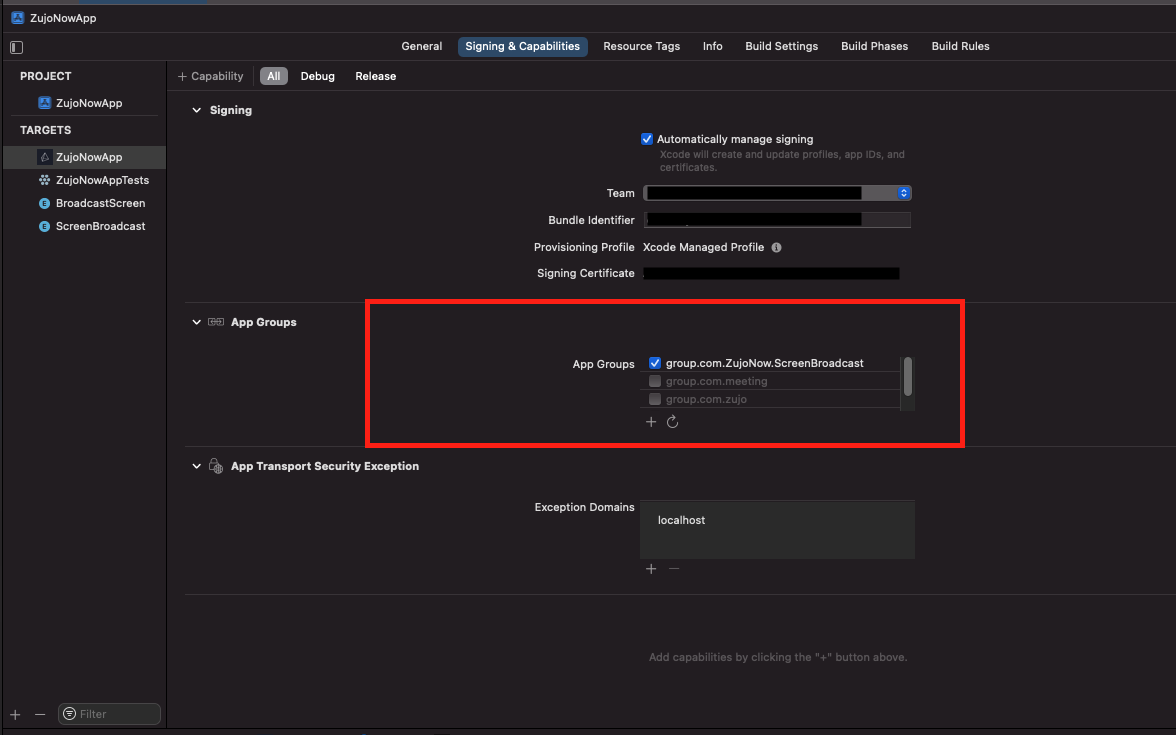
Step 8 : Add Capability in Extension
Go to Your-Extension-Name > Signing & Capabilities and configure App Group functionality which we had perform in previous steps. (Group id should be same for both targets)
Step 9 : Add App Group Id in Extension File
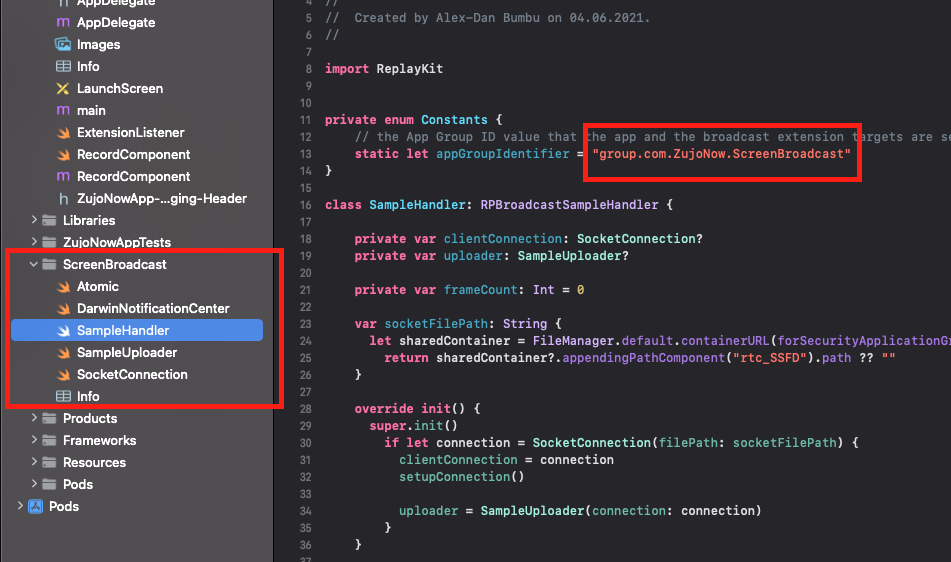
Go to extensions SampleHandler.swift file and paste your group Id in appGroupIdentifier constant.
Step 10 : Update App level info.plist file
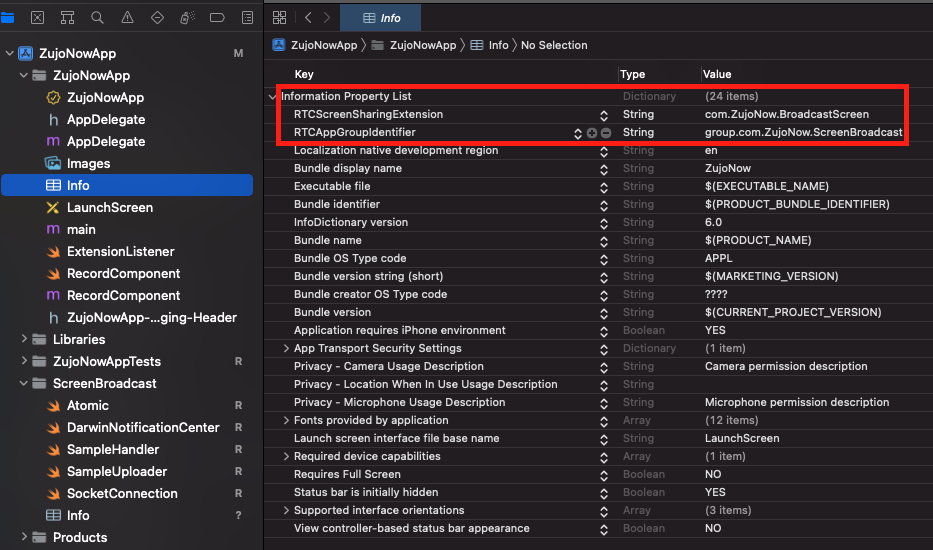
- Add a new key RTCScreenSharingExtension in Info.plist with the extension's Bundle Identifier as the value.
- Add a new key RTCAppGroupIdentifier in Info.plist with the extension's App groups Id as the value.
The extension's Bundle Identifier must start with your app's Bundle Identifier. For an app with the Bundle Identifier com.example.app, the two keys look like this:
<key>RTCScreenSharingExtension</key>
<string>com.example.app.FlutterBroadcast</string>
<key>RTCAppGroupIdentifier</key>
<string>group.com.example.app.ScreenBroadcast</string>
Note : For extension's Bundle Identifier, go to TARGETS > Your-Extension-Name > Signing & Capabilities .
Step 11 : Check the extension's info.plist file
The extension's own Info.plist must keep this entry:
<key>CFBundleIdentifier</key>
<string>$(PRODUCT_BUNDLE_IDENTIFIER)</string>
Without it, the build can fail with Embedded binary's bundle identifier is not prefixed with the parent app's.
If the iOS build fails with Cycle inside Runner, select the Runner target, open its Build Phases tab, and drag Embed Foundation Extensions above Run Script.
You can also check out extension example code on github
Enable Screen Share
- In order to start screen-sharing just call
room.enableScreenShare()method. - On iOS,
enableScreenShare()opens the system broadcast picker. The share starts when the user taps Start Broadcast. If the user closes the picker, callenableScreenShare()again to open it again. - Without a track, the share uses
CustomScreenShareTrackConfig.h720p_15fps. To choose another quality, create a track withVideoSDK.createScreenShareVideoTrack()and pass it ascustomTrack, as shown in Screen Share.
ElevatedButton(
    child: Text("Start ScreenSharing"),
    onPressed: () async {
        try {
            await room.enableScreenShare();
        } on VideoSDKError catch (error) {
            print("enableScreenShare failed: ${error.code} ${error.name}");
        }
    },
),
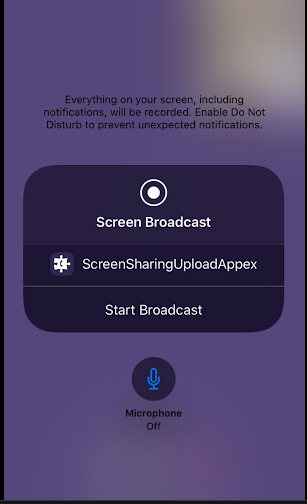
After clicking Start Broadcast button, we will be able to get the screen stream in session.
enableScreenShare() returns a Future that throws a VideoSDKError when the SDK refuses the call. It throws 3013 (ERROR_GET_DISPLAY_MEDIA) when the app is not set up for screen sharing: Info.plist has no RTCScreenSharingExtension or RTCAppGroupIdentifier key, or the app is not in that App Group. Check Steps 7 to 10.
Disable Screen Share
By using room.disableScreenShare() function, a participant can stop publishing screen stream to other participants. With the SampleHandler.swift change from Step 6, it also ends the broadcast on the device.
ElevatedButton(
    child: Text("Stop ScreenSharing"),
    onPressed: () async {
        try {
            await room.disableScreenShare();
        } on VideoSDKError catch (error) {
            print("disableScreenShare failed: ${error.code} ${error.name}");
        }
    },
),
When the user stops the broadcast from Control Center, the SDK ends the screen share for you, so you do not need to call disableScreenShare().
Got a Question?  Ask us on discord

