Optimize Video Tracks - Flutter
While optimizing for the best viewing experience, it is necessary to fine-tune the video tracks that are being used during the calls.
For the best fine-tuning experience, we have introduced the ability to pass a custom video track for the participant's media before and during the meeting.
Custom Video Track
This feature can be used to add custom video encoder configurations and background removal & video filter from external libraries and send it to other participants.
Once you set a custom video track created using createCameraVideoTrack(), VideoSDK remembers its settings and automatically reuses them whenever the webcam is turned back on. To change the track configuration, call disableCam(), then pass a new track created using createCameraVideoTrack() to enableCam(). VideoSDK preserves only tracks created using createCameraVideoTrack(). Filters applied through external SDKs or packages for virtual background are not preserved and must be re-applied each time the webcam is re-enabled.
How to Create a Custom Video Track ?
-
You can create a Video Track using
createCameraVideoTrack()method ofVideoSDKclass. -
This method can be used to create video track by specifying parameters like video resolution, camera facing mode, and the quality controls (
bitrateModeandmaxLayer). -
The video resolutions listed below are
common encoderconfiguration options supported acrossAll Platforms.
| Encoder Config | Resolution | Frame Rate | Optimized (kbps) | Balanced (kbps) | High Quality (kbps) |
|---|---|---|---|---|---|
| h144p_w192p | 192x144 | 15 fps | 60 | 100 | 150 |
| h240p_w320p | 320x240 | 15 fps | 120 | 200 | 350 |
| h480p_w640p | 640x480 | 25 fps | 300 | 500 | 750 |
| h720p_w960p | 960x720 | 30 fps | 800 | 1200 | 1600 |
| h1080p_w1440p | 1440x1080 | 30 fps | 1600 | 2200 | 2700 |
| h360p_w640p | 640x360 | 20 fps | 200 | 400 | 600 |
| h720p_w1280p | 1280x720 | 30 fps | 1000 | 1500 | 2000 |
| h1080p_w1440p | 1280x720 | 30 fps | 1600 | 2300 | 2700 |
- The video resolutions listed below are additional encoder configuration options available specifically for
Web applications.
| Encoder Config | Resolution | Frame Rate | Optimized (kbps) | Balanced (kbps) | High Quality (kbps) |
|---|---|---|---|---|---|
| h120p_w160p | 160x120 | 15 fps | 60 | 100 | 150 |
| h180p_w240p | 240x180 | 15 fps | 100 | 150 | 250 |
| h360p_w480p | 480x360 | 20 fps | 200 | 400 | 600 |
| h540p_w720p | 720×540 | 30 fps | 350 | 650 | 800 |
| h1440p_w1920p | 1920×1440 | 30 fps | 3500 | 4000 | 4500 |
| h180p_w320p | 320x180 | 15 fps | 100 | 150 | 250 |
| h216p_w384p | 384x216 | 15 fps | 120 | 200 | 350 |
| h540p_w960p | 960x540 | 25 fps | 400 | 600 | 800 |
| h1440p_w2560p | 2560x1440 | 30 fps | 5000 | 5500 | 6000 |
| h2160p_w3840p | 3840x2160 | 30 fps | 8000 | 8500 | 9000 |
The below encoder configurations can also be used in mobile applications (Android and iOS). However, the actual video resolution may differ from the requested value due to device and hardware limitations. To obtain the exact resolution being used, refer to the supported video tracks available on the mobile application.
Above mentioned encoder configurations are valid for both, landscape as well as portrait mode.
Example
import 'package:videosdk/videosdk.dart';

CustomTrack? customTrack = await VideoSDK.createCameraVideoTrack(
  // It will be the id of the camera from which the video should be captured.
  cameraId:"camera-id", // OPTIONAL

  // This will accept the resolution (height x width) of video you want to capture.
  encoderConfig: CustomVideoTrackConfig.h720p_w1280p, // CustomVideoTrackConfig.h360p_w640p ... // Default : CustomVideoTrackConfig.h720p_w1280p

  // For Mobile browser It will specify whether to use front or back camera for the video track.
  facingMode: FacingMode.environment, // FacingMode.user,  Default : FacingMode.user

  // We will discuss this parameter in next step.
  multiStream: true, // false,  Default : true

  // Optional: This controls the video quality and bandwidth usage.
  bitrateMode: BitrateMode.HIGH_QUALITY, // "HIGH_QUALITY" | "BALANCED" , Default : BALANCED

  // Optional: This specifies the maximum number of simulcast layers (maxLayer) to publish.
  maxLayer: 2, // 3 , Default: 3

  // Optional: This specifies the video codec used to encode this track.
  codec: VideoCodec.VP8, // VideoCodec.H264 | VideoCodec.VP9 | VideoCodec.AV1 , Default : VideoCodec.VP8
);
The capabilities of the device have a significant impact on how custom track configurations behave. Assuming a case where you set encoder configuration to 1080p but the webcam only supports 720p, then encoder configuration will automatically switch to the highest resolution that the device can handle, which is 720p.
What is multiStream?
- This parameter specifies whether the stream should send multiple resolution layers or a single resolution layer. It is
trueby default.
Refer to the Simulcast (Adaptive Bitrate) guide for the layers a track publishes and for how participants select the layer they receive.
What is BitrateMode?
BitrateMode is the key setting for video quality. It lets you decide whether to prioritize sharp details, save internet data, or find a good balance between the two.
You can choose from three distinct modes:
bandwidth_optimized: Prioritizes lower bandwidth usage over video quality. Ideal for users with poor or unstable network conditions.balanced: The default setting. It provides a smart compromise between clear video and efficient bandwidth consumption, suitable for most use cases.high_quality: Prioritizes video quality over bandwidth usage. Use this when high-fidelity video is essential and viewers are expected to have strong network connections.
What is maxLayer?
- This parameter caps how many layers a track publishes, and accepts
2or3. It applies only whenmultiStreamistrue, and defaults to3.
Refer to the Simulcast (Adaptive Bitrate) guide for what each value publishes.
What is codec?
- This parameter specifies the video codec used to encode your stream. VideoSDK supports
VP8(default),H264,VP9, andAV1, set throughVideoCodec. - Currently, VideoSDK doesn't support
multiStreamforH264,VP9, andAV1.multiStreamdefaults totrue, so setmultiStream: falsewhen you create anH264,VP9, orAV1track. Otherwise VideoSDK sets it tofalsefor you and emits theERROR_MULTISTREAM_NOT_SUPPORTEDerror event.
Refer to the Video Codecs guide to compare the four codecs, to check which codec a meeting is actually using, and to handle the cases where a codec is not supported.
How to Setup a Custom Video Track ?
The custom track can be set up both before and after the initialization of the meeting.
- Setting up a Custom Track during the initialization of a meeting
- Setting up a Custom Track with methods
1. Setting up a Custom Track during the initialization of a meeting
If you are passing webcamEnabled: true in the createRoom and want to use custom tracks from start of the meeting, you can pass custom track in the customCameraVideoTrack as shown below.
Custom Track will not apply on webcamEnabled: false configuration.
Example
import 'package:flutter/material.dart';
import 'package:videosdk/videosdk.dart';

class MeetingScreen extends StatefulWidget {
  final String meetingId;
  final String token;

  const MeetingScreen(
      {super.key, required this.meetingId, required this.token});

  @override
  State<MeetingScreen> createState() => _MeetingScreenState();
}

class _MeetingScreenState extends State<MeetingScreen> {
  late Room _room;

  @override
  void initState() {
    initRoom();
    super.initState();
  }

  void initRoom() {
    //Creating Custom Video Track
    CustomTrack? videoTrack = await VideoSDK.createCameraVideoTrack(
      encoderConfig: CustomVideoTrackConfig.h720p_w960p,
      multiStream: true,
      bitrateMode: BitrateMode.HIGH_QUALITY,
      maxLayer: 2,
      codec: VideoCodec.VP8,
    );

    //Creating a new Room with custom audio track
    // create room
    _room = VideoSDK.createRoom(
      roomId: widget.meetingId,
      token: widget.token,
      displayName: "John Doe",
      micEnabled: true,
      camEnabled: true,
      defaultCameraIndex:
          1, // Index of MediaDevices will be used to set default camera
      customCameraVideoTrack: videoTrack, // custom video track :: optional
    );
  }

  @override
  Widget build(BuildContext context) {
    return YourMeetingWidget();
  }
}
2. Setting up a Custom Track with methods
In order to switch tracks during the meeting, you have to pass the CustomTrack in the enableCam() method of Room.
Make sure to call disableCam() before you create a new track as it may lead to unexpected behavior.
Example
import 'package:flutter/material.dart';
import 'package:videosdk/videosdk.dart';

class MeetingScreen extends StatefulWidget {
  final String meetingId;
  final String token;

  const MeetingScreen(
      {super.key, required this.meetingId, required this.token});

  @override
  State<MeetingScreen> createState() => _MeetingScreenState();
}

class _MeetingScreenState extends State<MeetingScreen> {
  late Room _room;

  @override
  void initState() {
    initRoom();
    super.initState();
  }

  void initRoom() {
    ...
  }

  @override
  Widget build(BuildContext context) {
    return Column(
      childern: [
        ElevatedButton(
          onPressed: ()async{
            //Creating Custom Video Track
            CustomTrack? videoTrack = await VideoSDK.createCameraVideoTrack(
                encoderConfig: CustomVideoTrackConfig.h720p_w960p,
                multiStream: true,
                bitrateMode: BitrateMode.HIGH_QUALITY,
                maxLayer: 2,
                codec: VideoCodec.VP8,
            );

            _room.enableCam(videoTrack);
            //higlight-end
          },
          child: const Text("Enable Cam with Custom Track"),
        ),
      ]
    )
  }
}
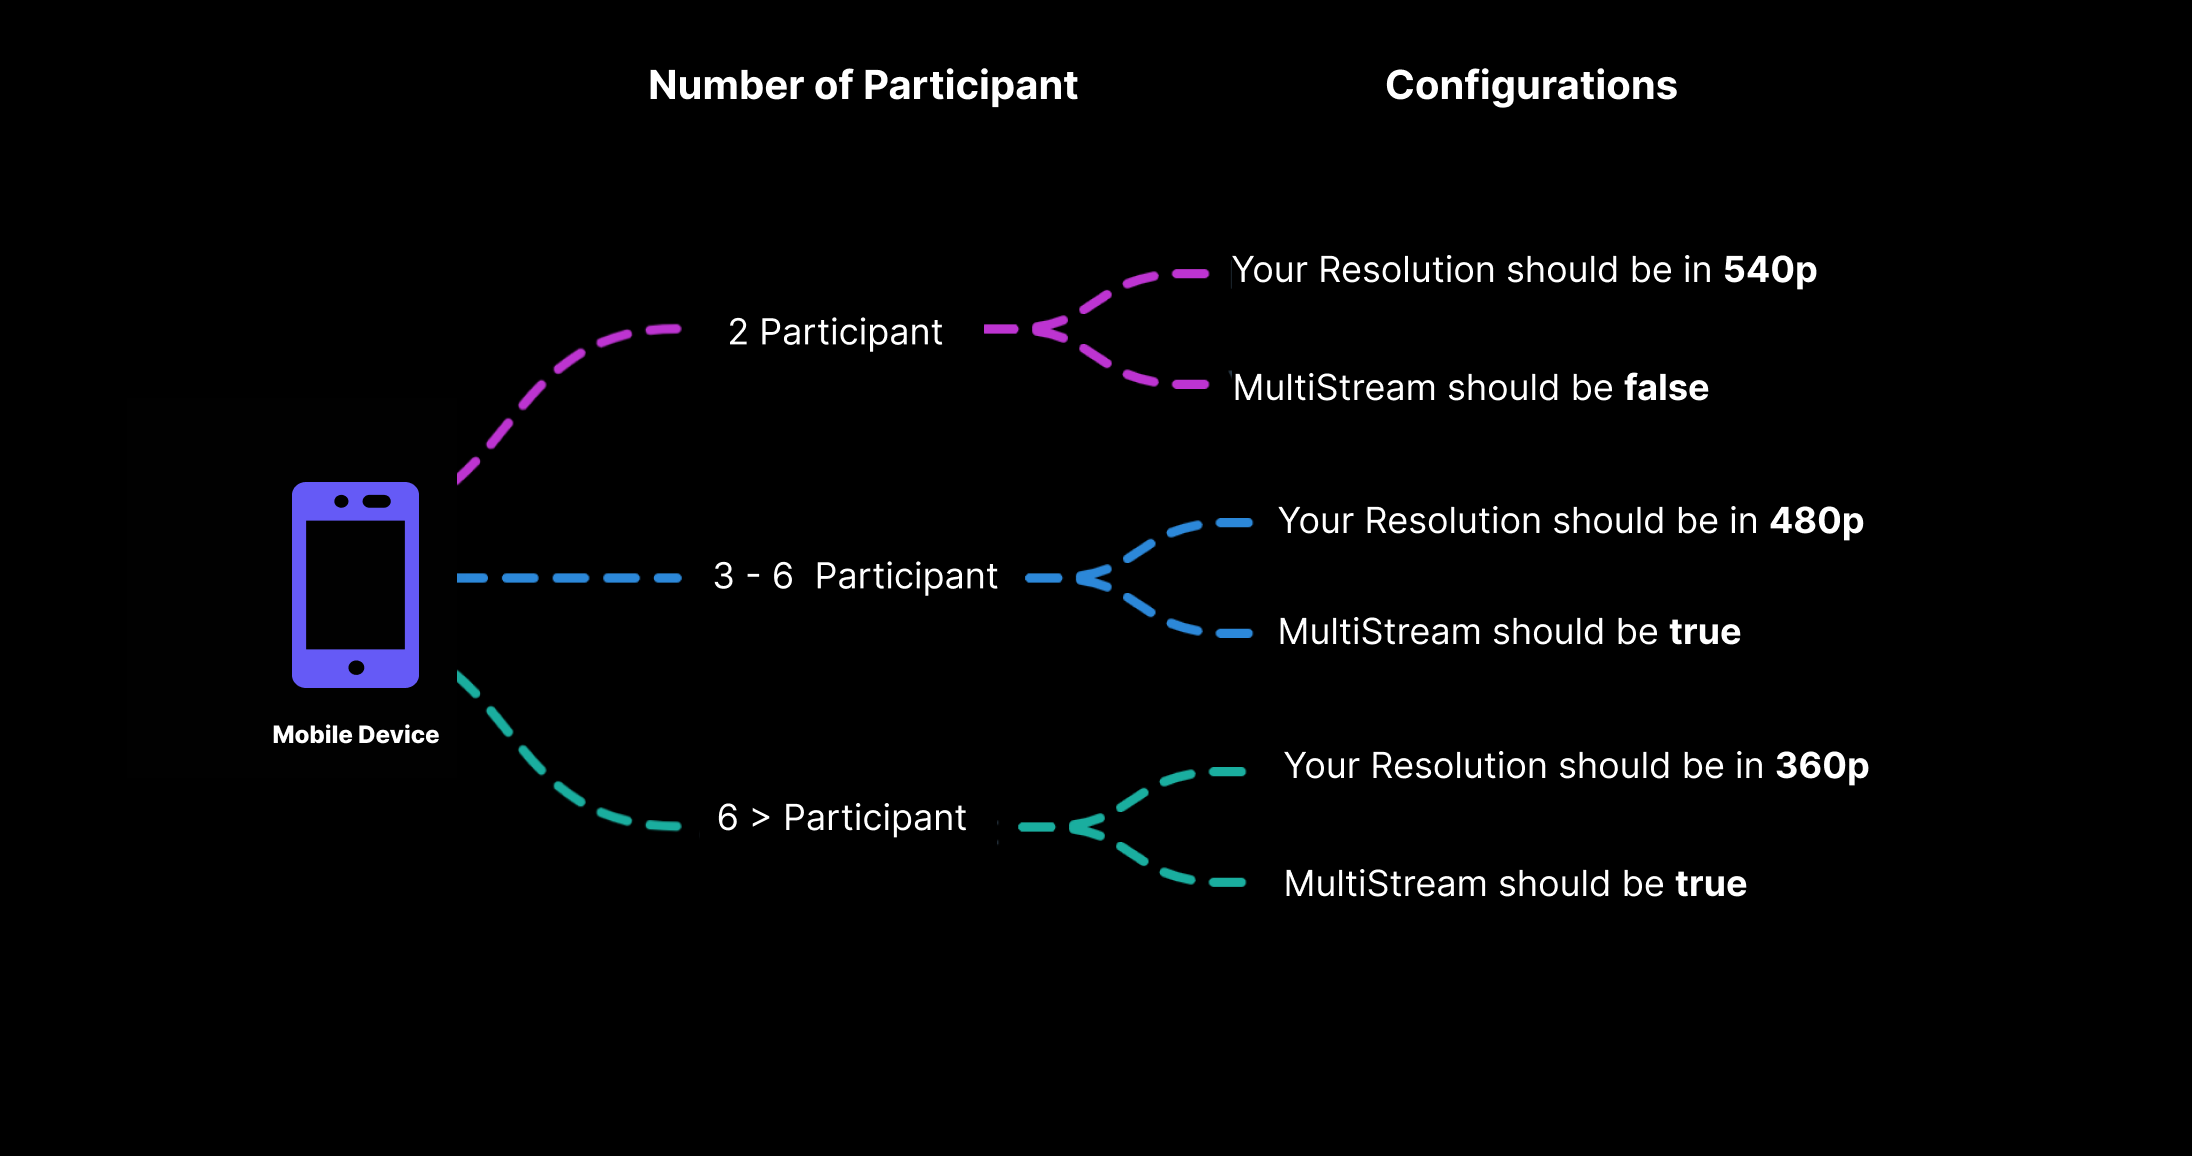
Which Configuration is suitable for Device ?
In this section, we will understand participant size wise encoder(Resolution) and multiStream configuration.
API Reference
The API references for all the methods and events utilised in this guide are provided below.
Got a Question?  Ask us on discord

