Picture-in-Picture Mode
Overview
Picture-in-Picture (PiP) mode enhances the video conferencing experience by allowing users to multitask while keeping a small, floating video window on their screen. This guide walks you through implementing PiP mode in Flutter using VideoSDK, covering both Android and iOS platforms—without relying on third-party dependencies.
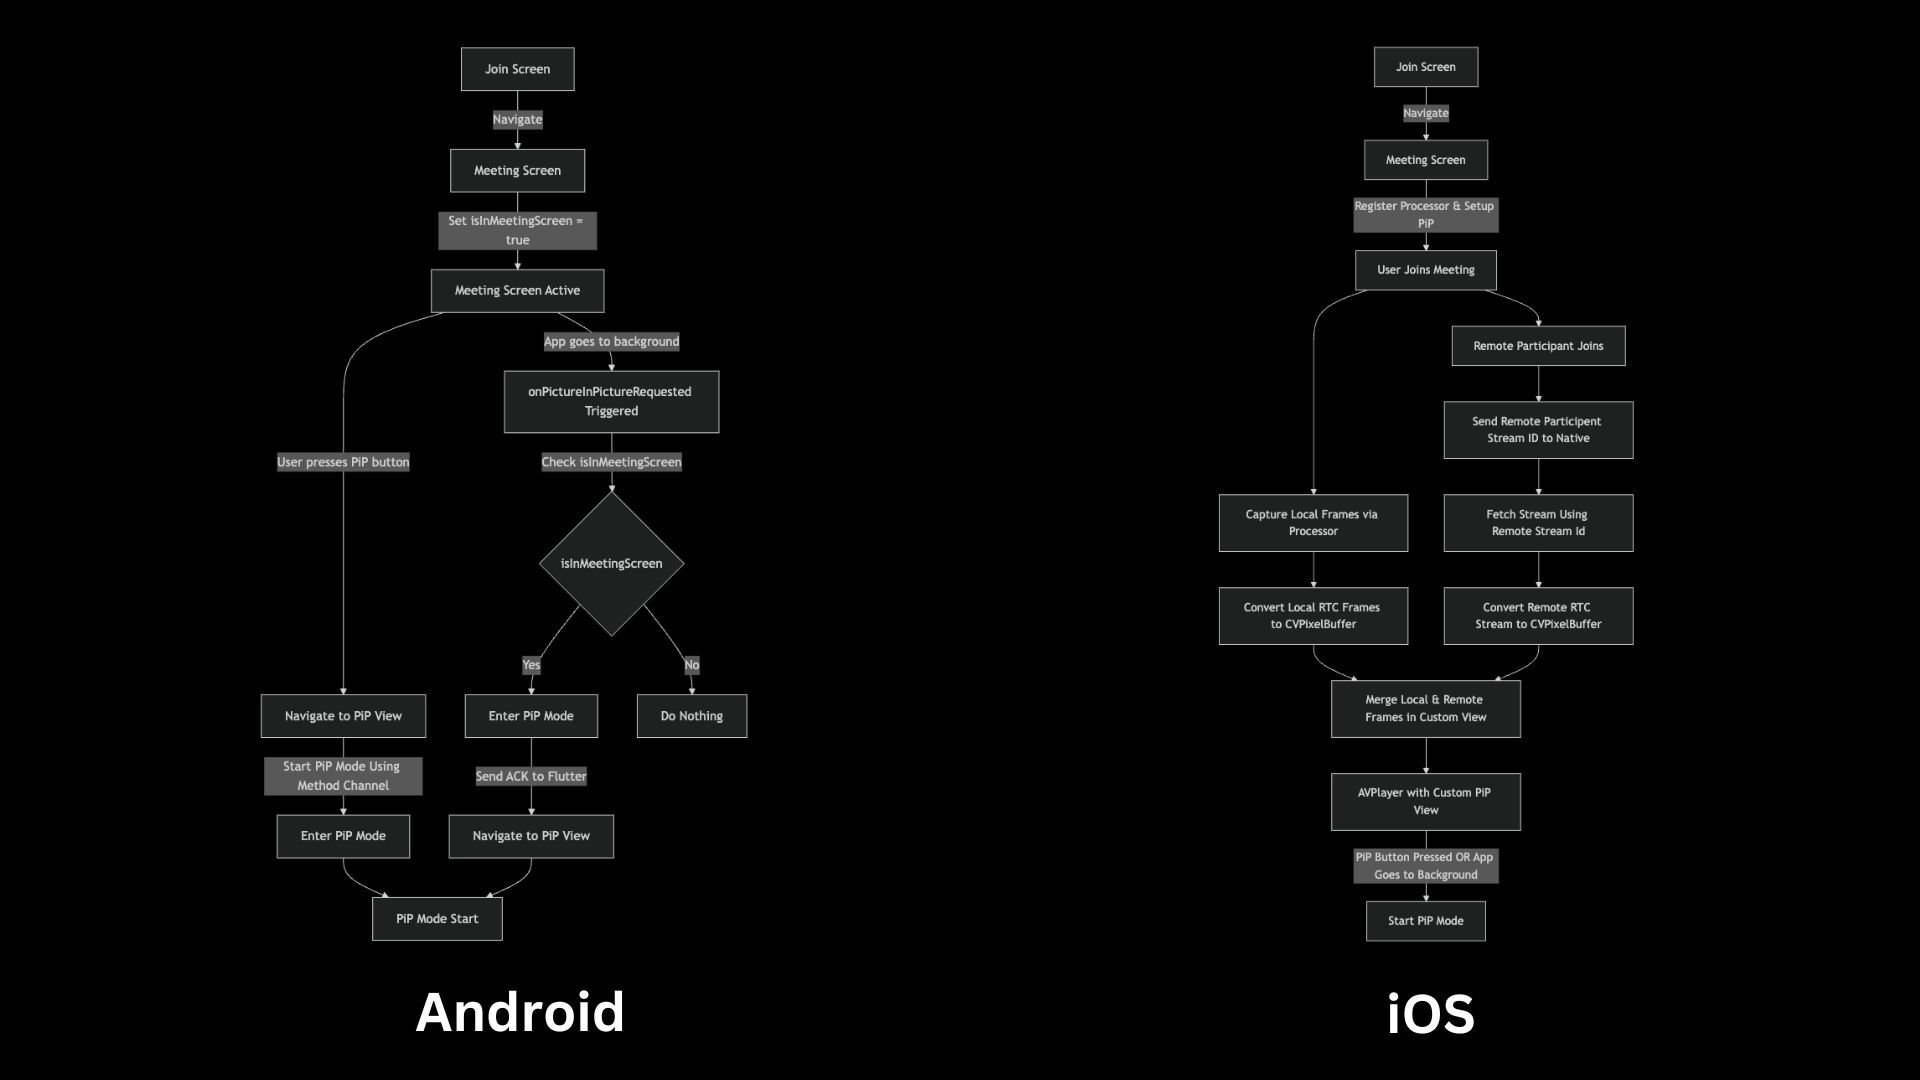
To enable PiP mode, native methods are used on both Android and iOS through the method channel. On Android, PiP mode is activated with the enterPictureInPictureMode() method. On iOS, the process involves capturing RTC frames natively, rendering them into a custom view with AVPlayer, and then utilizing that view to enable PiP functionality.
You can check out the complete implementation in the Github repository
Prerequisites
- Familiarity with method channels in Flutter.
- To implement PiP (Picture-in-Picture) mode, clone the Quick Start Repository and follow the implementation steps.
Architecture Diagram
Android Implementation
Step 1 : Configuring AndroidManifest.xml
To enable Picture-in-Picture (PiP) mode in your Flutter application, update the AndroidManifest.xml file with the necessary permissions and activity configurations:
<uses-permission android:name="android.permission.WAKE_LOCK" />
<uses-permission android:name="android.permission.SYSTEM_ALERT_WINDOW"/>
<uses-permission android:name="android.permission.PICTURE_IN_PICTURE"/>

<activity
    android:configChanges="orientation|screenSize|smallestScreenSize|screenLayout"
    android:supportsPictureInPicture="true">
</activity>
Step 2: Implementing PiP Mode
The native Android implementation utilizes the Picture-in-Picture (PiP) API to manage PiP mode effectively. The following methods play a crucial role in this implementation:
onPictureInPictureRequested(System-defined)
- Invoked when the system detects a request to enter PiP mode.
startPiPMode(Custom implementation)
- Manually initiates PiP mode with a 16:9 aspect ratio.
- It invokes
enterPictureInPictureMode()Method - This method attempts to put the activity into Picture-in-Picture mode, allowing it to continue displaying content in a small, resizable window when the user navigates away from the app.
package com.example.quick_start

import android.app.PictureInPictureParams
import android.os.Build
import android.os.Bundle
import android.util.Log
import android.util.Rational
import io.flutter.embedding.android.FlutterActivity
import io.flutter.embedding.engine.FlutterEngine
import io.flutter.plugin.common.MethodChannel

class MainActivity : FlutterActivity() {

    companion object {
        var instance: MainActivity? = null
    }

    // MethodChannel for Flutter-native communication
    private val Channel = "pip_channel"

    // Flag to track if the user is on the meeting screen
    private var isInMeetingScreen: Boolean = false

    override fun onCreate(savedInstanceState: Bundle?) {
        super.onCreate(savedInstanceState)
        instance = this
    }

    override fun configureFlutterEngine(flutterEngine: FlutterEngine) {
        super.configureFlutterEngine(flutterEngine)

        // Establish a MethodChannel for interaction with Flutter
        MethodChannel(flutterEngine.dartExecutor.binaryMessenger, Channel)
            .setMethodCallHandler { call, result ->
                when (call.method) {
                    "enterPiPMode" -> {
                        // Enter PiP mode upon request from Flutter
                        startPiPMode()
                        result.success(null)
                    }
                    "setMeetingScreen" -> {
                        // Update the meeting screen flag based on Flutter’s input
                        isInMeetingScreen = call.arguments as Boolean
                        result.success(null)
                    }
                    else -> result.notImplemented()
                }
            }
    }

    // Sends a message from Android to Flutter via MethodChannel
    private fun sendMessageToFlutter(message: String) {
        // Notify Flutter when PiP mode is activated
        MethodChannel(flutterEngine!!.dartExecutor.binaryMessenger, Channel)
            .invokeMethod("sendMessage", hashMapOf("message" to message))
    }

    // Handles system-triggered PiP requests
    override fun onPictureInPictureRequested(): Boolean {
        Log.d("MainActivity", "onPictureInPictureRequested: $isInMeetingScreen")

        // If the user is on the meeting screen, activate PiP mode and notify Flutter
        return if (isInMeetingScreen) {
            startPiPMode()
            sendMessageToFlutter("Done")
            true
        } else {
            super.onPictureInPictureRequested()
        }
    }

    // Initiates PiP mode
    private fun startPiPMode() {
        Log.d("MainActivity", "startPiPService")

        if (Build.VERSION.SDK_INT >= Build.VERSION_CODES.O) {
            // Ensure PiP mode is supported (Android 8.0+)
            val paramsBuilder = PictureInPictureParams.Builder()
                .setAspectRatio(Rational(16, 9)) // Define the PiP window aspect ratio
            this.enterPictureInPictureMode(paramsBuilder.build()) // Activate PiP mode
        }
    }
}
iOS Implementation
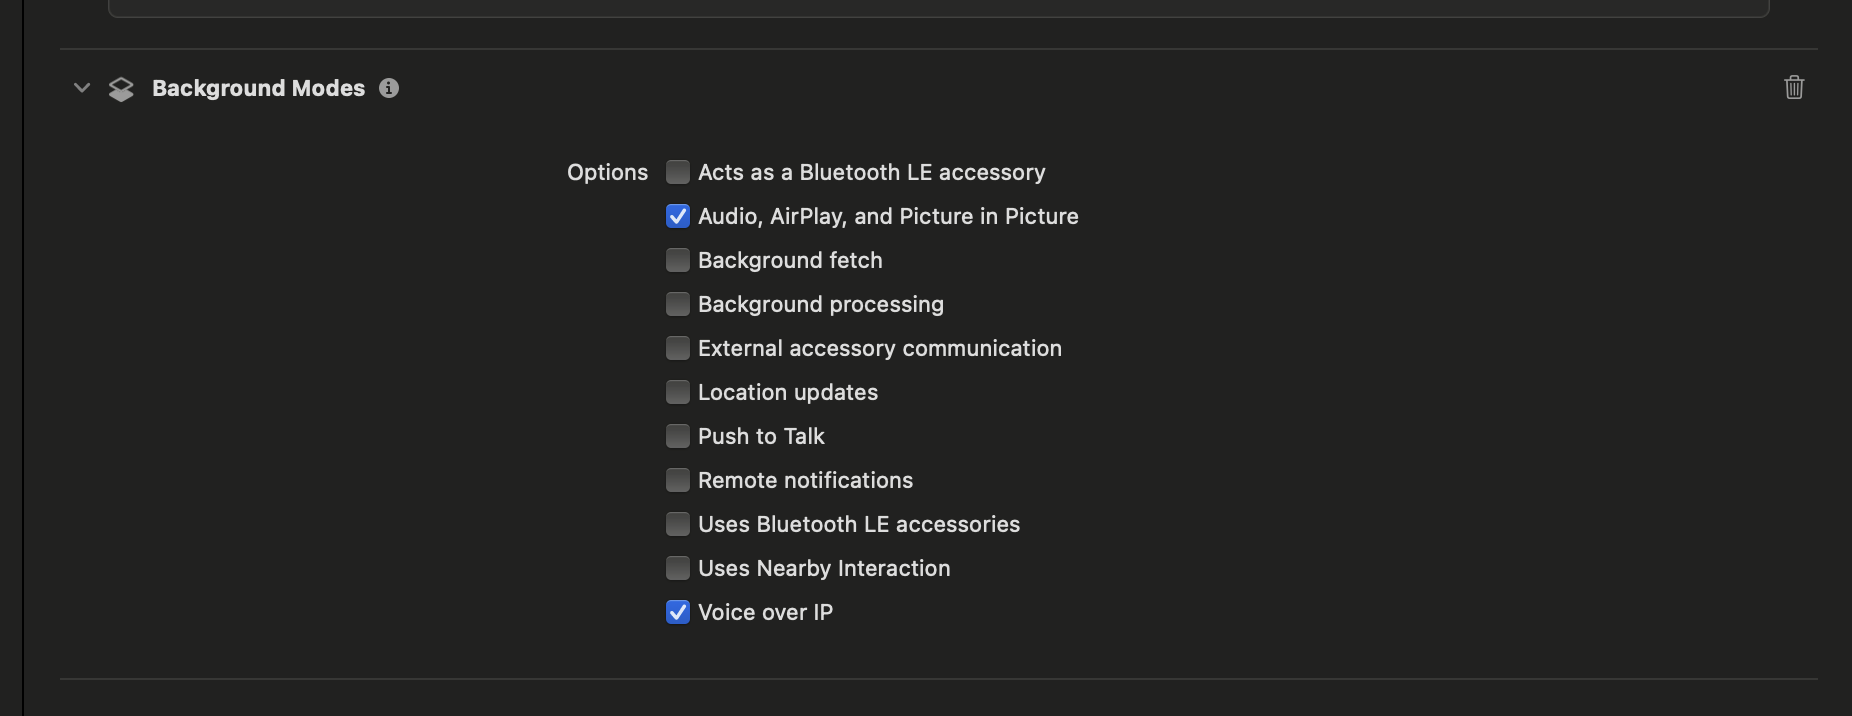
Step 1 : Enable Xcode Capabilities
Enable the necessary capabilities in Xcode:
- Open your project in Xcode.
- Navigate to your target settings.
- Select the "Signing & Capabilities" tab.
- Click the "+" button to add capabilities.
- Add Background Modes.
Under Background Modes, enable the following options:
- Audio, AirPlay, and Picture in Picture
- Voice over IP
Step 2: Handling Local and Remote participant Frames in iOS
Local participant Frames Handling
For local participant frames, we utilize the VideoProcessor class in VideoSDK.
For a detailed setup guide on proceesor refer to this documentation.
- Below is the Swift implementation to process and render local frames:
public class FrameProcessor: VideoProcessor {

  // Override the onFrameReceived function to access VideoFrames
  public override func onFrameReceived(_ frame: RTCVideoFrame) -> RTCVideoFrame? {
    // Access the frame data
    return frame
  }
}
Handling Remote participant Streams
- To handle remote participants video streams, we extract the WebRTC stream and pass it to the PiP manager.
public class FrameProcessor: VideoProcessor {

  // for the remote stream for specific remote id
  static func updateRemote(remoteId: String) {
    remoteTrack = FlutterWebRTCPlugin.sharedSingleton()?.remoteTrack(forId: remoteId)
  }
}
Step 3: Converting RTC Frames for PiP Mode
To display Video in PiP mode, we need to convert RTCVideoFrame into a format compatible with AVKit.
- Extract the frame buffer (
RTCCVPixelBuffer). - Convert it to a
CVPixelBuffer. - Create a
CMSampleBufferfor AVFoundation compatibility. - Render the sample buffer using
AVSampleBufferDisplayLayer. - Manage PiP mode using
AVPictureInPictureController.
Step 4 : Integrating PiP Mode
To enable PiP mode using AVKit:
- Create a PiPManager class for managing PiP state.
- Use
AVPictureInPictureControllerto toggle PiP mode. - Assign the AVSampleBufferDisplayLayer to PiP.
- Enable user interactions with PiP mode.
- For a full implementation, refer to the frame.swift
Step 5 : Implementing PiP Method Channel in AppDelegate.swift
The method channel in AppDelegate.swift is responsible for connecting Flutter and iOS for PiP mode control.
import UIKit
import Flutter
import videosdk

@main
@objc class AppDelegate: FlutterAppDelegate {
    override func application(
        _ application: UIApplication,
        didFinishLaunchingWithOptions launchOptions: [UIApplication.LaunchOptionsKey: Any]?
    ) -> Bool {
        GeneratedPluginRegistrant.register(with: self)

        // Video SDK setup
        let bgProcessor = FrameProcessor()
        let videoSDK = VideoSDK.getInstance
        videoSDK.registerVideoProcessor(videoProcessorName: "processor", videoProcessor: bgProcessor)

        guard let controller = window?.rootViewController as? FlutterViewController else {
            return super.application(application, didFinishLaunchingWithOptions: launchOptions)
        }

        // PiP Channel Setup
        let pipChannel = FlutterMethodChannel(
            name: "pip_channel",
            binaryMessenger: controller.binaryMessenger
        )

        pipChannel.setMethodCallHandler { (call, result) in
            switch call.method {
            case "setupPiP":
                PiPManager.setupPiP()
                result(nil)

            case "remoteStream":
                guard let args = call.arguments as? [String: Any],
                      let remoteId = args["remoteId"] as? String else {
                    result(FlutterError(code: "INVALID_ARGUMENTS", message: "Missing remoteId", details: nil))
                    return
                }
                FrameProcessor.updateRemote(remoteId: remoteId)
                result(nil)

            case "startPiP":
                PiPManager.startPIP()
                result(nil)

            case "stopPiP":
                PiPManager.stopPIP()
                result(nil)

            case "dispose":
                PiPManager.dispose()
                result(nil)

            default:
                result(FlutterMethodNotImplemented)
            }
        }

        return super.application(application, didFinishLaunchingWithOptions: launchOptions)
    }
}
Flutter Side Implementation
Step 1: Adding a PiP Mode Button in meeting_controls.dart
- Modify the meeting controls UI to include a PiP mode button:
import 'package:flutter/material.dart';

class MeetingControls extends StatelessWidget {
  // ...
  final void Function() pipButtonPressed;

  const MeetingControls({
    super.key,
    // ...
    required this.pipButtonPressed,
  });

  @override
  Widget build(BuildContext context) {
    return Row(
      mainAxisAlignment: MainAxisAlignment.spaceEvenly,
      children: [
        // ...
        ElevatedButton(
            onPressed: pipButtonPressed,
            child: const Text('PiP Mode'),
        ),
      ],
    );
  }
}
Step 2: Creating a Custom PiP View pip_view.dart
- Since Android natively converts the entire page into PiP mode, we need to create a custom PiP View in Flutter.
import 'package:flutter/material.dart';
import 'package:videosdk/videosdk.dart';
import './participant_tile.dart';

class PiPView extends StatefulWidget {
  final Room room;

  const PiPView({super.key, required this.room});

  @override
  State<PiPView> createState() => _PiPViewState();
}

class _PiPViewState extends State<PiPView> with WidgetsBindingObserver {
  late Room _room;
  Map<String, Participant> participants = {};

  @override
  void initState() {
    super.initState();
    WidgetsBinding.instance.addObserver(this);
    _room = widget.room;
    setMeetingEventListener();

    participants.putIfAbsent(
        _room.localParticipant.id, () => _room.localParticipant);
    participants.addAll(_room.participants);
  }

  @override
  void dispose() {
    WidgetsBinding.instance.removeObserver(this);
    super.dispose();
  }

  void setMeetingEventListener() {
    _room.on(Events.participantJoined, (Participant participant) {
      setState(() {
        participants.putIfAbsent(participant.id, () => participant);
      });
    });

    _room.on(Events.participantLeft, (String participantId , Map<String,dynamic> reason) {
      setState(() {
        participants.remove(participantId);
      });
    });
  }

  @override
  Widget build(BuildContext context) {
    List<Participant> participantList = participants.values.toList();

    return Scaffold(
      backgroundColor: Colors.black,
      body: Center(
        child: SizedBox(
          width: 200,
          height: 120,
          child: _buildParticipantsView(participantList),
        ),
      ),
    );
  }

  Widget _buildParticipantsView(List<Participant> participantList) {
    if (participantList.length == 1) {
      return Row(
        children: [
          Expanded(child: ParticipantTile(participant: _room.localParticipant)),
          Expanded(
            child: Container(
              color: Colors.grey.shade800,
              child: const Center(
                child: Text(
                  "Only one participant in the meeting",
                  style: TextStyle(color: Colors.white, fontSize: 12),
                  textAlign: TextAlign.center,
                ),
              ),
            ),
          ),
        ],
      );
    } else {
      Participant localParticipant = _room.localParticipant;
      Participant remoteParticipant = participantList.firstWhere(
        (p) => p.id != localParticipant.id,
        orElse: () => participantList[1],
      );
      return Row(
        children: [
          Expanded(child: ParticipantTile(participant: localParticipant)),
          Expanded(child: ParticipantTile(participant: remoteParticipant)),
        ],
      );
    }
  }
}
Step 3: Updating meeting_screen.dart for PiP Mode
We now enhance the MeetingScreen to support Picture-in-Picture (PiP) mode. This includes:
- Establishing a method channel for Flutter to interact with native platforms (Android and iOS).
- Registering a video processor to capture and process local frames in iOS side.
- Handling remote participant streams by extracting stream IDs, sending them to native iOS, and keeping them updated.
- Properly disposing of PiP mode resources when leaving the meeting to prevent memory leaks and ensure smooth transitions.
For a full implementation, refer to the meeting_screen.dart
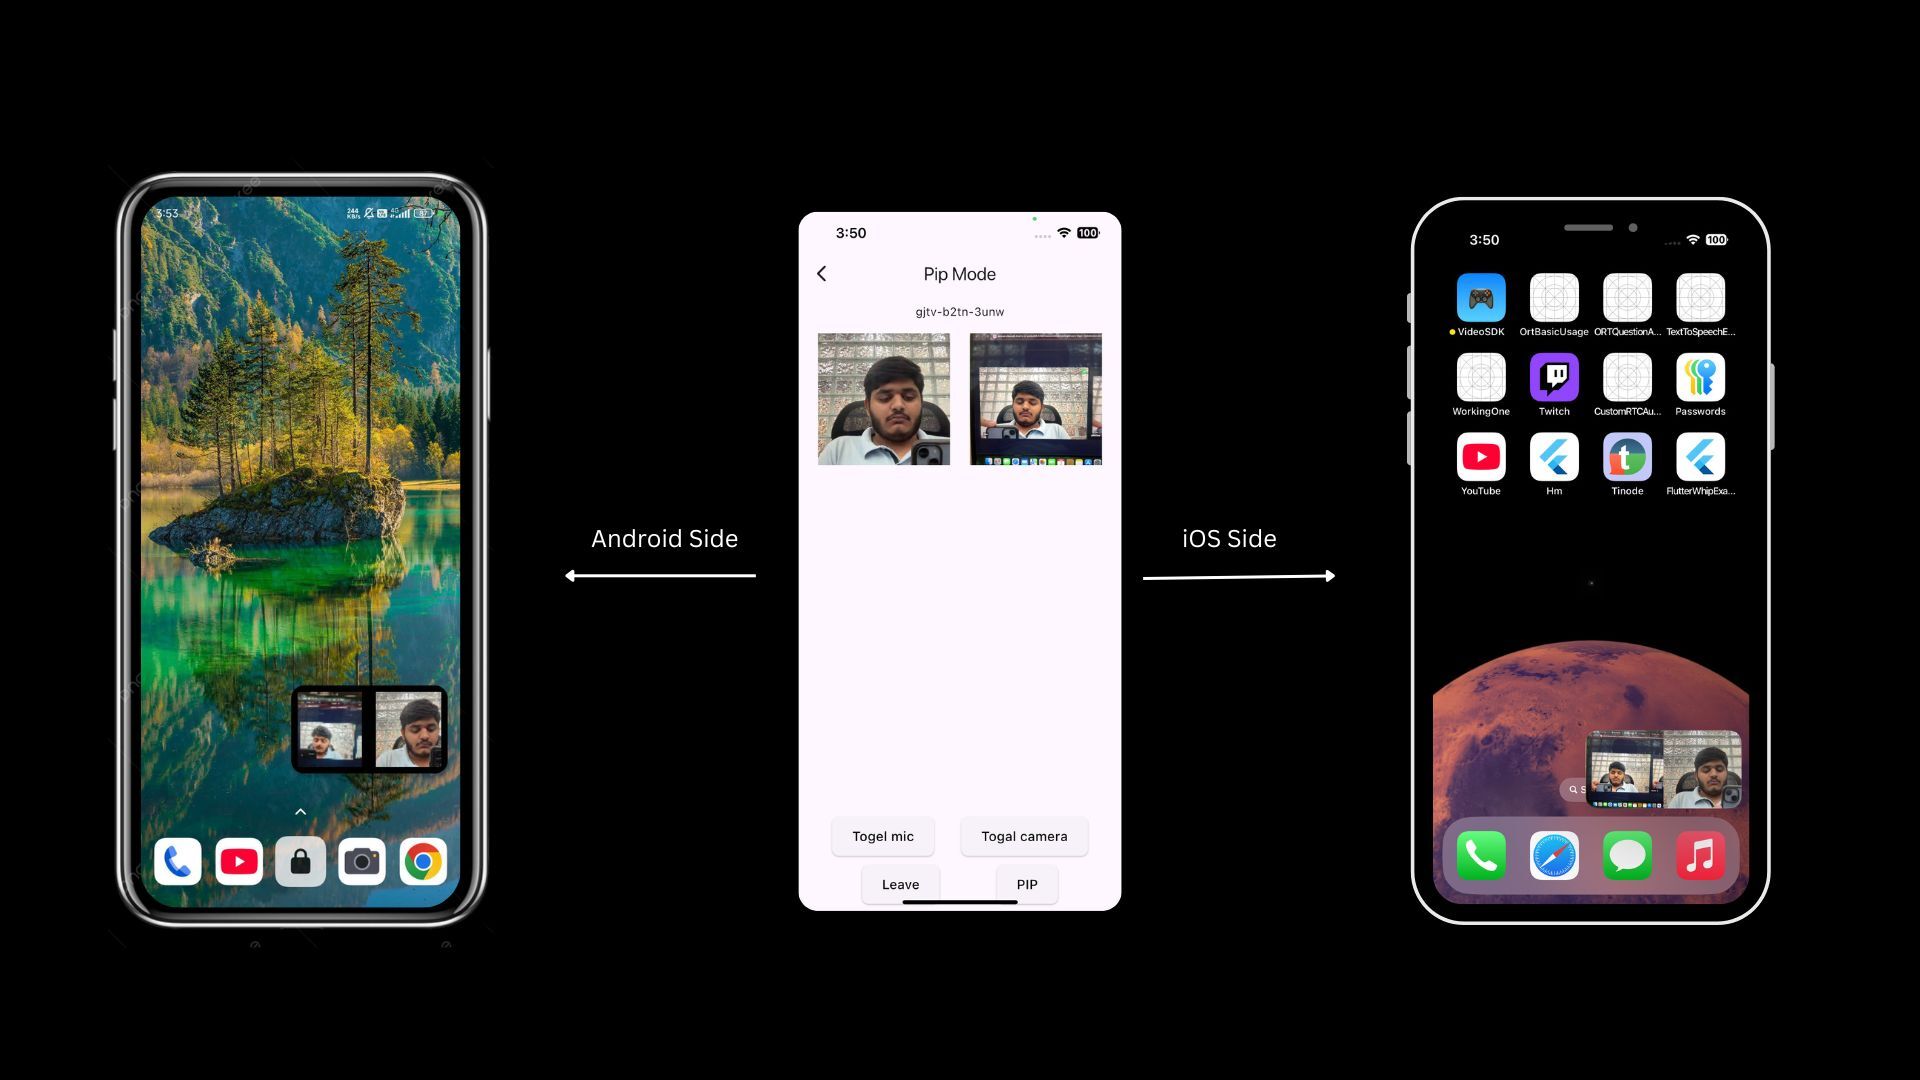
Final Output
The final output of Picture-in-Picture (PiP) Mode in the Flutter application using VideoSDK, without relying on any third-party packages. You can further customize the view and optimize it as per your requirements.
Stuck anywhere? Check out this here on GitHub
Got a Question? ![]() Ask us on discord
Ask us on discord

