Precall Setup - Flutter
Picture this: before diving into the depths of a video call, imagine giving your setup a quick check-up, like a tech-savvy doctor ensuring all systems are a go. That's essentially what a precall experience does- it’s like your extensive debug session before the main code execution—a crucial step in ensuring your app's performance is top-notch.
Step-by-Step Guide: Integrating Precall Feature
Step 1: Check Permissions
- Begin by ensuring that your application has the necessary permissions to access user devices such as cameras, microphones, and speakers.
- Utilize the
checkPermissions()method of theVideoSDKclass to verify if permissions are granted. - To enable checking of microphone and camera permissions on iOS devices, add the following to your
Podfile:
post_install do |installer|
  installer.pods_project.targets.each do |target|
    flutter_additional_ios_build_settings(target)
    target.build_configurations.each do |config|
    //Add this into your podfile
      config.build_settings['GCC_PREPROCESSOR_DEFINITIONS'] ||= [
        'PERMISSION_CAMERA=1',
        'PERMISSION_MICROPHONE=1',
      ]
    end
  end
end
import 'package:videosdk/videosdk.dart';

void checkMediaPermissions() async {
  try {
  //By default both audio and video permissions will be checked.
  Map<String, bool>? checkAudioVideoPermissions = await VideoSDK.checkPermissions();
  //For checking just audio permission.
  Map<String, bool>? checkAudioPermissions = await VideoSDK.checkPermissions(Permissions.audio);
  //For checking just video permission.
  Map<String, bool>? checkVideoPermissions = await VideoSDK.checkPermissions(Permissions.video);
  //For checking both audio and video permissions.
  Map<String, bool>? checkAudioVideoPermissions = await VideoSDK.checkPermissions(Permissions.audio_video);
  } catch (ex) {
    print("Error in checkPermissions()");
  }
  // Output: Map object for both audio and video permission:
  /*
        Map(2)
        0 : {"audio" => true}
            key: "audio"
            value: true
        1 : {"video" => true}
            key: "video"
            value: true
    */
};
checkPermissions()method is not supported on Desktop Applications and Firefox Browser.
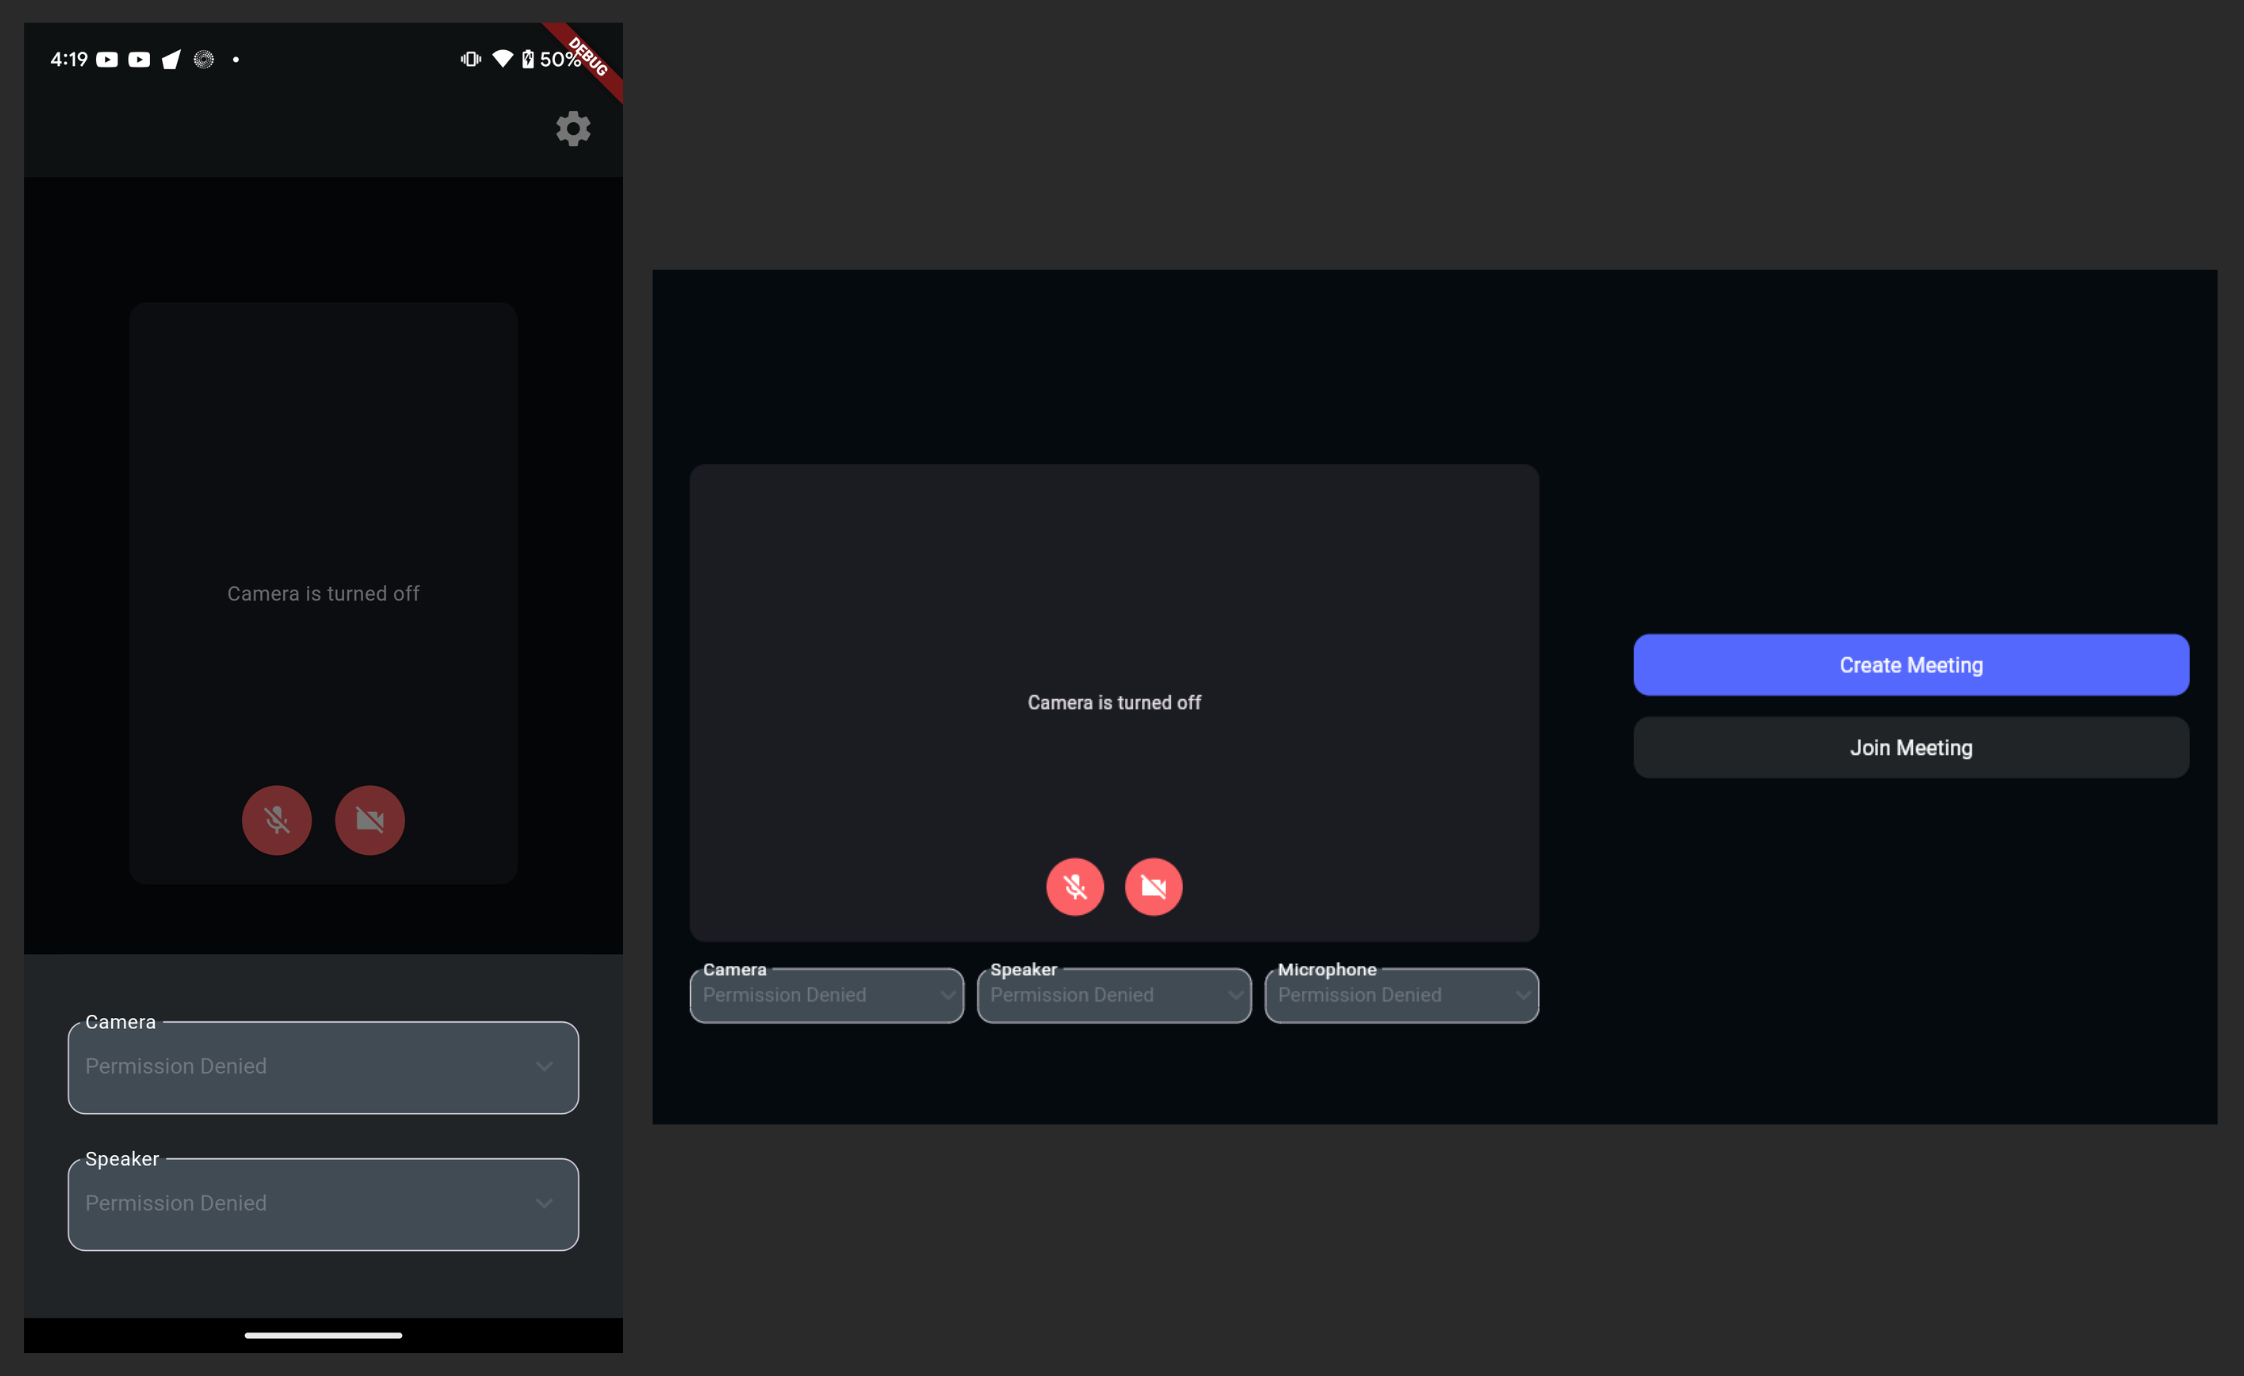
- When microphone and camera permissions are blocked, rendering device lists is not possible:
Step 2: Request Permissions (if necessary)
- If permissions are not granted, use the
requestPermission()method of theVideoSDKclass to prompt users to grant access to their devices. - To enable requesting of microphone and camera permissions on iOS devices, add the following to your
Podfile:
post_install do |installer|
  installer.pods_project.targets.each do |target|
    flutter_additional_ios_build_settings(target)
    target.build_configurations.each do |config|
    //Add this into your podfile
      config.build_settings['GCC_PREPROCESSOR_DEFINITIONS'] ||= [
        'PERMISSION_CAMERA=1',
        'PERMISSION_MICROPHONE=1',
      ]
    end
  end
end
In case permissions are blocked by the user, the permission request dialogue cannot be re-rendered programmatically. In such cases, consider providing guidance to users on manually adjusting their permissions.
void requestMediaPermissions() async {
  try {
      //By default both audio and video permissions will be requested.
      Map<String, bool>? reqAudioVideoPermissions = await VideoSDK.requestPermissions();
      //For requesting just audio permission.
      Map<String, bool>? reqAudioPermissions = await VideoSDK.requestPermissions(Permissions.audio);
      //For requesting just video permission.
      Map<String, bool>? reqVideoPermissions = await VideoSDK.requestPermissions(Permissions.video);
      //For requesting both audio and video permissions.
      Map<String, bool>? reqAudioVideoPermissions = await VideoSDK.requestPermissions(Permissions.audio_video);

  } catch (ex) {
    print("Error in requestPermission ");
  }
};
- The
requestPermissions()method is not supported on Desktop Applications and Firefox Browser.
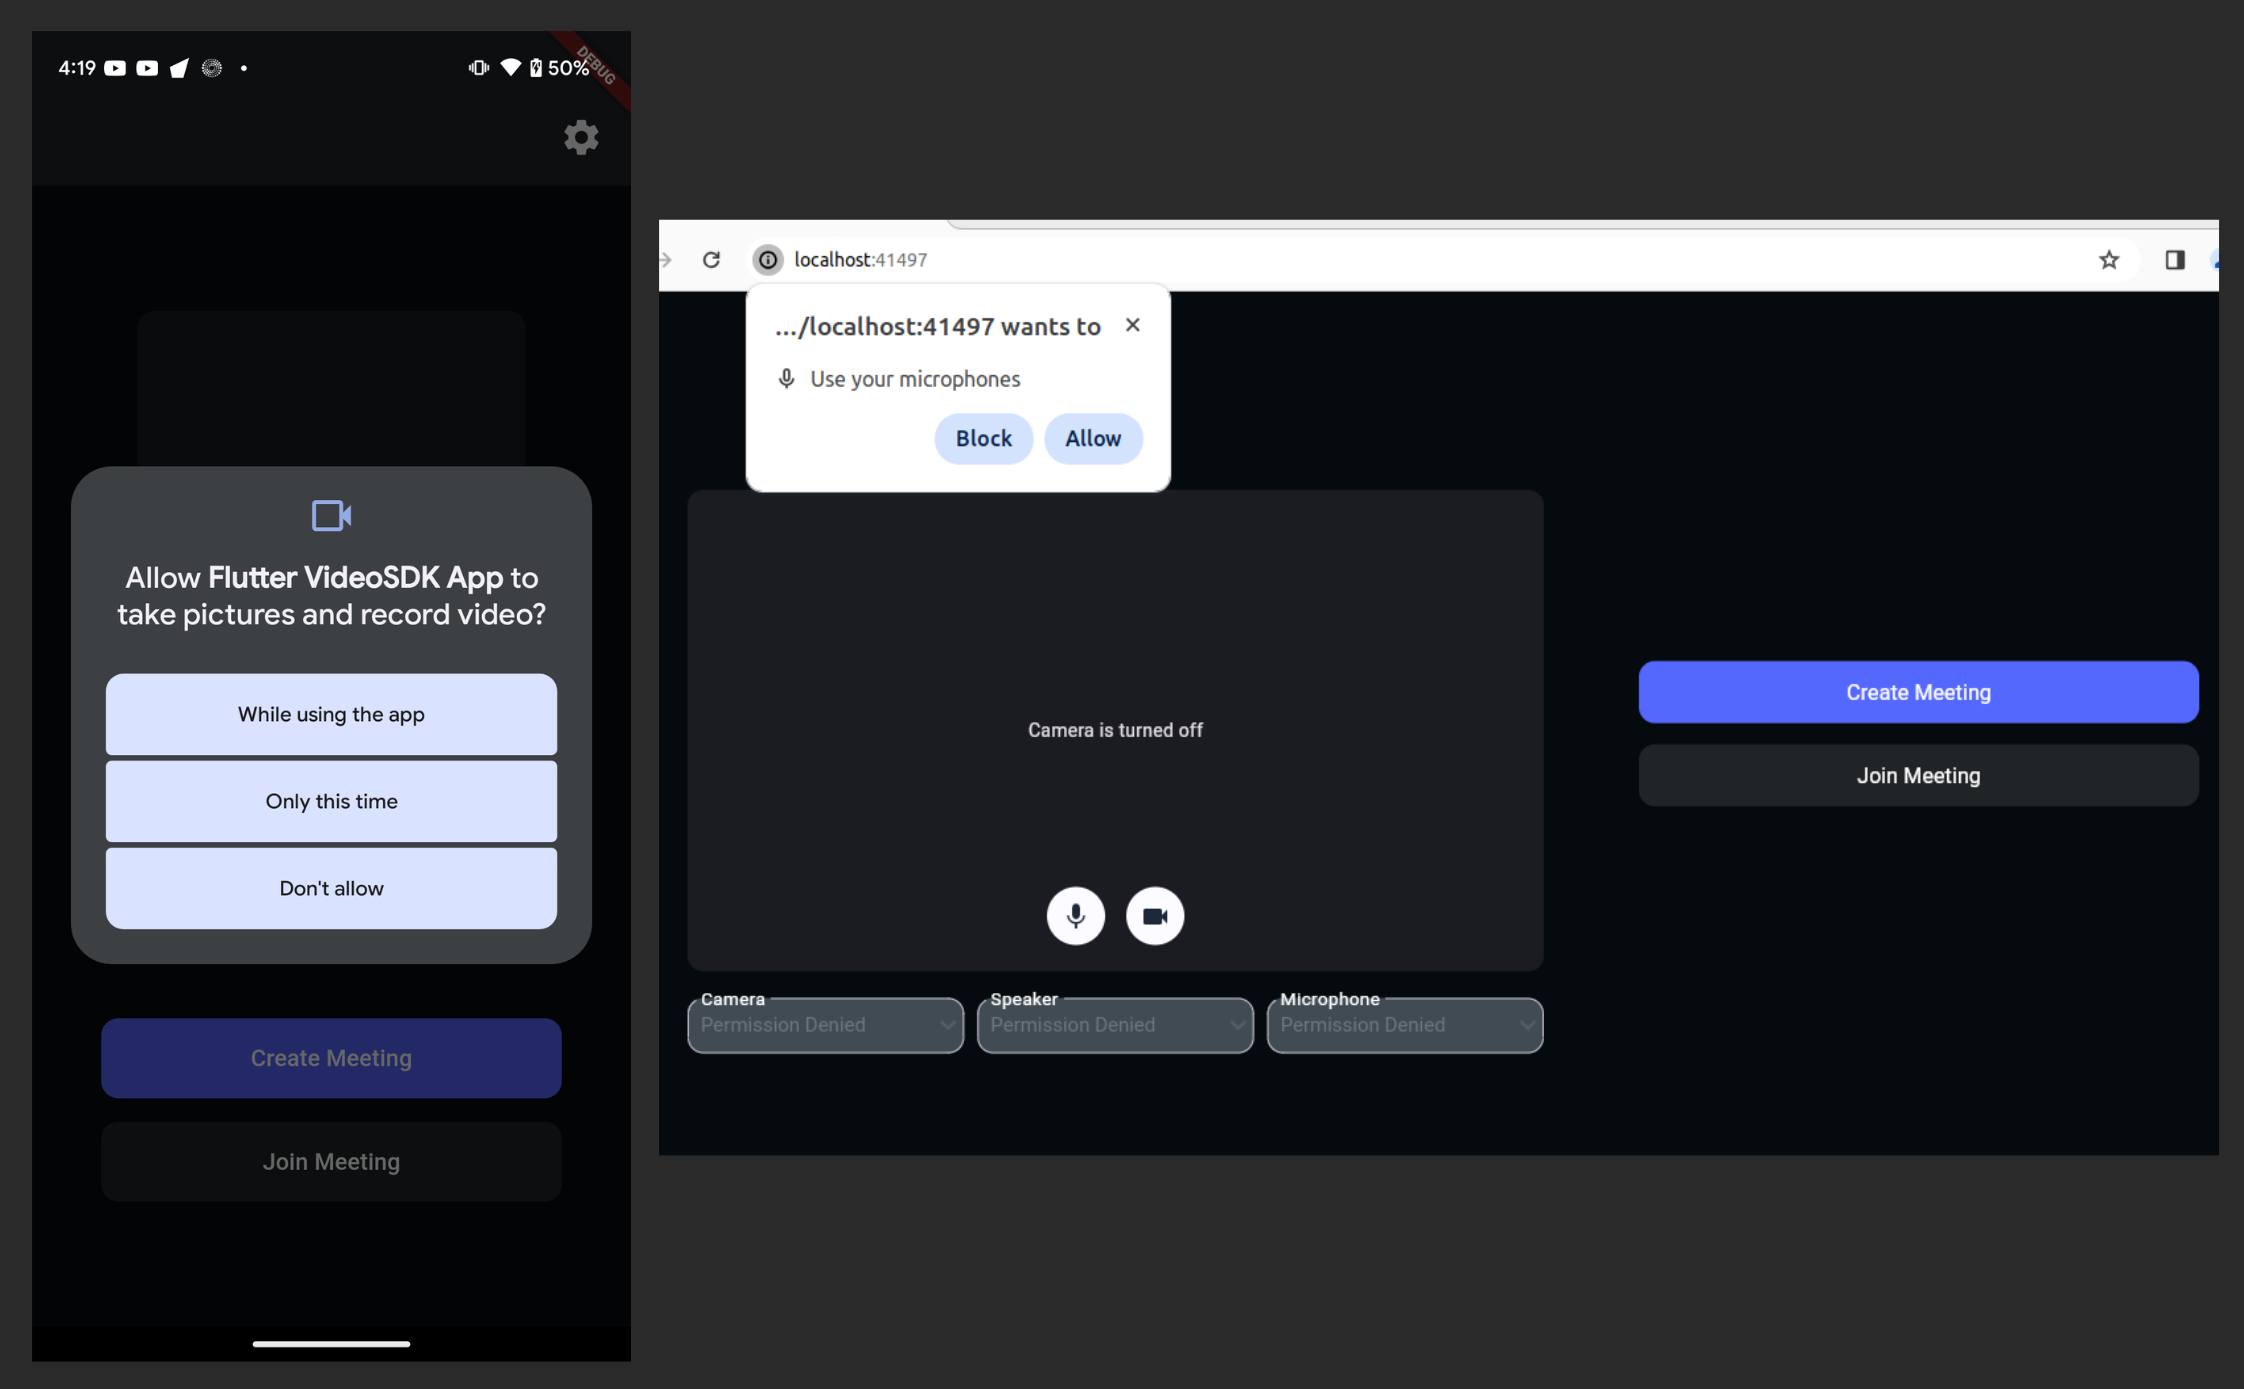
- Requesting permissions if not already granted:
Step 3: Render Device List
- Once you have the necessary permissions, Fetch and render list of available video and audio devices using the
getVideoDevices()andgetAudioDevices()methods of theVideoSDKclass respectively. - Enable users to select their preferred devices from these lists.
For iOS devices:
EARPIECEis not supported wheneverWIRED_HEADSETorBLUETOOTHdevice is connected.WIRED_HEADSETandBLUETOOTHdevices are not supported simultaneously. Priority is given to the most recently connected device.
List<AudioDeviceInfo> audioInputDevices = [];
List<AudioDeviceInfo> audioOutputDevices = [];

const getMediaDevices = async () => {
  try {
    //Method to get all available video devices.
    List<VideoDeviceInfo>? videoDevices = await VideoSDK.getVideoDevices();
    //Method to get all available Microphones.
    List<AudioDeviceInfo>? audioDevices = await VideoSDK.getAudioDevices();
    for (AudioDeviceInfo device in audioDevices!) {
      //For Mobile Applications
      if (!kIsWeb) {
        if (Platform.isAndroid || Platform.isIOS) {
          audioOutputDevices.add(device);
        }
      } else {
        //For Web and Desktop Applications
          if (device.kind == 'audioinput') {
            audioInputDevices.add(device);
          } else {
            audioOutputDevices.add(device);
          }
        }
      }
  } catch (err) {
    print("Error in getting audio or video devices");
  }
};
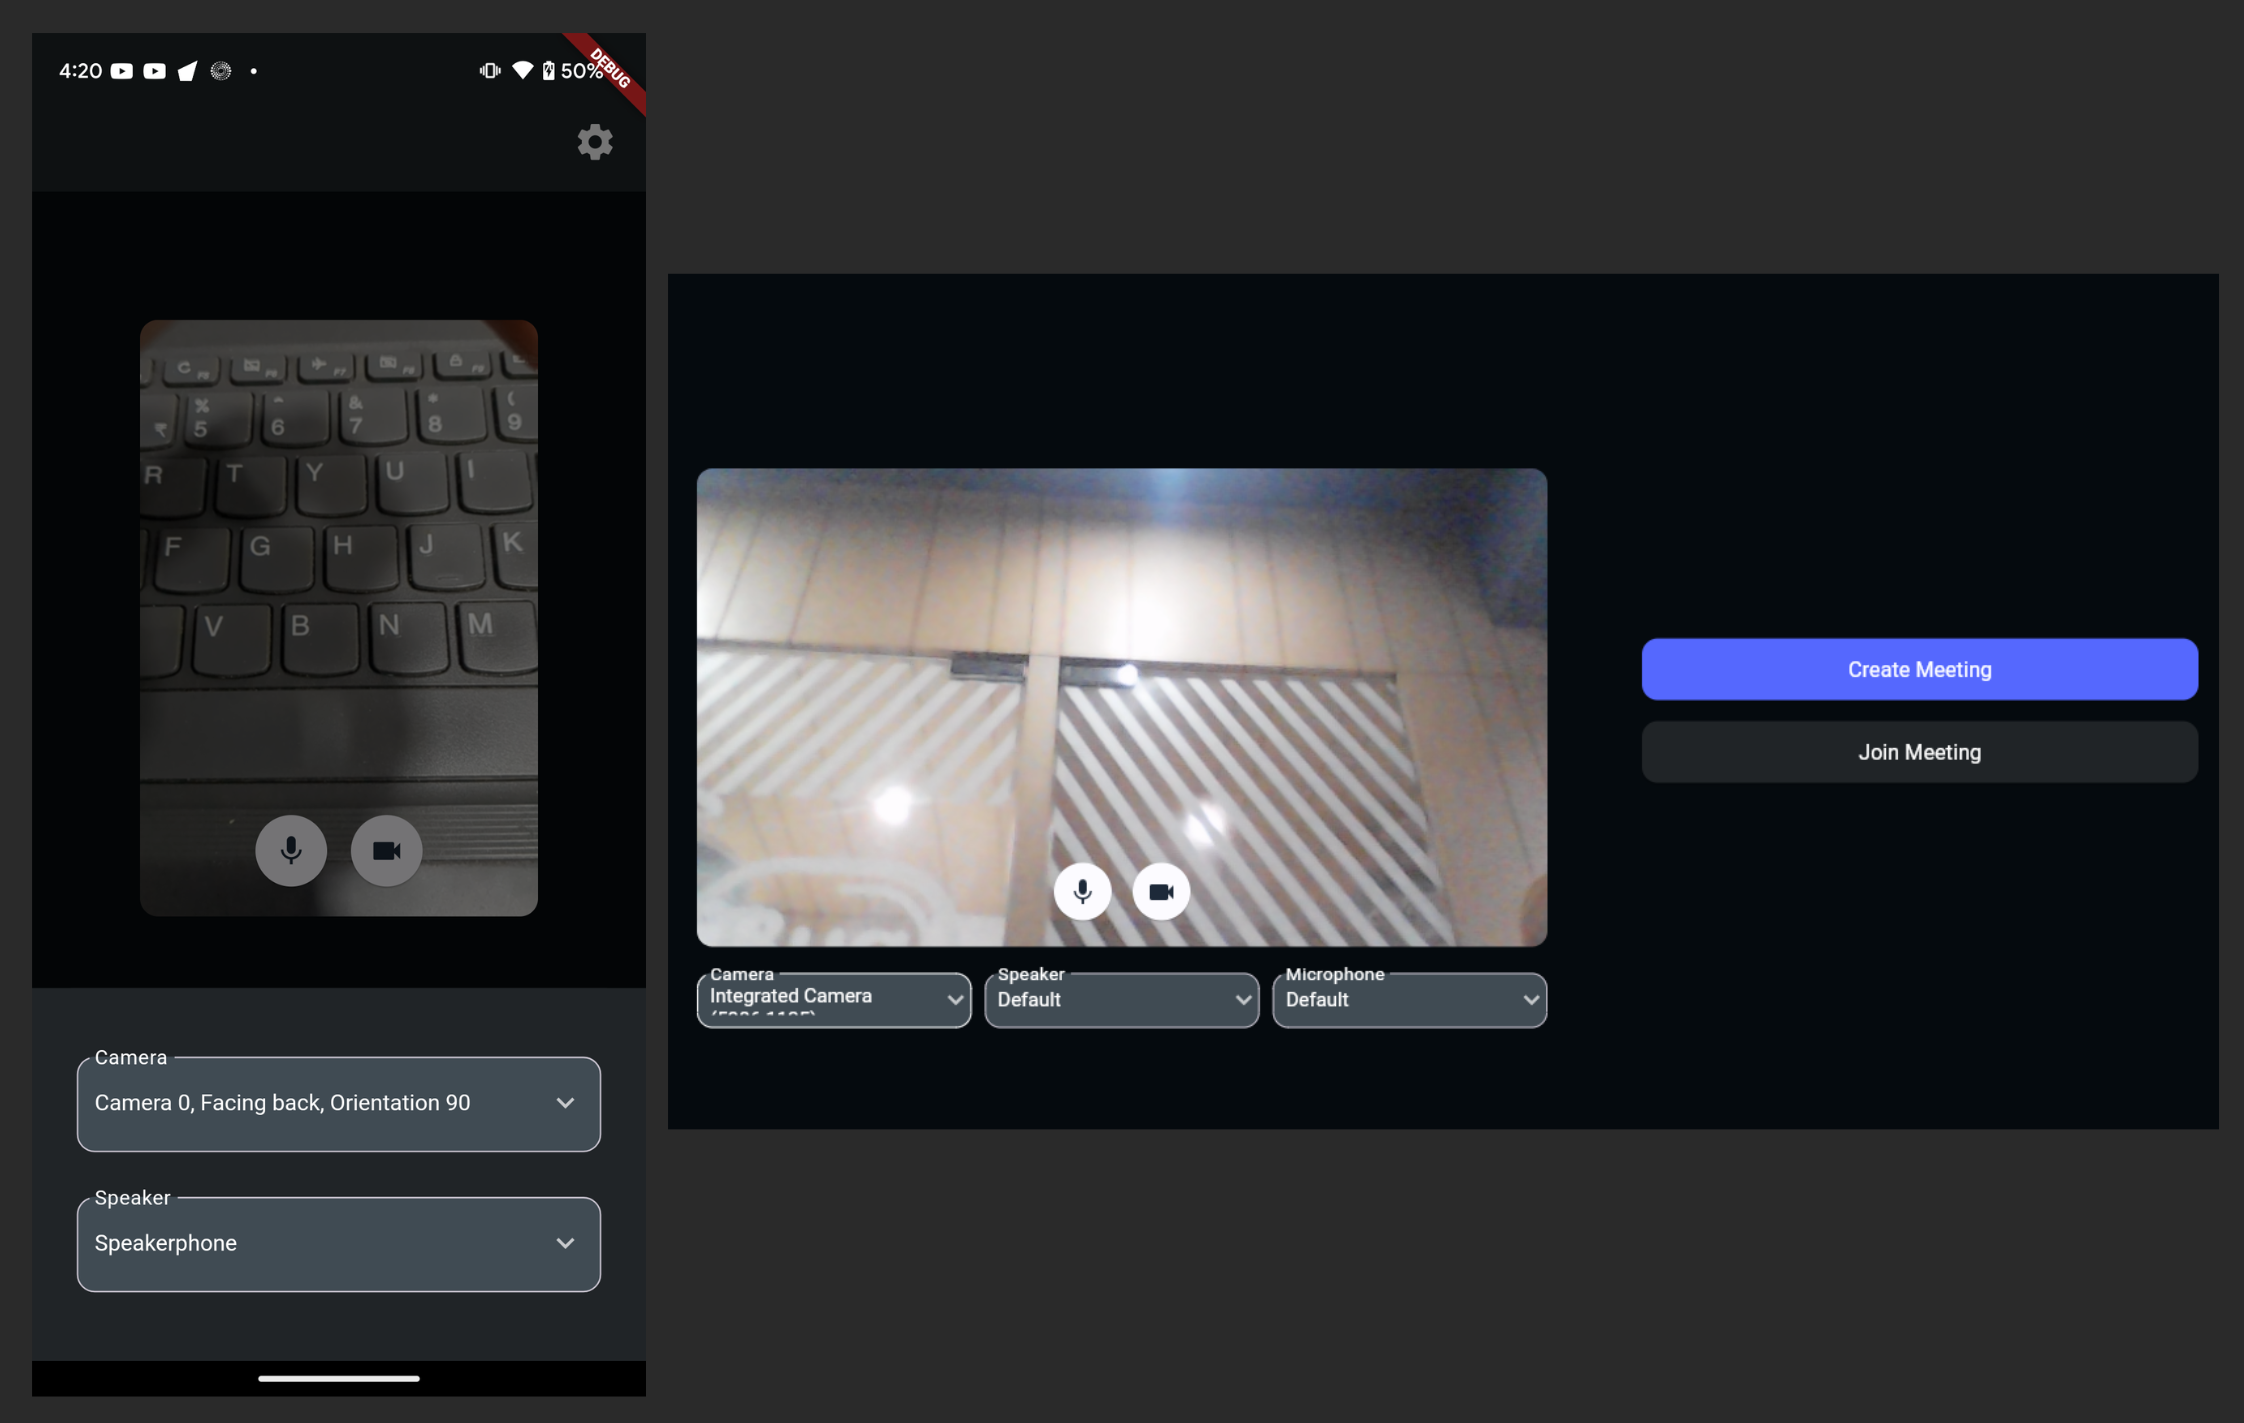
- Displaying device lists once permissions are granted:
Step 4: Handle Device Changes
- Implement the
deviceChangedcallback of theVideoSDKclass to dynamically re-render device lists whenever new devices are attached or removed from the system. - Ensure that users can seamlessly interact with newly connected devices without disruptions.
- The
deviceChangedevent is not supported in macOS applications.
VideoSDK.on(
  Events.deviceChanged,
  (devices) {
    print("device changed ${devices}");
  },
);
Step 5: Ensuring the selected devices are used in the Meeting
- Ensure that all relevant states, such as microphone and camera status (on/off), and selected devices, are passed into the meeting from the precall screen.
- This can be accomplished by passing these crucial states and media streams onto the VideoSDK and Room Methods.
- For the video device, create a custom track with the selected CameraID and pass it to the
createRoommethod. - For audio devices in web and desktop applications:
- Use the
switchAudioDevicemethod to select the desired audio output device. - Use the
changeMicmethod to select the desired audio input device once the room is joined.
- Use the
- For audio devices in mobile applications, use the
switchAudioDevicemethod to select both the input and output audio devices. - By ensuring this integration, users can seamlessly transition from the precall setup to the actual meeting while preserving their preferred settings.
import 'package:flutter/material.dart';
import 'package:videosdk/videosdk.dart';

class MeetingScreen extends StatefulWidget {
  final String meetingId;
  final String token;

  const MeetingScreen(
      {super.key, required this.meetingId, required this.token});

  @override
  State<MeetingScreen> createState() => _MeetingScreenState();
}

class _MeetingScreenState extends State<MeetingScreen> {
  late Room _room;

  @override
  void initState() {
    //Create a custom track with the selectedVideoDevice Id
    CustomTrack? cameraTrack = await VideoSDK.createCameraVideoTrack(
      cameraId: selectedVideoDevice?.deviceId);
    // create room
    _room = VideoSDK.createRoom(
      roomId: widget.meetingId,
      token: widget.token,
      displayName: "John Doe",
      micEnabled: true,
      camEnabled: true,
      customCameraVideoTrack: cameraTrack, //For Video Devices
    );
    registerMeetingEvents(room);
    super.initState();
  }

  //For Audio Devices
void registerMeetingEvents(Room _meeting) {
    // Called when joined in meeting
  _meeting.on(
    Events.roomJoined,
    () {
      //When meeting is joined, call the switchAudioDevice method to switch Audio Output.
      _meeting.switchAudioDevice(widget.selectedAudioOutputDevice!);

      //When meeting is joined, call the changeMic method to switch Audio Input.(Onlyrequired for web and desktop applications)
        if (kIsWeb || Platform.isWindows || Platform.isMacOS) {
          _meeting.changeMic(widget.selectedAudioInputDevice!);
        }
    },
  );
}

  @override
  Widget build(BuildContext context) {
    return YourMeetingWidget();
  }
}
By following these step-by-step instructions, you can seamlessly integrate a precall feature into your application, empowering users to optimize their audio and video setup for a superior communication experience.
You can explore the complete implementation of the Precall feature in the official Flutter SDK example available here.
API Reference
The API references for all the methods utilized in this guide are provided below.
Got a Question? ![]() Ask us on discord
Ask us on discord

