Display Video - iOS
In this guide, we will take a look at how to render the participant's video on the screen.
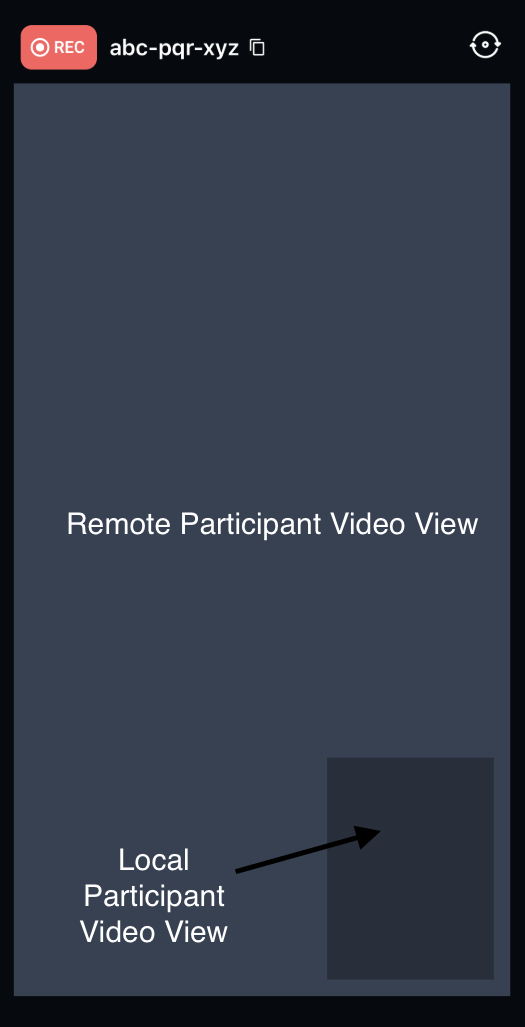
For simplicity purposes, we will render a remote participant and a local participant in our Meeting View.
1. Create VideoView
We will create a storyboad for our video view as shown below.
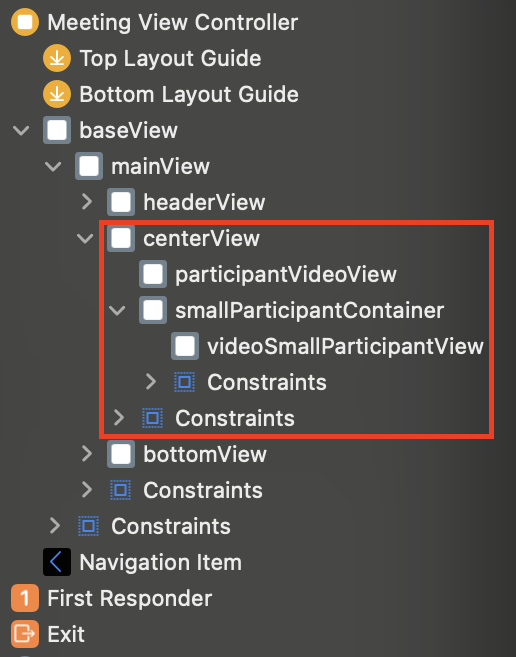
Use the above view hierarchy for faster implementation.
Below is the code for defining the variables for the UIViews that we create in the storyboard
- Swift
class MeetingViewController: UIViewController, UNUserNotificationCenterDelegate {
    //remote participant view
    @IBOutlet weak var participantViewsContainer: UIView!
    @IBOutlet weak var remoteParticipantVideoContainer: RTCMTLVideoView!
    //local participant view
    @IBOutlet weak var localParticipantViewContainer: UIView!
    @IBOutlet weak var localParticipantViewVideoContainer: RTCMTLVideoView!
2. Setup Event Listeners
When a meeting is created or joined by a participant, we add the event listeners that will notify us when participant's video needs to be rendered.
Adding event listeners will enable us to listen the onStreamEnabled and onStreamDisabled events, using which we can update the view and start rendering the video.
- Swift
//adding event listener when local peer joins the meeting
func initializeMeeting() {
        // initialize
        meeting = VideoSDK.initMeeting(
            meetingId: "abcd-xyzw-efgh",
            participantName: "John Doe",
            micEnabled: true,
            webcamEnabled: true,
        )
        // add listener after creating meeting
        meeting?.addEventListener(self)
        // join
        meeting?.join(cameraPosition: .front)
    }

//adding event listener when remote peer joins the meeting
extension MeetingViewController: MeetingEventListener {
    /// Meeting started
    func onMeetingJoined() {
        // handle local participant on start
        guard let localParticipant = self.meeting?.localParticipant else { return }
            // add event listener
            localParticipant.addEventListener(self)
    }
    func onParticipantJoined(_ participant: Participant) {
            // add event listener
            participant.addEventListener(self)
    }
}
After adding event listeners, We can use the onStreamEnabled() and onStreamDisabled() of the ParticipantEventListener protocol for rendering purposes.
3. Render Video
-
When an audio/video stream is enabled by local or remote participant, the
onStreamEnabledevent is triggered. Similarly when an audio/video stream is disabled by the local or remote participant, theonStreamDisabledevent is triggered. -
We can render the video using the stream that we get from
onStreamEnabledas shown below.
We will not render audio seperately, it is handled by the RTCMTLVideoView automatically.
- Swift
extension MeetingViewController: ParticipantEventListener {

    func onStreamEnabled(_ stream: MediaStream, forParticipant participant: Participant) {
        //call updateView function
        updateView(participant: participant, forStream: stream, enabled: true)
    }

    func onStreamDisabled(_ stream: MediaStream, forParticipant participant: Participant) {
        //call updateView function
        updateView(participant: participant, forStream: stream, enabled: false)
    }
}
- Swift
extension MeetingViewController {
    //update view for stream kind video
    func updateView(participant: Participant, forStream stream: MediaStream, enabled: Bool) { // true
        switch stream.kind {
        case .state(value: .video):
            if let videotrack = stream.track as? RTCVideoTrack {
                if enabled {
                    showVideoView(participant: participant, stream: videotrack) // show video
                } else {
                    hideVideoView(participant: participant, stream: videotrack) // hide video
                }
            }
        default:
            break
        }
    }
    //show video view
    func showVideoView(participant: Participant, stream: RTCVideoTrack){
        DispatchQueue.main.async {
            UIView.animate(withDuration: 0.5){
                //rendering if more than one participants
                if self.participants.count > 1 {
                    if let currentVideoTrack = self.participants.first(where: { $0.isLocal })?.streams.first(where: {$1.kind == .state(value: .video)})?.value.track as? RTCVideoTrack {
                        currentVideoTrack.remove(self.remoteParticipantVideoContainer)
                        currentVideoTrack.remove(self.localParticipantViewVideoContainer)
                    }
                        //add stream to the respective video view
                        stream.add(participant.isLocal ? self.localParticipantViewVideoContainer : self.remoteParticipantVideoContainer)
                        //show the respective video view
                        if participant.isLocal {
                            self.localParticipantViewVideoContainer.isHidden = false
                        } else {
                            self.remoteParticipantVideoContainer.isHidden = false
                        }
                        //shift local video view to its container
                        if let localParticipantVideoStream = self.participants.first(where: { $0.isLocal })?.streams.first(where: {$1.kind == .state(value: .video )})?.value.track as? RTCVideoTrack {
                        localParticipantVideoStream.add(self.localParticipantViewVideoContainer)
                        self.localParticipantViewVideoContainer.isHidden = false
                        self.localParticipantViewContainer.isHidden = false
                    }

                } else {
                    //rendering if more than one participants
                    stream.add(self.remoteParticipantVideoContainer)
                    self.remoteParticipantVideoContainer.isHidden = false
                }
            }
        }
    }
    //hide video view
    func hideVideoView(participant: Participant, stream: RTCVideoTrack){
        UIView.animate(withDuration: 0.5){
            //adjust view when there are more than one participants
            if self.participants.count > 1 {
                //remove stream from the respective view
                    stream.remove(participant.isLocal ? self.localParticipantViewVideoContainer : self.remoteParticipantVideoContainer)
                    //hide the respective view
                    if participant.isLocal {
                        self.localParticipantViewVideoContainer.videoContentMode = .scaleAspectFill
                        self.localParticipantViewVideoContainer.isHidden = true
                    } else {
                        self.remoteParticipantVideoContainer.isHidden = true
                    }
            } else {
                //render video in remote container when there is only one participant
                stream.remove(self.remoteParticipantVideoContainer)
                self.remoteParticipantVideoContainer.isHidden = true
            }
        }
    }
}

Above code is the simplified example of how you can render or remove video stream whenever required. Use this as a reference to render your own video inside a RTCMTLVideoView.
Additionally, you can show Participant's initials when their video is off using the participant.displayName. Display the initials when onStreamDisabled event is triggered when user switch off their camera, by placing another view that would contain the initials over the respective container.
4. Display Audio Status
- Unlike Video, we do not need to explicitly render audio. Therefore, you can use the
onStreamEnabledevents for the audio kind to show the mute/unmute mic icon.
Below is the sample on how it can be done.
Example
- Swift
extension MeetingViewController: ParticipantEventListener {

    func onStreamEnabled(_ stream: MediaStream, forParticipant participant: Participant) {
        //call updateView function
        updateView(participant: participant, forStream: stream, enabled: true)
    }

    func onStreamDisabled(_ stream: MediaStream, forParticipant participant: Participant) {
        //call updateView function
        updateView(participant: participant, forStream: stream, enabled: false)
    }
}
- Swift
extension MeetingViewController {
    //update view for stream kind audio
    func updateView(participant: Participant, forStream stream: MediaStream, enabled: Bool) { // true
        switch stream.kind {
        case .state(value: .audio):
            updateMic(participant: participant, enabled)
        default:
            break
        }
    }
    //update mic according to the status.
    func updateMic(participant: Participant, _ enabled: Bool) {
        if !participant.isLocal {
            viewRemoteMicContainer.isHidden = enabled // set mic icon accordingly
        } else if participants.count == 1 {
            participantViewsContainer.bringSubviewToFront(viewRemoteMicContainer)
            viewRemoteMicContainer.isHidden = enabled // set mic icon accordingly
        }
    }
API Reference
The API references for all the methods and events utilized in this guide are provided below.
Got a Question? ![]() Ask us on discord
Ask us on discord

