Display Video - React Native
In this guide, we will take a look at how to render the participant's audio and video on the screen.
Rendering Participant
The two steps are involve to achieve this process.
1. Get Mic and Webcam Status
We must determine whether the participant's audio or video is on or off before rendering him or her. Hence, if the webcam is not turned on, we will begin by rendering the participant's frames with their name in them; otherwise, we will render the video.
Step 1: Let's get every participants from useMeeting and create a straightforward box with each person's name.
import {
  useMeeting,
  useParticipant,
  RTCView,
  MediaStream,
} from "@videosdk.live/react-native-sdk";

import { View, Text, FlatList } from "react-native";

const MeetingView = () => {
  //Getting all the participants
  const { participants } = useMeeting();

  const participantsArrId = [...participants.keys()];

  return (
    <View
      style={{
        flex: 1,
        marginVertical: 12,
      }}
    >
      {participantsArrId.length > 0 ? (
        <FlatList
          data={participantsArrId}
          renderItem={({ item }) => {
            return <ParticipantView participantId={item} />;
          }}
        />
      ) : (
        <View
          style={{
            flex: 1,
            backgroundColor: "#F6F6FF",
            justifyContent: "center",
            alignItems: "center",
          }}
        >
          <Text style={{ fontSize: 20 }}>Participant has not joined yet</Text>
        </View>
      )}
    </View>
  );
};

// This will render a single participant's view
function ParticipantView({ participantId }) {
  const { displayName } = useParticipant(participantId);

  return (
    <View
      style={{
        height: 250,
        backgroundColor: "#404B53",
        marginVertical: 8,
      }}
    >
      <Text>{displayName}</Text>
    </View>
  );
}
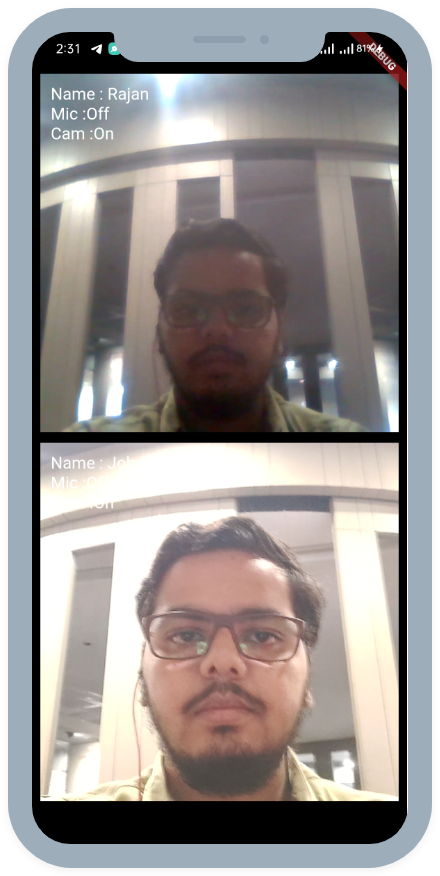
Step 2: To display the status of each participant's microphone and webcam in the list, you can use the micOn and webcamOn properties of the useParticipant hook.
Here's a code code snippet of rendering mic and webcam status:
function ParticipantView({ participantId }) {
  //Getting the micOn and webcamOn property
  const { webcamOn, displayName, micOn } = useParticipant(participantId);

  return (
    <View
      style={{
        height: 250,
        backgroundColor: "#404B53",
        marginVertical: 8,
      }}
    >
      <Text>{displayName}</Text>
      <Text>
        Webcam:{webcamOn ? "On" : "Off"} Mic: {micOn ? "On" : "Off"}
      </Text>
    </View>
  );
}
2. Rendering Video
The status of the webcam and mic is now displayed. If the webcam is turned on, we will require the participant's webcamStream which we will obtain from the useParticipant hook, in order to display the participant's video.
const ParticipantView = ({ participantId }) => {
  //Getting the webcamStream property
  const { webcamOn, displayName, micOn, webcamStream } =
    useParticipant(participantId);

  return (
    <View
      style={{
        height: 250,
        backgroundColor: "#404B53",
        marginVertical: 8,
      }}
    >
      <Text>{displayName}</Text>
      <Text>
        Webcam:{webcamOn ? "On" : "Off"} Mic: {micOn ? "On" : "Off"}
      </Text>
      {webcamOn && webcamStream ? (
        <RTCView
          streamURL={new MediaStream([webcamStream.track]).toURL()}
          objectFit={"cover"}
          style={{
            height: 200,
          }}
        />
      ) : null}
    </View>
  );
};
Unlike before, you don't need to render audio separately because RTCView is a component that handles audio stream automatically.
2.1 Mirror Local Video View
If you wish to show the mirror view of the local participant, you can pass boolean value to mirror property of RTCView.
const ParticipantView = ({ participantId }) => {
  const { isLocal } = useParticipant(participantId);

  //... Other video configurations

  return (
    <>
      {webcamOn && webcamStream ? (
        <RTCView
          streamURL={new MediaStream([webcamStream.track]).toURL()}
          objectFit={"cover"}
          mirror={isLocal ? true : false}
          style={{
            height: 200,
          }}
        />
      ) : null}
    </>
  );
};
Sample of mirror view video

API Reference
The API references for all the methods and events utilised in this guide are provided below.
Got a Question? ![]() Ask us on discord
Ask us on discord

