Optimize Video Tracks - React Native
While optimizing for the best viewing experience, it is necessary to fine-tune the video tracks that are being used during the calls.
For the best fine-tuning experience, we have introduced the ability to pass a custom video track for the participant's media before and during the meeting.
Custom Video Track
This feature can be used to add custom video encoder configurations, optimization mode (whether you want to focus on motion, text or detail of the video) and background removal & video filter from external libraries and send it to other participants.
How to Create a Custom Video Track ?
- You can create a Video Track using
createCameraVideoTrack()method of@videosdk.live/react-native-sdk. - This method can be used to create video track using different encoding parameters, camera facing mode, and optimization mode and return
MediaStream.
Example
import { createCameraVideoTrack } from "@videosdk.live/react-native-sdk";

let customTrack = await createCameraVideoTrack({
  // It will be the id of the camera from which the video should be captured.
  cameraId: "camera-id", // OPTIONAL

  // We will discuss this parameter in next step.
  optimizationMode: "motion", // "text" | "detail",  Default : "motion"

  // This will accept the resolution (height x width) of video you want to capture.
  encoderConfig: "h480p_w640p", // "h540p_w960p" | "h720p_w1280p" ... // Default : "h360p_w640p"

  // For Mobile browser It will specify whether to use front or back camera for the video track.
  facingMode: "environment", // "user",  Default : "environment"

  // We will discuss this parameter in next step.
  multiStream:true // false,  Default : true

});
The capabilities of the device have a significant impact on how custom track configurations behave. Assuming a case where you set encoder configuration to 1080p but the webcam only supports 720p, then encoder configuration will automatically switch to the highest resolution that the device can handle, which is 720p.
What is optimizationMode?
-
It will specify the optimization mode for the video track being generated.
-
motion: This type of track should more fcous on motion video. For example, webcam video, movies or video games.- This type of track will degrade
resolutionin order to maintainframe rate.
- This type of track will degrade
-
text: This type of track should more fcous on significant sharp edges and areas of consistent color that can change frequently. For example, presentations or web pages with text content.- This type of track will degrade
frame ratein order to maintainresolution.
- This type of track will degrade
-
detail: This type of track should more fcous on details of the video. For example, presentations, painting or line art.- This type of track will degrade
frame ratein order to maintainresolution.
- This type of track will degrade
What is multiStream?
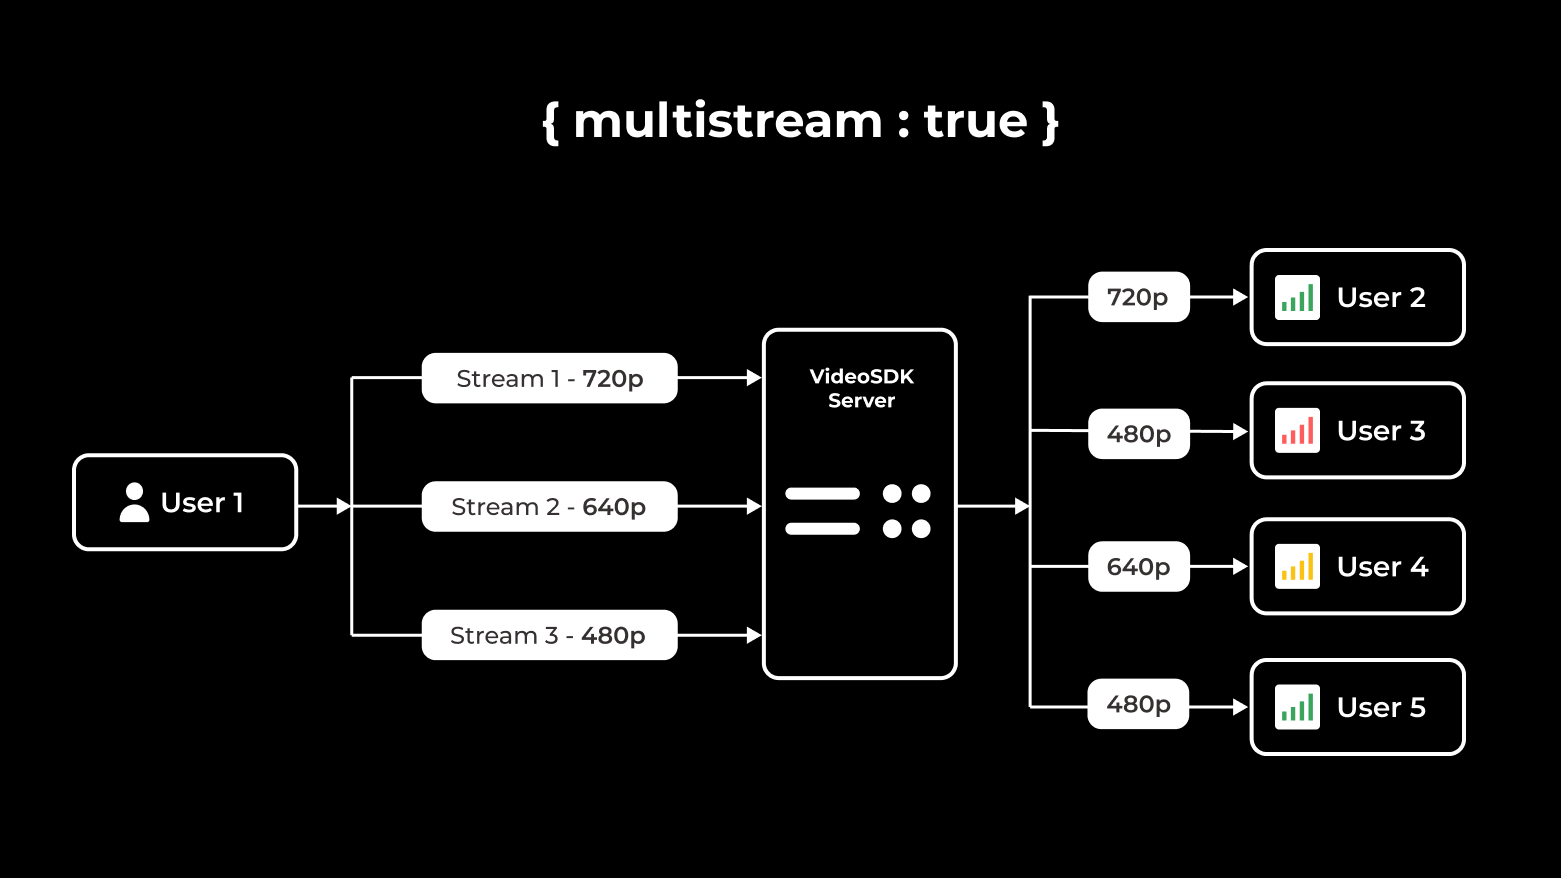
- It will specify if the stream should send multiple resolution layers or single resolution layer.
multiStream : true By default, VideoSDK sends multiple resolution video streams to the server (whether you are using custom video track or not), For instance, user device capabilty is 720p, so VideoSDK sends 720p along with 640p and 480p streams. This allows VideoSDK to deliver the appropriate stream to each participant based on their network bandwidth.
multiStream : false If you want to restrict the VideoSDK to send only one stream to maintain quality, you can set multiStream to false.
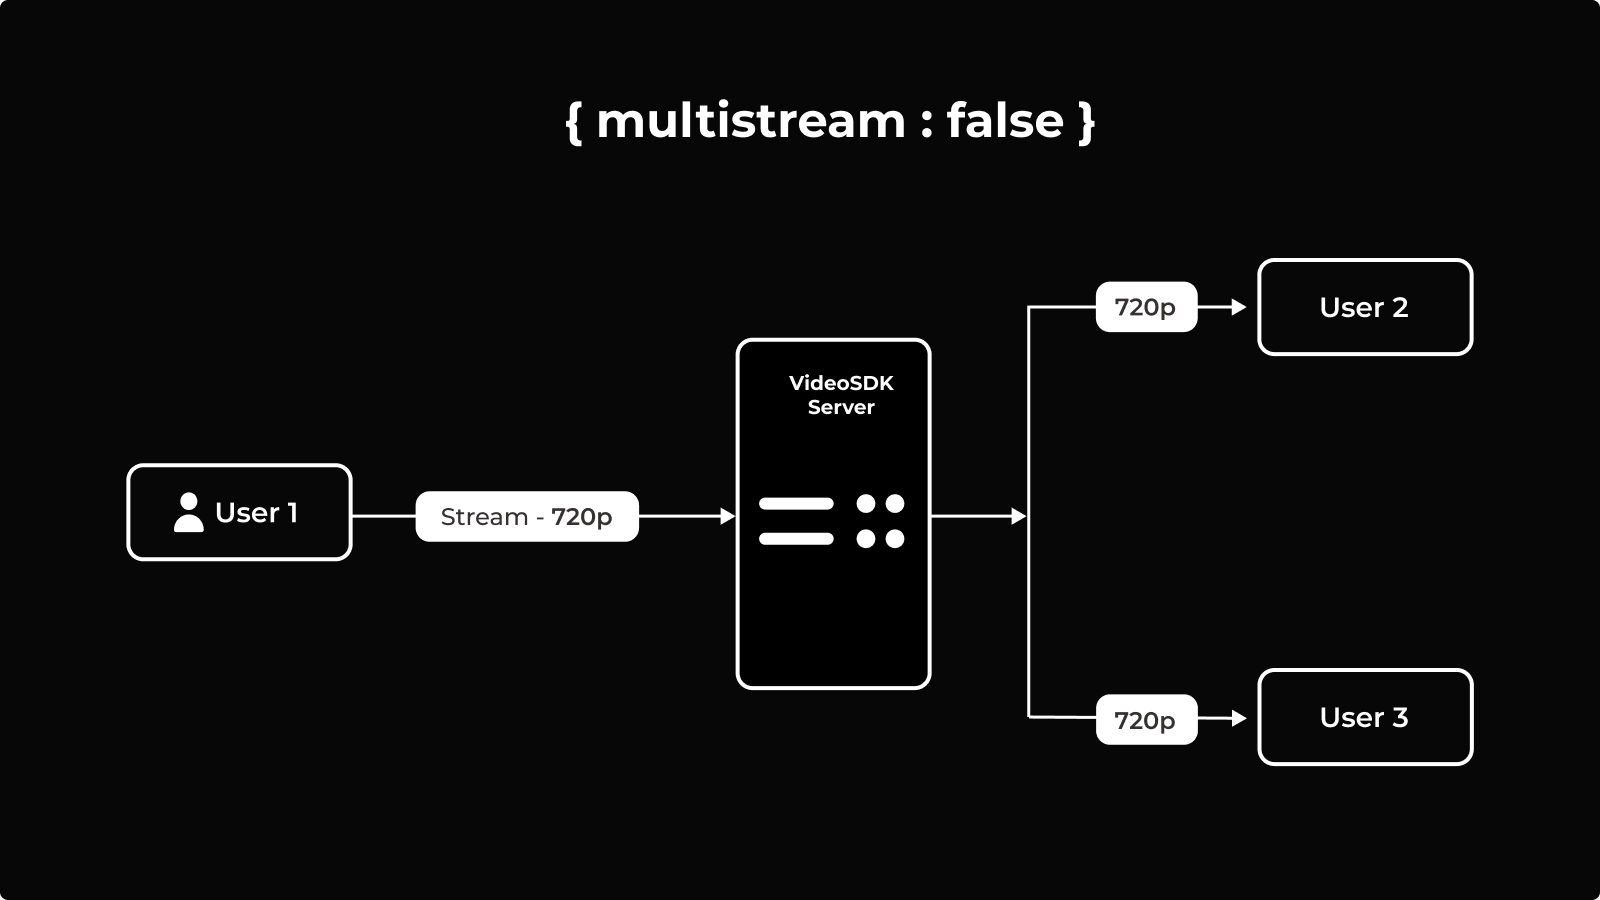
setQuality would not have any effect if multiStream is set to false.
How to Setup a Custom Video Track ?
The custom track can be set up both before and after the initialization of the meeting.
- Setting up a Custom Track during the initialization of a meeting
- Setting up a Custom Track with methods
1. Setting up a Custom Track during the initialization of a meeting
If you are passing webcamEnabled: true in the config of MeetingProvider and want to use custom tracks from start of the meeting, you can pass custom track in the config as shown below.
Custom Track will not apply on webcamEnabled: false configuration.
Example
import {
  createCameraVideoTrack,
  MeetingProvider,
} from "@videosdk.live/react-native-sdk";

function App() {
  const getTrack = async () => {
    const track = await createCameraVideoTrack({
      optimizationMode: "motion",
      encoderConfig: "h720p_w960p",
      facingMode: "user",
    });
    setCustomTrack(track);
  };

  let [customTrack, setCustomTrack] = useState();

  useEffect(() => {
    getTrack();
  }, []);

  return (
    customTrack && (
      <MeetingProvider
        config={{
          meetingId,
          micEnabled: true,
          //If true, it will use the passed custom track to turn webcam on
          webcamEnabled: true,
          //Pass the custom video track here
          customCameraVideoTrack: customTrack,
        }}
        token={token}
      >
        <MeetingView />
      </MeetingProvider>
    )
  );
}
2. Setting up a Custom Track with methods
In order to switch tracks during the meeting, you have to pass the MediaStream in the enableWebcam() or toggleWebcam() method of useMeeting.
Make sure to call disableWebcam() before you create a new track as it may lead to unexpected behavior.
Example
import {
  createCameraVideoTrack,
  useMeeting,
} from "@videosdk.live/react-native-sdk";
import { TouchableOpacity, Text } from "react-native";

const MeetingControls = () => {
  const { localWebcamOn, enableWebcam, disableWebcam, toggleWebcam } =
    useMeeting();

  const handleToggleWebcam = async () => {
    if (localWebcamOn) {
      toggleWebcam();
    } else {
      let customTrack = await createCameraVideoTrack({
        optimizationMode: "motion",
        encoderConfig: "h720p_w960p",
        facingMode: "user",
        multiStream: false,
      });

      toggleWebcam(customTrack);
    }
  };

  const handleEnableWebcam = async () => {
    if (localWebcamOn) {
      disableWebcam();
    } else {
      let customTrack = await createCameraVideoTrack({
        optimizationMode: "motion",
        encoderConfig: "h720p_w960p",
        facingMode: "user",
        multiStream: false,
      });

      enableWebcam(customTrack);
    }
  };

  return (
    <>
      <TouchableOpacity
        onPress={() => {
          handleToggleWebcam();
        }}
      >
        <Text>Toggle Webcam</Text>
      </TouchableOpacity>

      <TouchableOpacity
        onPress={() => {
          handleEnableWebcam();
        }}
      >
        <Text>Enable Webcam</Text>
      </TouchableOpacity>
    </>
  );
};
Using custom video tracks is not just limited to the video tracks created using the createCameraVideoTrack method. You can use any MediaStream object as a replacement which can include a custom canvas track created by you.
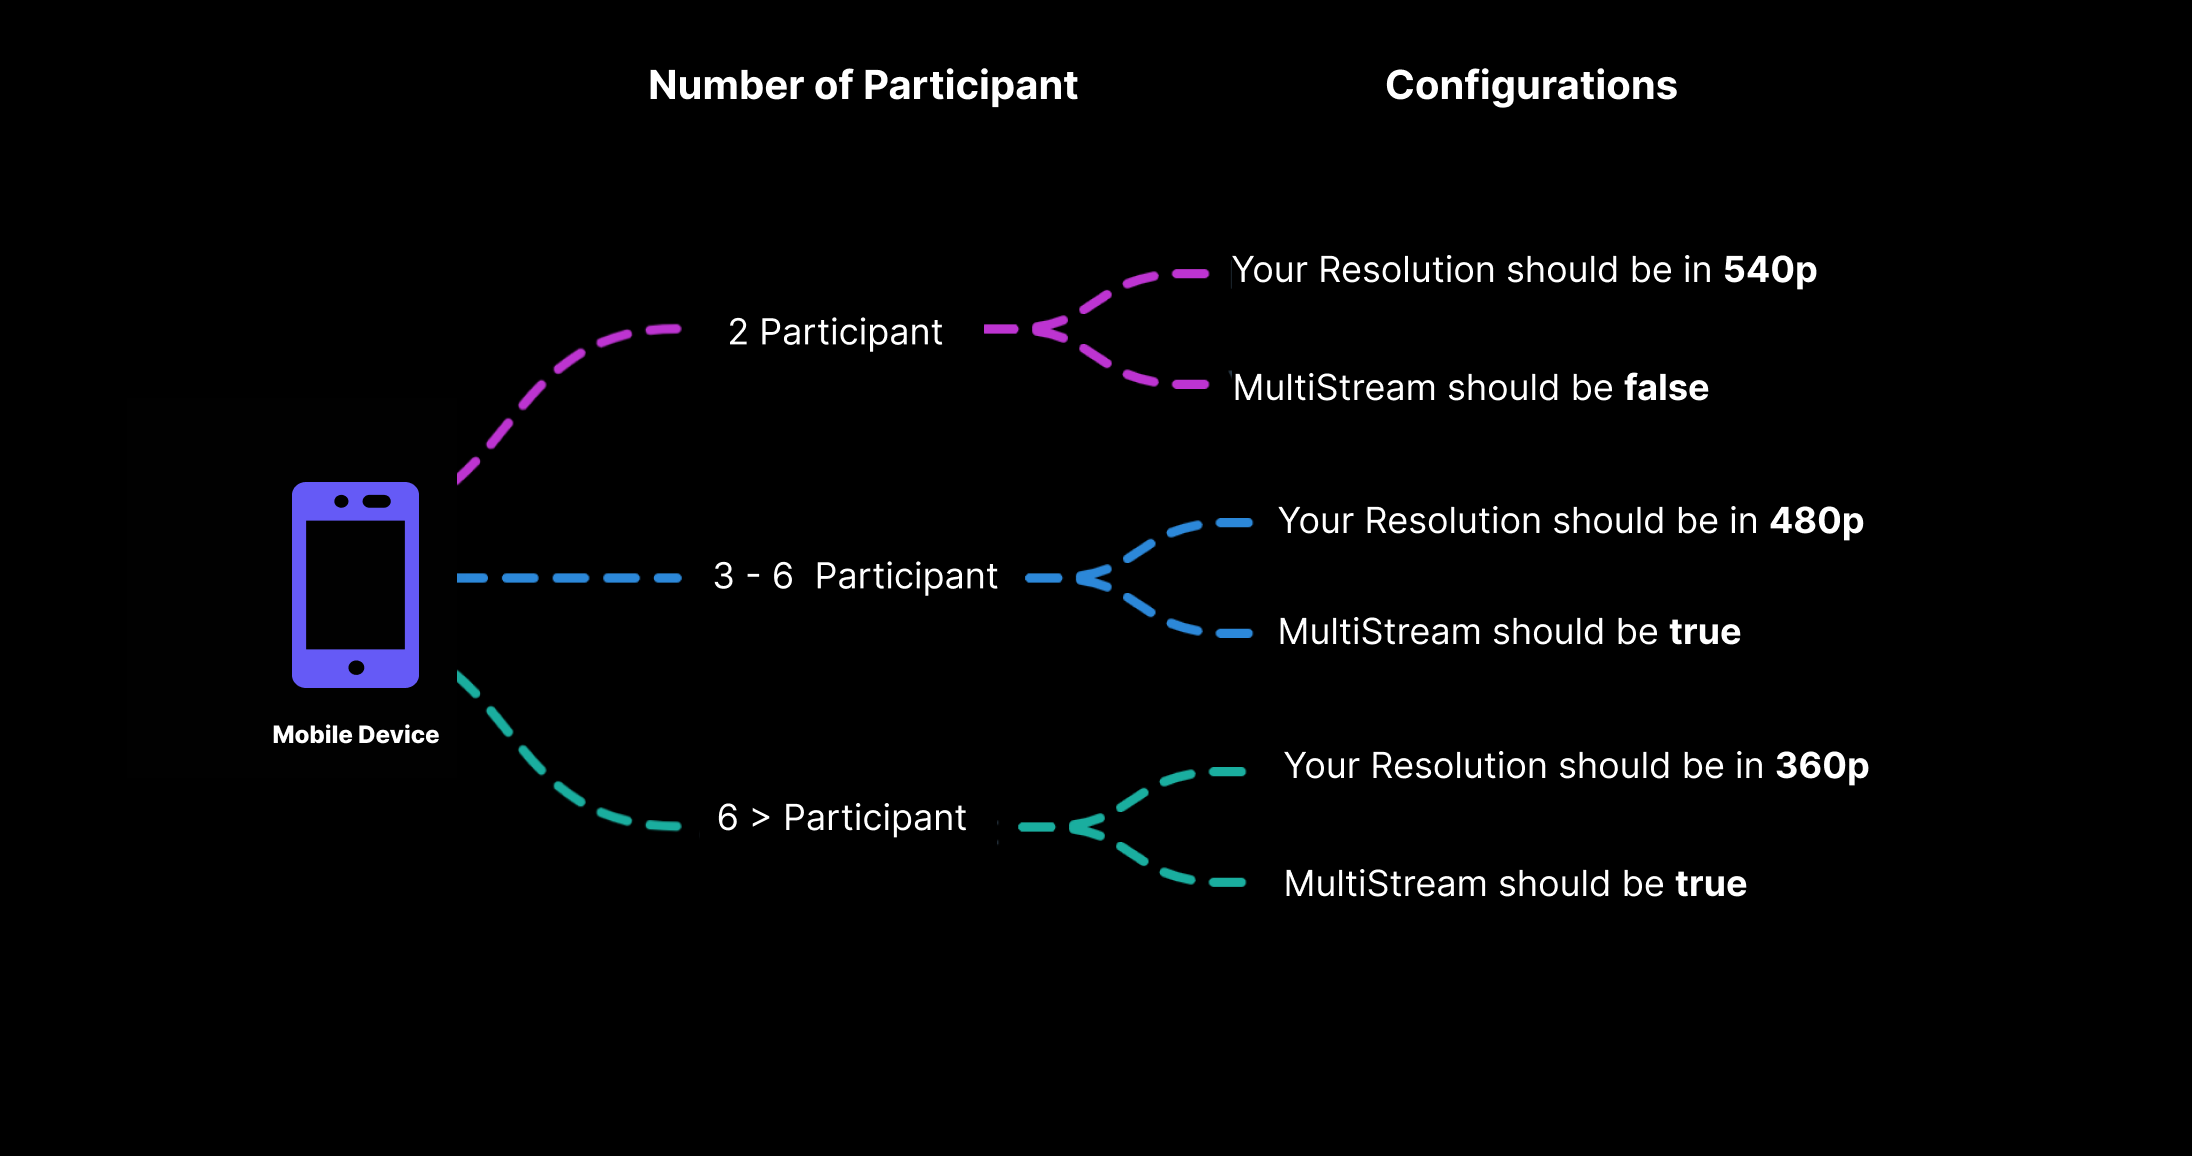
Which Configuration is suitable for Device ?
In this section, we will understand participant size wise encoder(Resolution) and multiStream configuration.
Custom Screen Share Track
This feature can be used to customise screenshare streams with enhanced optimization mode and predefined encoderConfig(Resolution + FPS) for specific use-case and send it to other participants.
How to Create Custom Screen Share Track ?
- You can create a Video Track using
createScreenShareVideoTrack()method of@videosdk.live/react-native-sdk. - This method can be used to create video track using different encoding parameters and optimization mode.
Example
import { createScreenShareVideoTrack } from "@videosdk.live/react-native-sdk";

let customShareTrack = await createScreenShareVideoTrack({
  optimizationMode: "motion", // "text" | "detail",  Default : "motion"

  // This will accept the  height & FPS of video you want to capture.
  encoderConfig: "h720p_15fps", //  `h360p_30fps` | `h1080p_30fps` // Default : `h720p_15fps`
});
You can learn about optimizationMode from here What is optimizationMode ?
How to Setup Custom Screen Share Track ?
In order to switch tracks during the meeting, you have to pass the MediaStream in the enableScreenShare() or toggleScreenShare() method of useMeeting.
Make sure to call disableScreenShare() before you create a new track as it may lead to unexpected behavior.
Example
import {
  createScreenShareVideoTrack,
  useMeeting,
} from "@videosdk.live/react-native-sdk";
import { TouchableOpacity, Text } from "react-native";

const MeetingControls = () => {
  const {
    localScreenShareOn,
    enableScreenShare,
    disableScreenShare,
    toggleScreenShare,
  } = useMeeting();

  const handleToggleScreenShare = async () => {
    if (localScreenShareOn) {
      toggleScreenShare();
    } else {
      let customTrack = await createScreenShareVideoTrack({
        optimizationMode: "motion",
        encoderConfig: "h720p_15fps",
      });

      toggleScreenShare(customTrack);
    }
  };

  const handleEnableScreenShare = async () => {
    if (localScreenShareOn) {
      disableScreenShare();
    }

    let customTrack = await createScreenShareVideoTrack({
      optimizationMode: "motion",
      encoderConfig: "h720p_15fps",
    });

    enableScreenShare(customTrack);
  };

  return (
    <>
      <TouchableOpacity
        onPress={() => {
          handleToggleWebcam();
        }}
      >
        <Text>Toggle ScreenShare</Text>
      </TouchableOpacity>

      <TouchableOpacity
        onPress={() => {
          handleEnableWebcam();
        }}
      >
        <Text>Enable ScreenShare</Text>
      </TouchableOpacity>
    </>
  );
};
API Reference
The API references for all the methods and events utilised in this guide are provided below.
Got a Question? ![]() Ask us on discord
Ask us on discord

