Display Video - React Native
This guide elaborates on how to render a participant's video on the screen. With React Native, there's no need to specifically render a participant's audio, as it is handled by the native functionality.
Rendering Participant
The steps involved in rendering the video of a participant are as follows.
1. Get Mic and Webcam Status
To render a participant, it is essential to determine whether their audio or video is on or off. If the webcam is not turned on, start by rendering the participant's frames with their name; otherwise, render the video.
Step 1: First, retrieve every participant from the useMeeting hook and create a simple box with each of their names.
import {
  useMeeting,
  useParticipant,
  RTCView,
  MediaStream,
} from "@videosdk.live/react-native-sdk";

import { View, Text, FlatList } from "react-native";

const MeetingView = () => {
  //Getting all the participants
  const { participants } = useMeeting();

  const participantsArrId = [...participants.keys()];

  return (
    <View
      style={{
        flex: 1,
        marginVertical: 12,
      }}
    >
      {participantsArrId.length > 0 ? (
        <FlatList
          data={participantsArrId}
          renderItem={({ item }) => {
            return <ParticipantView participantId={item} />;
          }}
        />
      ) : (
        <View
          style={{
            flex: 1,
            backgroundColor: "#F6F6FF",
            justifyContent: "center",
            alignItems: "center",
          }}
        >
          <Text style={{ fontSize: 20 }}>Participant has not joined yet</Text>
        </View>
      )}
    </View>
  );
};

// This will render a single participant's view
function ParticipantView({ participantId }) {
  const { displayName } = useParticipant(participantId);

  return (
    <View
      style={{
        height: 250,
        backgroundColor: "#404B53",
        marginVertical: 8,
      }}
    >
      <Text>{displayName}</Text>
    </View>
  );
}
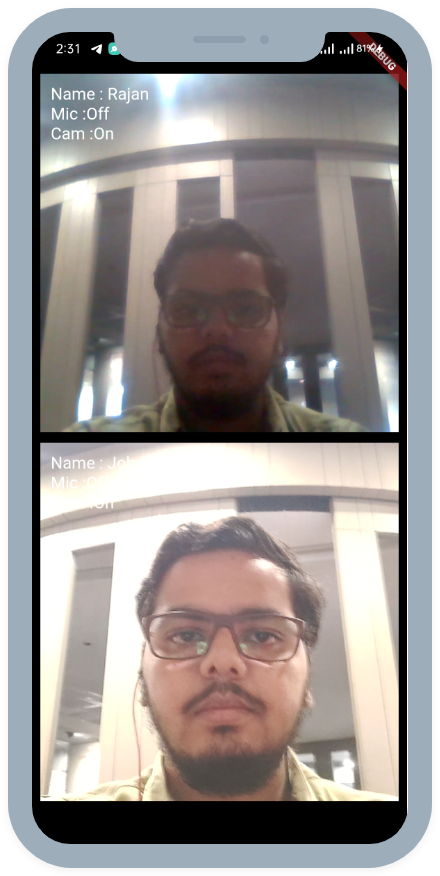
Step 2: To display the status of each participant's microphone and webcam in the list, you can use the micOn and webcamOn properties of the useParticipant hook.
Here's a code code snippet of rendering mic and webcam status:
function ParticipantView({ participantId }) {
  //Getting the micOn and webcamOn property
  const { webcamOn, displayName, micOn } = useParticipant(participantId);

  return (
    <View
      style={{
        height: 250,
        backgroundColor: "#404B53",
        marginVertical: 8,
      }}
    >
      <Text>{displayName}</Text>
      <Text>
        Webcam:{webcamOn ? "On" : "Off"} Mic: {micOn ? "On" : "Off"}
      </Text>
    </View>
  );
}
2. Rendering Video
The status of the webcam and mic is now displayed. Now whenever a participant's webcam is turned on, to display their video, you will require their webcamStream which can be obtained from the useParticipant hook.
const ParticipantView = ({ participantId }) => {
  //Getting the webcamStream property
  const { webcamOn, displayName, micOn, webcamStream } =
    useParticipant(participantId);

  return (
    <View
      style={{
        height: 250,
        backgroundColor: "#404B53",
        marginVertical: 8,
      }}
    >
      <Text>{displayName}</Text>
      <Text>
        Webcam:{webcamOn ? "On" : "Off"} Mic: {micOn ? "On" : "Off"}
      </Text>
      {webcamOn && webcamStream ? (
        <RTCView
          streamURL={new MediaStream([webcamStream.track]).toURL()}
          objectFit={"cover"}
          style={{
            height: 200,
          }}
        />
      ) : null}
    </View>
  );
};
Here, you don't need to render audio separately because RTCView is a component that handles audio stream automatically.
2.1 Mirror Local Video View
If you want to display the mirror view of the local participant, you can pass a boolean value to mirror property of RTCView.
const ParticipantView = ({ participantId }) => {
  const { isLocal } = useParticipant(participantId);

  //... Other video configurations

  return (
    <>
      {webcamOn && webcamStream ? (
        <RTCView
          streamURL={new MediaStream([webcamStream.track]).toURL()}
          objectFit={"cover"}
          mirror={isLocal ? true : false}
          style={{
            height: 200,
          }}
        />
      ) : null}
    </>
  );
};
Sample of mirror view video

API Reference
The API references for all the methods and events utilised in this guide are provided below.
Got a Question? ![]() Ask us on discord
Ask us on discord

