Picture-in-Picture Mode - React Native
Overview
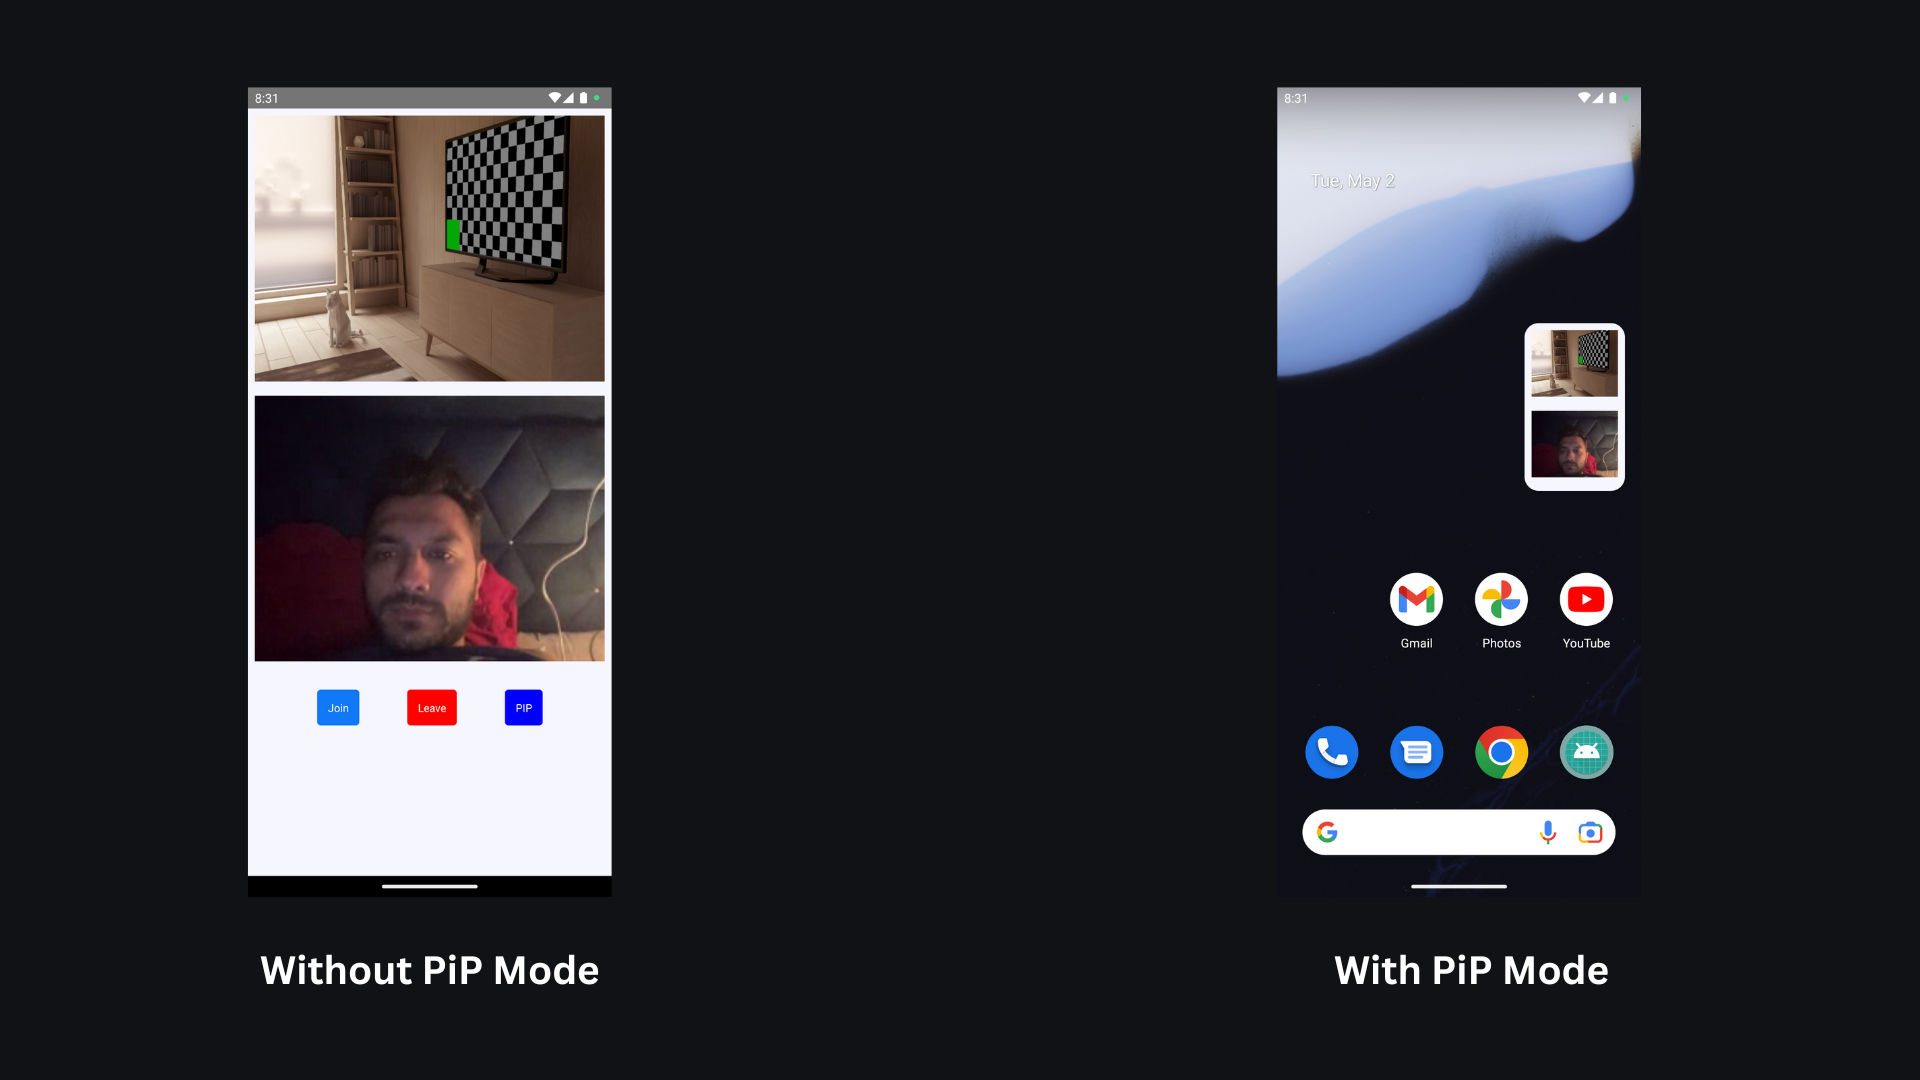
Picture-in-picture (PiP) is a commonly used feature in video conferencing software, enabling users to simultaneously engage in a video conference and perform other tasks on their device. With PiP, you can keep the video conference window open, resize it to a smaller size, and continue working on other tasks while still seeing and hearing the other participants in the conference. This feature proves beneficial when you need to take notes, send an email, or look up information during the conference.
This guide walks you through implementing PiP using VideoSDK's React Native SDK.
- On Android, PiP is supported natively and can be implemented using the
react-native-pip-androiddependency. - On iOS, the approach is custom: we capture RTC frames natively, convert them into
AVPlayer-compatibleframes, and render them inside a custom view to enable PiP functionality usingAVPictureInPictureController.
In the following sections, you'll find platform-specific instructions to help you integrate PiP mode smoothly into your application.
- Picture-in-Picture (PiP) functionality is not supported after screen sharing
You can view the complete working implementation in this Github repository
Prerequisites
- Familiarity with Native Modules in React Native.
- To implement PiP (Picture-in-Picture) mode, clone the Quick Start Repository and follow the implementation steps.
Android Implementation
Step 1: Install the PiP Dependency
- NPM
- YARN
npm install @videosdk.live/react-native-pip-android
yarn add @videosdk.live/react-native-pip-android
Step 2: Setup
Include the following attribute in /android/app/src/main/AndroidManifest.xml file.
  <activity
    ...
      android:supportsPictureInPicture="true"
      android:configChanges=
        "screenSize|smallestScreenSize|screenLayout|orientation"
        ...
Step 3: Import Activity in MainActivity.java file
- java
- kotlin
...
import live.videosdk.pipmode.AndroidPipModule;

public class MainActivity extends ReactActivity {

...
  // this is for the changing values of pip listener
  @Override
  public void onPictureInPictureModeChanged (boolean isInPictureInPictureMode) {
    AndroidPipModule.pipModeChanged(isInPictureInPictureMode);
  }

  // this is for the auto enable pip mode
  @Override
  public boolean onPictureInPictureRequested() {
    AndroidPipModule.pipModeReq();
    return true;
  }
}
...
import live.videosdk.pipmode.AndroidPipModule

class MainActivity : ReactActivity() {

...
  // This is for the changing values of pip listener
  override fun onPictureInPictureModeChanged(isInPictureInPictureMode: Boolean) {
    AndroidPipModule.pipModeChanged(isInPictureInPictureMode)
  }

  // This is for the auto enable pip mode
  override fun onPictureInPictureRequested(): Boolean {
    AndroidPipModule.pipModeReq()
    return true
  }
}
iOS Implementation
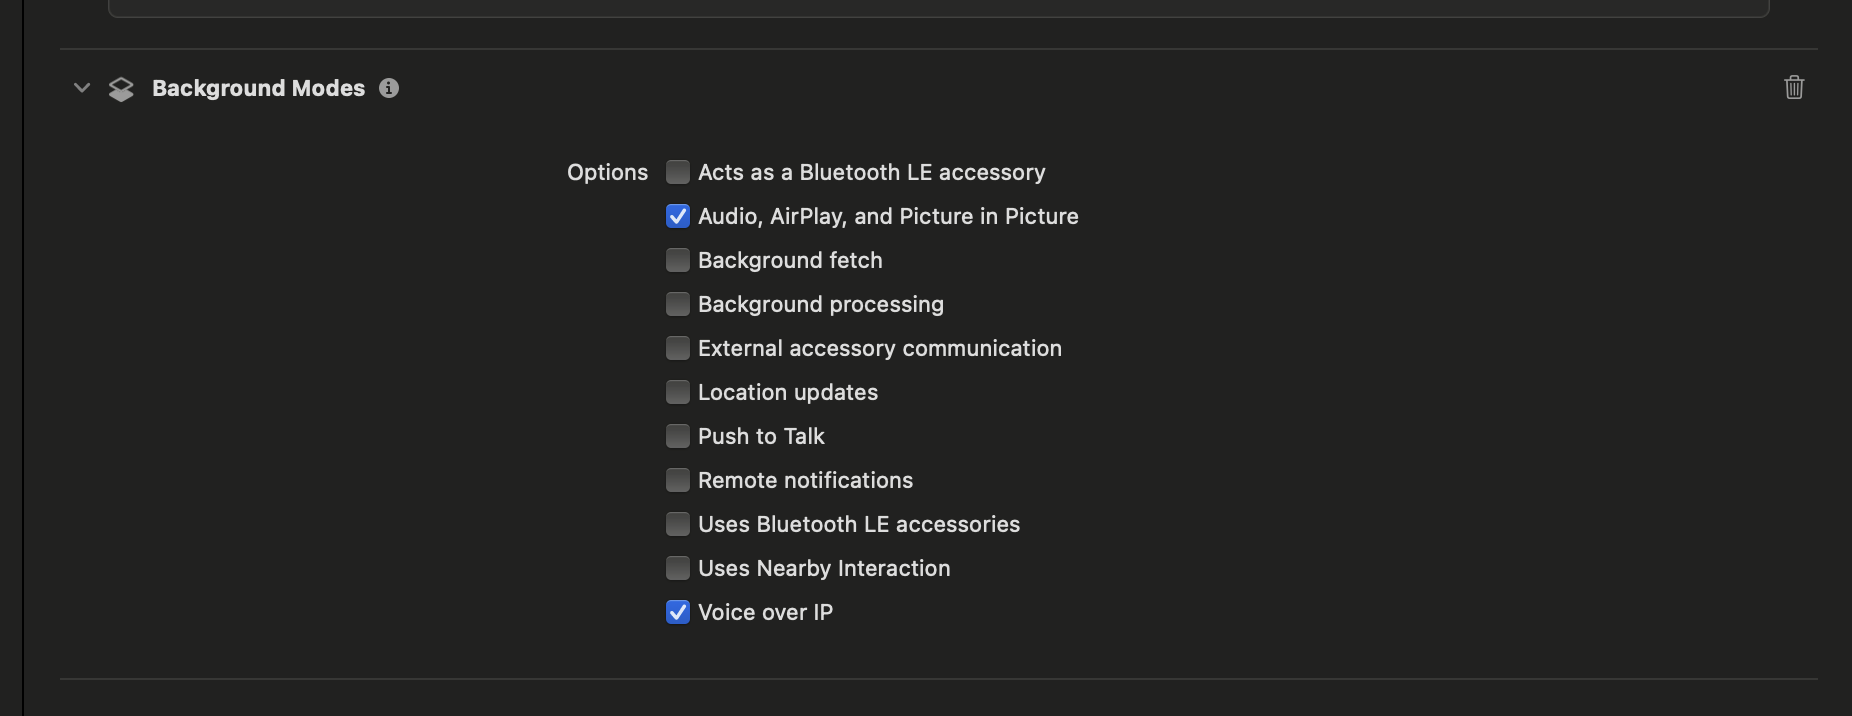
Step 1 : Enable Xcode Capabilities
Enable the necessary capabilities in Xcode:
- Open your project in Xcode.
- Navigate to your target settings.
- Select the "Signing & Capabilities" tab.
- Click the "+" button to add capabilities.
- Add Background Modes.
Under Background Modes, enable the following options:
- Audio, AirPlay, and Picture in Picture
- Voice over IP
Step 2 : Handle Local Participant Frames (Using VideoProcessor)
Use the VideoSDK's VideoProcessor to access local RTC video frames:
For a detailed setup guide on processor refer to this documentation.
- Below is the Swift implementation to process and render local frames:
// Override VideoProcessor class to access VideoFrames
@objc public class VideoProcessor: NSObject, VideoFrameProcessorDelegate {

  public func capturer(_ capturer: RTCVideoCapturer!, didCapture frame: RTCVideoFrame!) -> RTCVideoFrame! {
    // This method gives access to local participant’s RTC video frames
    return frame
  }
}
Step 3 : Handle Remote Participant Frames via Native Module Bridge
To access remote video frames, pass the remote stream ID from React Native to native code using a custom bridge.
RemoteTrackModule Bridge (Objective-C Header)
#import <React/RCTBridgeModule.h>

@interface RCT_EXTERN_MODULE(RemoteTrackModule, NSObject)
RCT_EXTERN_METHOD(attachRenderer:(NSString *)trackId)
@end
Use Stream ID in Swift
@objc(RemoteTrackModule)
class RemoteTrackModule: NSObject, RTCVideoRenderer {

  @objc func attachRenderer(_ trackId: String) {
    if let track = RemoteTrackRegistry.shared().remoteTrack(forId: trackId) {
      print("Got remote track: \(trackId)")
      track.add(self)
    } else {
      print("No track for ID: \(trackId)")
    }
  }
}
Step 4: Convert Frames for AVKit
To render video in PiP mode, convert RTC frames (RTCVideoFrame) into CVPixelBuffer and display them using AVSampleBufferDisplayLayer.
- Extract buffer from
RTCVideoFrame. - Convert it to a
CVPixelBuffer. - Create a
CMSampleBuffer. - Display via
AVSampleBufferDisplayLayer. - Manage PiP using
AVPictureInPictureController.
Once you’ve converted both local and remote video frames, you can combine them into a single view—called SplitVideoView—which can dynamically switch between showing the local and/or remote participant.
This combined view can then be used as the content source for PiP rendering.
Check out the complete code implementation for frame conversion and SplitVideoView here
Step 5: Expose PiP Controls (Bridge)
PiPManager Bridge(Objective-C Header)
#import <React/RCTBridgeModule.h>

@interface RCT_EXTERN_MODULE(PiPManager, NSObject)
RCT_EXTERN_METHOD(setupPiP)
RCT_EXTERN_METHOD(startPiP)
RCT_EXTERN_METHOD(stopPiP)
RCT_EXTERN_METHOD(setShowRemote:(BOOL)value)
@end
PiPManager Implementation in Swift
@objc(PiPManager)
class PiPManager: NSObject, AVPictureInPictureControllerDelegate {

  private var _showRemote: Bool = false {
    didSet {
      DispatchQueue.main.async {
        SplitVideoView.shared.updateRemoteVisibility(showRemote: self._showRemote)
      }
    }
  }

  private var pipController: AVPictureInPictureController?
  private var pipViewController: AVPictureInPictureVideoCallViewController?
  private var splitVideoView: SplitVideoView?

  @objc override init() {
    super.init()
  }

  @objc func setShowRemote(_ value: Bool) {
    _showRemote = value
  }

  @objc func setupPiP() {
    DispatchQueue.main.async {
      guard AVPictureInPictureController.isPictureInPictureSupported(),
            let rootView = UIApplication.shared.connectedScenes
              .compactMap({ $0 as? UIWindowScene })
              .flatMap({ $0.windows })
              .first(where: { $0.isKeyWindow })?.rootViewController?.view else {
        print("PiP not supported or root view not found")
        return
      }

      self.splitVideoView = SplitVideoView.shared

      let pipVC = AVPictureInPictureVideoCallViewController()
      pipVC.preferredContentSize = CGSize(width: 120, height: 90)

      if let splitView = self.splitVideoView {
        pipVC.view.addSubview(splitView)
        splitView.translatesAutoresizingMaskIntoConstraints = false
        NSLayoutConstraint.activate([
          splitView.topAnchor.constraint(equalTo: pipVC.view.topAnchor),
          splitView.bottomAnchor.constraint(equalTo: pipVC.view.bottomAnchor),
          splitView.leadingAnchor.constraint(equalTo: pipVC.view.leadingAnchor),
          splitView.trailingAnchor.constraint(equalTo: pipVC.view.trailingAnchor)
        ])
        splitView.updateRemoteVisibility(showRemote: self._showRemote)
      }

      let contentSource = AVPictureInPictureController.ContentSource(
        activeVideoCallSourceView: rootView,
        contentViewController: pipVC
      )

      self.pipController = AVPictureInPictureController(contentSource: contentSource)
      self.pipController?.delegate = self
      self.pipController?.canStartPictureInPictureAutomaticallyFromInline = true
      self.pipViewController = pipVC

      print("PiP setup complete")
    }
  }

  @objc func startPiP() {
    DispatchQueue.main.async {
      if self.pipController?.isPictureInPictureActive == false {
        self.pipController?.startPictureInPicture()
        print("PiP started")
      }
    }
  }

  @objc func stopPiP() {
    DispatchQueue.main.async {
      if self.pipController?.isPictureInPictureActive == true {
        self.pipController?.stopPictureInPicture()
        print("PiP stopped")
      }
    }
  }

  func pictureInPictureControllerDidStopPictureInPicture(_ controller: AVPictureInPictureController) {
    self.splitVideoView?.removeFromSuperview()
    self.pipViewController = nil
    self.pipController = nil
    print("PiP cleanup complete")
  }
}
React Native Side Implementation
After configuring platform-specific native implementations (Android and iOS), you can control Picture-in-Picture behavior from the React Native side using simple, intuitive APIs.
This section outlines how to implement PiP mode behavior inside your React Native component using:
@videosdk.live/react-native-pip-androidfor Android- Native modules (
PiPManager,RemoteTrackModule,VideoProcessor) for iOS
Android: Using @videosdk.live/react-native-pip-android
For Android, implementation is straightforward since the PiP functionality is handled using the @videosdk.live/react-native-pip-android library.
1. Entering PiP Mode Using a Button
A button can be used to trigger PiP mode manually. This functionality is typically included inside the ControlsContainer:
import PipHandler, { usePipModeListener } from '@videosdk.live/react-native-pip-android';

<Button
  onPress={() => {
    PipHandler.enterPipMode(300, 500);
  }}
  buttonText={'PiP'}
  backgroundColor={'#1178F8'}
/>
2. Auto-Enable PiP Mode Using a Variable
You can also enable PiP mode automatically when the meeting screen is entered. Use useEffect to set PiP mode upon mounting the component and to deactivate it when the user leaves:
import { useEffect, useState } from 'react';
import PipHandler from '@videosdk.live/react-native-pip-android';

export default function App() {
  useEffect(() => {
    // Set default PiP dimensions when the component mounts
    PipHandler.setDefaultPipDimensions(300, 500);

    // Automatically activate PiP mode when entering the meeting screen
    PipHandler.setMeetingScreenState(true);

    // Cleanup: Deactivate PiP mode when leaving the meeting screen (when component unmounts)
    return () => {
      console.log('Cleaning up: Setting meeting screen state to false');
      PipHandler.setMeetingScreenState(false);
    };
  }, []);
}
3. Rendering in PiP Mode
Inside the MeetingView component, the PiP rendering is conditionally handled when in PiP mode. The usePipModeListener hook is used to track PiP mode status:
const inPipMode = usePipModeListener();

if (inPipMode && Platform.OS === 'android') {
  return [...participants.keys()].map((participantId, index) => (
    <ParticipantView
      key={index}
      participantId={participantId}
      inPipMode={true}
    />
  ));
}
4. Adjust Video Rendering for PiP Mode
When rendering video in PiP mode, you can adjust the size of the video based on the platform and PiP mode status. For instance, reducing the height of the video stream when in PiP mode:
function ParticipantView({ participantId, inPipMode }) {
  const { webcamStream, webcamOn } = useParticipant({});

  return webcamOn && webcamStream ? (
    <RTCView
      streamURL={new MediaStream([webcamStream.track]).toURL()}
      objectFit={'cover'}
      style={{
        height: Platform.OS === 'android' && inPipMode ? 75 : 300,
        marginVertical: 8,
        marginHorizontal: 8,
      }}
    />
  ) : (
    <View
      style={{
        backgroundColor: 'grey',
        height: Platform.OS === 'android' && inPipMode ? 75 : 300,
        justifyContent: 'center',
        alignItems: 'center',
        marginVertical: 8,
        marginHorizontal: 8,
      }}>
      <Text style={{ fontSize: 16 }}>NO MEDIA</Text>
    </View>
  );
}
iOS (Using Native Modules)
iOS requires a more involved setup, including local frame access and stream management via native bridges.
1. Register Local Frame Processor
To process local frames, register and apply the custom processor:
function register() {
  VideoEffectModule.registerProcessor('VideoProcessor');
}

function applyProcessor() {
  VideoProcessor.applyVideoProcessor('VideoProcessor');
}
These are called from the “Apply Processor” button:
<Button
  onPress={() => {
    if (Platform.OS === 'ios') {
      register();
      applyProcessor();
      PiPManager.setupPiP();
    } else if (Platform.OS === 'android') {
      console.log('for android you don’t need to apply processor');
    }
  }}
  buttonText={'Apply Processor'}
  backgroundColor={'#1178F8'}
/>
2. Triggering PiP Mode
Start PiP by invoking the native method:
<Button
  onPress={() => {
    if (Platform.OS === 'ios') {
      PiPManager.startPiP();
    } else if (Platform.OS === 'android') {
      PipHandler.enterPipMode(300, 500);
    }
  }}
  buttonText={'PiP'}
  backgroundColor={'#1178F8'}
/>
3. Handling Remote Participant Frames
When a remote participant enables their webcam, we extract the stream.track.id and pass it to the native side via the RemoteTrackModule:
onStreamEnabled: stream => {
  const trackId = stream.track.id;
  RemoteTrackModule.attachRenderer(trackId);
  PiPManager.setShowRemote(true);
}
Similarly, when the remote stream is disabled or the participant leaves, the component updates PiPManager to either switch to another participant or turn off remote video in PiP:
onStreamDisabled: () => {
  PiPManager.setShowRemote(false);
}
4. Dynamic Remote Management
To handle switching between remote participants in PiP mode, the app keeps track of active participants using:
pipedParticipantRef(to store the participant currently shown in PiP)webcamStatusMap(to track webcam status for fallback logic)
In onParticipantJoined and onParticipantLeft, we check and assign new participants dynamically based on their webcam status.
Output
Got a Question? ![]() Ask us on discord
Ask us on discord

