Switch Remote Participant Camera - React
This guide outlines the process of switching camera view (from front camera to back or vice versa) of a remote participant in a meeting. The method involves utilizing a pubsub mechanism to communicate camera changes among participants and creating custom video tracks with the desired resolution.
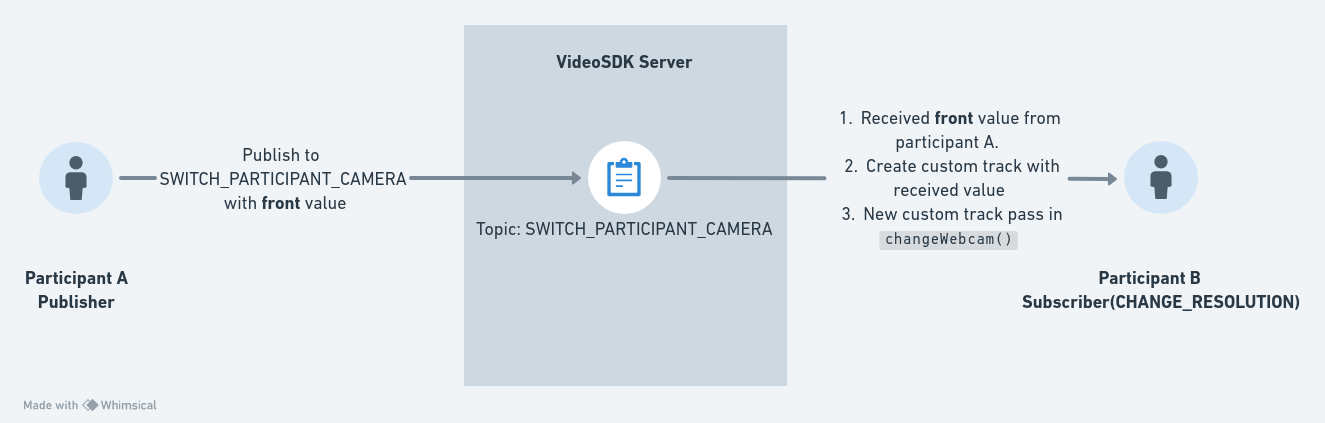
For a clearer understanding, consider this scenario: If participant A wishes to change the camera view of participant B, participant A publishes a topic called SWITCH_PARTICIPANT_CAMERA with either front or back as the value. Participant B subscribes to the SWITCH_PARTICIPANT_CAMERA topic and receives the value shared by participant A. Following this, a custom video track is generated with the new resolution value, and this track is then passed into the changeWebcam() function.
Here's a visual representation to enhance the understanding:
Step 1 : Create a Pubsub Topic
- First create a pubsub topic called
SWITCH_PARTICIPANT_CAMERAinParticipantViewComponent for publishing selected camera view value.
import { usePubSub } from "@videosdk.live/react-sdk";

function ParticipantView({ participantId }) {
  // ..

  const { publish: switchCameraPublish } = usePubSub(
    `SWITCH_PARTICIPANT_CAMERA_${participantId}`,
    {
      onMessageReceived: async ({ message }) => {
        console.log("message", message);
      },
    }
  );
}
Step 2 : Create Switch Button
-
Next, create a switch button with
FRONTandBACKoptions on top of the participant grid item. -
Upon clicking the button, publish a pubsub topic with either the
FRONTorBACKvalue to communicate the desired camera facing value.
import { useParticipant } from "@videosdk.live/react-sdk";

function ParticipantView({ participantId }) {
  // ..
  const {
    //..
    isLocal,
  } = useParticipant(participantId);

 return (
  {!isLocal && (
      <div style={{ position: "absolute", top: "1", left: "10" }}>
        <div>
          {[{ value: "front", label: "FRONT", res: "h480p_w640p" },
            { value: "back", label: "BACK", res: "h720p_w1280p" },
          ].map(({ value, label, res }) =>
            label === "FRONT" || label === "BACK" ? (
              <button
                onClick={async (e) => {
                  switchCameraPublish(
                    {facingMode: value}
                  );
                  e.stopPropagation();
                }}
              >
                {label}
              </button>
            ) : null
          )}
        </div>
      </div>
  )}
 )
}
Step 3 : Create a SwitchCameraListener Component
Now, create a SwitchCameraListener component to subscribe to the SWITCH_PARTICIPANT_CAMERA topic.
-
Within this component, you will receive either
frontorbackas the value. Based on this value, find the cameraId and the label (eitherfrontorback) from the webcam list. -
On finding the cameraId value, create a customVideoTrack by passing it as the
webcamIdparam value. -
After creating the custom video track with the received value, pass that track into the
changeWebcammethod to initiate the camera view change.
import {
  useMeeting,
  usePubSub,
  createCameraVideoTrack,
} from "@videosdk.live/react-sdk";
import { useMeetingAppContext } from "../context/MeetingAppContext";
import { useEffect, useRef, useState } from "react";
import useMediaStream from "../hooks/useMediaStream";

const SwitchCameraListner = () => {
  const [webcams, setWebcams] = useState([]);
  const webcamsRef = useRef();

  useEffect(() => {
    webcamsRef.current = webcams;
  }, [webcams]);

  const getWebcams = async () => {
    const devices = await navigator.mediaDevices.enumerateDevices();
    const webcams = devices.filter(
      (d) =>
        d.kind === "videoinput" &&
        d.deviceId !== "default" &&
        d.deviceId !== "communications"
    );

    webcams && webcams?.length && setWebcams(webcams);
  };

  const mMeeting = useMeeting();

  useEffect(() => {
    getWebcams(mMeeting?.getWebcams);
  }, []);

  usePubSub(`SWITCH_PARTICIPANT_CAMERA_${mMeeting?.localParticipant?.id}`, {
    onMessageReceived: async ({ message }) => {
      let customTrack;

      const deviceId = webcamsRef.current.find((webcam) =>
        webcam.label.toLowerCase().includes(message.facingMode)
      )?.deviceId;
      const label = webcamsRef.current.find((webcam) =>
        webcam.label.toLowerCase().includes(message.facingMode)
      )?.label;

      await mMeeting?.disableWebcam();
      try {
        customTrack = await createCameraVideoTrack({
          cameraId: deviceId,
          facingMode: message.facingMode,
          optimizationMode: "motion",
          multiStream: false,
        });
      } catch (error) {
        console.log("error in creating custom video track", error);
      }

      mMeeting.changeWebcam(customTrack);
    },
  });

  return <></>;
};

export default SwitchCameraListener;
Step 4 : Place the SwitchCameraListener in MeetingContainer
- Finally, render the
SwitchCameraListnercomponent in theMeetingContainerto facilitate the reception and transmission of camera view changes among participants.
function MeetingContainer() {
  //..

  return (
    // ..
    <SwitchCameraListener />
  );

  //..
}
API Reference
The API references for all the methods utilized in this guide are provided below.
Got a Question? ![]() Ask us on discord
Ask us on discord

