Quick Start for Conference in React
VideoSDK empowers you to seamlessly integrate the video calling feature into your React application within minutes.
In this quickstart, you'll explore the group calling feature of VideoSDK. Follow the step-by-step guide to integrate it within your application.
Prerequisites
Before proceeding, ensure that your development environment meets the following requirements:
- VideoSDK Developer Account (Not having one, follow VideoSDK Dashboard)
- Basic understanding of React
- React VideoSDK
- Have Node and NPM installed on your device.
- Basic understanding of Hooks (useState, useRef, useEffect)
- React Context API (optional)
One should have a VideoSDK account to generate token. Visit VideoSDK dashboard to generate token
Getting Started with the Code!
Follow the steps to create the environment necessary to add video calls into your app. You can also find the code sample for quickstart here.
Create new React App
Create a new React App using the below command.
$ npx create-react-app videosdk-rtc-react-app
Install VideoSDK
Install the VideoSDK using the below-mentioned npm command. Make sure you are in your react app directory before you run this command.
- NPM
- Yarn
$ npm install "@videosdk.live/react-sdk"

//For the Participants Video
$ npm install "react-player"
$ yarn add "@videosdk.live/react-sdk"

//For the Participants Video
$ yarn add "react-player"
Structure of the project
Your project structure should look like this.
   root
   ├── node_modules
   ├── public
   ├── src
   │    ├── API.js
   │    ├── App.js
   │    ├── index.js
   .    .
You are going to use functional components to leverage react's reusable component architecture. There will be components for users, videos and controls (mic, camera, leave) over the video.
App Architecture
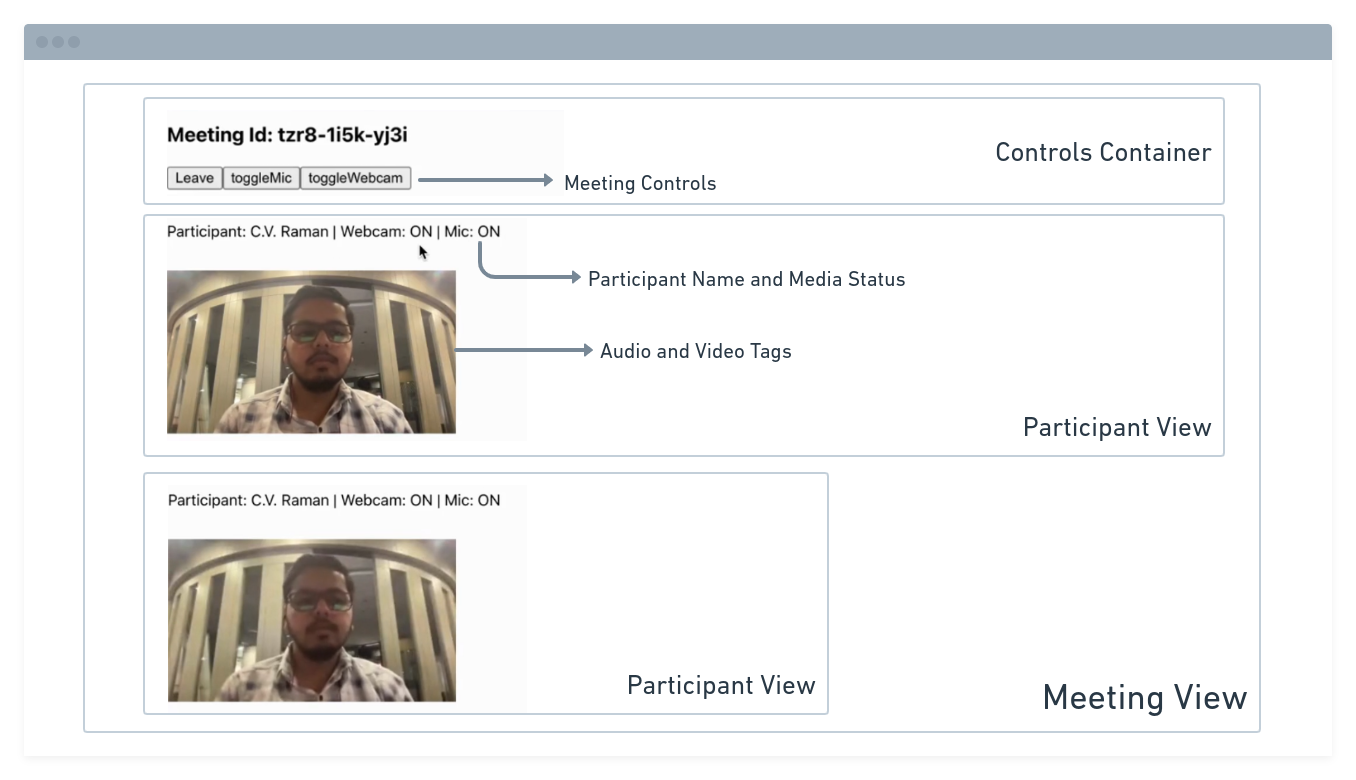
The App will contain a MeetingView component which includes a ParticipantView component which will render the participant's name, video, audio, etc. It will also have a Controls component which will allow the user to perform operations like leave and toggle media.
You will be working on the following files:
- API.js: Responsible for handling API calls such as generating unique meetingId and token
- App.js: Responsible for rendering
MeetingViewand joining the meeting.
Step 1: Get started with API.js
Prior to moving on, you must create an API request to generate a unique meetingId. You will need an authentication token, which you can create either through the videosdk-rtc-api-server-examples or directly from the VideoSDK Dashboard for developers.
- Javascript
- Typescript
//This is the Auth token, you will use it to generate a meeting and connect to it
export const authToken = "<Generated-from-dashbaord>";
// API call to create a meeting
export const createMeeting = async ({ token }) => {
  const res = await fetch(`https://api.videosdk.live/v2/rooms`, {
    method: "POST",
    headers: {
      authorization: `${authToken}`,
      "Content-Type": "application/json",
    },
    body: JSON.stringify({}),
  });
  //Destructuring the roomId from the response
  const { roomId } = await res.json();
  return roomId;
};
//This is the Auth token, you will use it to generate a meeting and connect to it
export const authToken: string = "YOUR GENERATED TOKEN HERE";

// API call to create a meeting
export const createMeeting = async ({ token }: { token: string }) => {
  const res = await fetch(`https://api.videosdk.live/v2/rooms`, {
    method: "POST",
    headers: {
      authorization: `${authToken}`,
      "Content-Type": "application/json",
    },
    body: JSON.stringify({}),
  });
  //Destructuring the roomId from the response
  const { roomId }: { roomId: string } = await res.json();
  return roomId;
};
Step 2: Wireframe App.js with all the components
To build up wireframe of App.js, you need to use VideoSDK Hooks and Context Providers. VideoSDK provides MeetingProvider, MeetingConsumer, useMeeting and useParticipant hooks.
First you need to understand Context Provider and Consumer. Context is primarily used when some data needs to be accessible by many components at different nesting levels.
- MeetingProvider: This is the Context Provider. It accepts value
configandtokenas props. The Provider component accepts a value prop to be passed to consuming components that are descendants of this Provider. One Provider can be connected to many consumers. Providers can be nested to override values deeper within the tree. - MeetingConsumer: This is the Context Consumer. All consumers that are descendants of a Provider will re-render whenever the Provider’s value prop changes.
- useMeeting: This is the meeting hook API. It includes all the information related to meeting such as join, leave, enable/disable mic or webcam etc.
- useParticipant: This is the participant hook API. It is responsible for handling all the events and props related to one particular participant such as name, webcamStream, micStream etc.
The Meeting Context provides a way to listen for any changes that occur when a participant joins the meeting or makes modifications to their microphone, camera, and other settings. Begin by making a few changes to the code in the App.js file.
- Javascript
- Typescript
import "./App.css";
import React, { useEffect, useMemo, useRef, useState } from "react";
import {
  MeetingProvider,
  MeetingConsumer,
  useMeeting,
  useParticipant,
  VideoPlayer,
} from "@videosdk.live/react-sdk";
import { authToken, createMeeting } from "./API";

function JoinScreen({ getMeetingAndToken }) {
  return null;
}

function ParticipantView(props) {
  return null;
}

function Controls(props) {
  return null;
}

function MeetingView(props) {
  return null;
}

function App() {
  const [meetingId, setMeetingId] = useState(null);

  //Getting the meeting id by calling the api we just wrote
  const getMeetingAndToken = async (id) => {
    const meetingId =
      id == null ? await createMeeting({ token: authToken }) : id;
    setMeetingId(meetingId);
  };

  //This will set Meeting Id to null when meeting is left or ended
  const onMeetingLeave = () => {
    setMeetingId(null);
  };

  return authToken && meetingId ? (
    <MeetingProvider
      config={{
        meetingId,
        micEnabled: true,
        webcamEnabled: true,
        name: "C.V. Raman",
      }}
      token={authToken}
    >
      <MeetingView meetingId={meetingId} onMeetingLeave={onMeetingLeave} />
    </MeetingProvider>
  ) : (
    <JoinScreen getMeetingAndToken={getMeetingAndToken} />
  );
}

export default App;
import "./App.css";
import React, { useEffect, useMemo, useRef, useState } from "react";
import {
  MeetingProvider,
  MeetingConsumer,
  useMeeting,
  useParticipant,
  VideoPlayer,
} from "@videosdk.live/react-sdk";
import { authToken, createMeeting } from "./API";

function JoinScreen({
  getMeetingAndToken,
}: {
  getMeetingAndToken: (meeting?: string) => void,
}) {
  return null;
}

function ParticipantView({ participantId }: { participantId: string }) {
  return null;
}

function Controls() {
  return null;
}

function MeetingView({
  onMeetingLeave,
  meetingId,
}: {
  onMeetingLeave: () => void,
  meetingId: string,
}) {
  return null;
}

function App() {
  const [meetingId, setMeetingId] = (useState < string) | (null > null);

  //Getting the meeting id by calling the api we just wrote
  const getMeetingAndToken = async (id?: string) => {
    const meetingId =
      id == null ? await createMeeting({ token: authToken }) : id;
    setMeetingId(meetingId);
  };

  //This will set Meeting Id to null when meeting is left or ended
  const onMeetingLeave = () => {
    setMeetingId(null);
  };

  return authToken && meetingId ? (
    <MeetingProvider
      config={{
        meetingId,
        micEnabled: true,
        webcamEnabled: true,
        name: "C.V. Raman",
      }}
      token={authToken}
    >
      <MeetingView meetingId={meetingId} onMeetingLeave={onMeetingLeave} />
    </MeetingProvider>
  ) : (
    <JoinScreen getMeetingAndToken={getMeetingAndToken} />
  );
}

export default App;
Step 3: Implement Join Screen
Join screen will serve as a medium to either schedule a new meeting or join an existing one.
- Javascript
- Typescript
function JoinScreen({ getMeetingAndToken }) {
  const [meetingId, setMeetingId] = useState(null);
  const onClick = async () => {
    await getMeetingAndToken(meetingId);
  };
  return (
    <div>
      <input
        type="text"
        placeholder="Enter Meeting Id"
        onChange={(e) => {
          setMeetingId(e.target.value);
        }}
      />
      <button onClick={onClick}>Join</button>
      {" or "}
      <button onClick={onClick}>Create Meeting</button>
    </div>
  );
}
function JoinScreen({
  getMeetingAndToken,
}: {
  getMeetingAndToken: (meeting?: string) => void;
}) {
  const [meetingId, setMeetingId] = useState<string | undefined>();
  const onClick = async () => {
    getMeetingAndToken(meetingId);
  };
  return (
    <div>
      <input
        type="text"
        placeholder="Enter Meeting Id"
        onChange={(e) => {
          setMeetingId(e.target.value);
        }}
      />
      <button onClick={onClick}>Join</button>
      {" or "}
      <button onClick={onClick}>Create Meeting</button>
    </div>
  );
}
Output

Step 4: Implement MeetingView and Controls
Next step is to create MeetingView and Controls components to manage features such as join, leave, mute and unmute.
- Javascript
- Typescript
function MeetingView(props) {
  const [joined, setJoined] = useState(null);
  //Get the method which will be used to join the meeting.
  //We will also get the participants list to display all participants
  const { join, participants } = useMeeting({
    //callback for when meeting is joined successfully
    onMeetingJoined: () => {
      setJoined("JOINED");
    },
    //callback for when meeting is left
    onMeetingLeft: () => {
      props.onMeetingLeave();
    },
  });
  const joinMeeting = () => {
    setJoined("JOINING");
    join();
  };

  return (
    <div className="container">
      <h3>Meeting Id: {props.meetingId}</h3>
      {joined && joined == "JOINED" ? (
        <div>
          <Controls />
          //For rendering all the participants in the meeting
          {[...participants.keys()].map((participantId) => (
            <ParticipantView
              participantId={participantId}
              key={participantId}
            />
          ))}
        </div>
      ) : joined && joined == "JOINING" ? (
        <p>Joining the meeting...</p>
      ) : (
        <button onClick={joinMeeting}>Join</button>
      )}
    </div>
  );
}
function Controls() {
  const { leave, toggleMic, toggleWebcam } = useMeeting();
  return (
    <div>
      <button onClick={() => leave()}>Leave</button>
      <button onClick={() => toggleMic()}>toggleMic</button>
      <button onClick={() => toggleWebcam()}>toggleWebcam</button>
    </div>
  );
}
function MeetingView({
  onMeetingLeave,
  meetingId,
}: {
  onMeetingLeave: () => void,
  meetingId: string,
}) {
  const [joined, setJoined] = (useState < string) | (null > null);
  //Get the method which will be used to join the meeting.
  //We will also get the participants list to display all participants
  const { join, participants } = useMeeting({
    //callback for when meeting is joined successfully
    onMeetingJoined: () => {
      setJoined("JOINED");
    },
    //callback for when meeting is left
    onMeetingLeft: () => {
      onMeetingLeave();
    },
  });
  const joinMeeting = () => {
    setJoined("JOINING");
    join();
  };

  return (
    <div className="container">
      <h3>Meeting Id: {meetingId}</h3>
      {joined && joined == "JOINED" ? (
        <div>
          <Controls />
          //For rendering all the participants in the meeting
          {[...participants.keys()].map((participantId) => (
            <ParticipantView
              participantId={participantId}
              key={participantId}
            />
          ))}
        </div>
      ) : joined && joined == "JOINING" ? (
        <p>Joining the meeting...</p>
      ) : (
        <button onClick={joinMeeting}>Join</button>
      )}
    </div>
  );
}
function Controls() {
  const { leave, toggleMic, toggleWebcam } = useMeeting();
  return (
    <div>
      <button onClick={() => leave()}>Leave</button>
      <button onClick={() => toggleMic()}>toggleMic</button>
      <button onClick={() => toggleWebcam()}>toggleWebcam</button>
    </div>
  );
}
Output of Controls Component

Step 5: Implement Participant View
Before implementing the participant view, you need to understand a couple of concepts.
1. Forwarding Ref for mic
The useRef hook is responsible for referencing the audio component. It will be used to play and stop the audio of the participant.
const micRef = useRef(null);
2. useParticipant Hook
The useParticipant hook is responsible for handling all the properties and events of one particular participant joined in the meeting. It will take participantId as argument.
const { micStream, webcamOn, micOn } = useParticipant(props.participantId);
3. MediaStream API
The MediaStream API is beneficial for adding a MediaTrack to the audio tag, enabling the playback of audio.
const micRef = useRef(null);
const mediaStream = new MediaStream();
mediaStream.addTrack(micStream.track);

micRef.current.srcObject = mediaStream;
micRef.current
  .play()
  .catch((error) => console.error("micElem.current.play() failed", error));
Only use the MediaStream API for microphone access. The VideoPlayer component in VideoSDK automatically handles the video stream.
Now you can use both of the hooks and the API to create ParticipantView
- Javascript
- Typescript
function ParticipantView(props) {
  const micRef = useRef(null);
  const {micStream, webcamOn, micOn, isLocal, displayName } =
    useParticipant(props.participantId);

  useEffect(() => {
    if (micRef.current) {
      if (micOn && micStream) {
        const mediaStream = new MediaStream();
        mediaStream.addTrack(micStream.track);

        micRef.current.srcObject = mediaStream;
        micRef.current
          .play()
          .catch((error) =>
            console.error("videoElem.current.play() failed", error)
          );
      } else {
        micRef.current.srcObject = null;
      }
    }
  }, [micStream, micOn]);

  return (
    <div>
      <p>
        Participant: {displayName} | Webcam: {webcamOn ? "ON" : "OFF"} | Mic:{" "}
        {micOn ? "ON" : "OFF"}
      </p>
      <audio ref={micRef} autoPlay playsInline muted={isLocal} />
      {webcamOn && (
        <VideoPlayer
          participantId={props.participantId} // Required
          type="video"
          containerStyle={{
            height: "300px",
            width: "300px",
          }}
          className="h-full"
          classNameVideo="h-full"
          videoStyle={{}}
        />
      )}
    </div>
  );
}
function ParticipantView({ participantId }: { participantId: string }) {
  const micRef = useRef < HTMLAudioElement > null;
  const { micStream, webcamOn, micOn, isLocal, displayName } =
    useParticipant(participantId);

  useEffect(() => {
    if (micRef.current) {
      if (micOn && micStream) {
        const mediaStream = new MediaStream();
        mediaStream.addTrack(micStream.track);

        micRef.current.srcObject = mediaStream;
        micRef.current
          .play()
          .catch((error) =>
            console.error("videoElem.current.play() failed", error)
          );
      } else {
        micRef.current.srcObject = null;
      }
    }
  }, [micStream, micOn]);

  return (
    <div key={participantId}>
      <p>
        Participant: {displayName} | Webcam: {webcamOn ? "ON" : "OFF"} | Mic:{" "}
        {micOn ? "ON" : "OFF"}
      </p>
      <audio ref={micRef} autoPlay muted={isLocal} />
      {webcamOn && (
        <VideoPlayer
          participantId={participantId} // Required
          type="video"
          containerStyle={{
            height: "300px",
            width: "300px",
          }}
          className="h-full"
          classNameVideo="h-full"
          videoStyle={{}}
        />
      )}
    </div>
  );
}
Final Output
You have completed the implementation of a customized video calling app in React.js using VideoSDK. To explore more features, go through Basic and Advanced features.
You can checkout the complete quick start example here.
Got a Question? ![]() Ask us on discord
Ask us on discord

