Display Audio and Video - React
This guide elaborates on how to render a participant's audio and video on the screen.
Rendering Participant
The steps involved in rendering the audio and video of a participant are as follows.
1. Get Mic and Webcam Status
To render a participant, it is essential to determine whether their audio or video is on or off. If the webcam is not turned on, start by rendering the participant's frames with their name; otherwise, render the video.
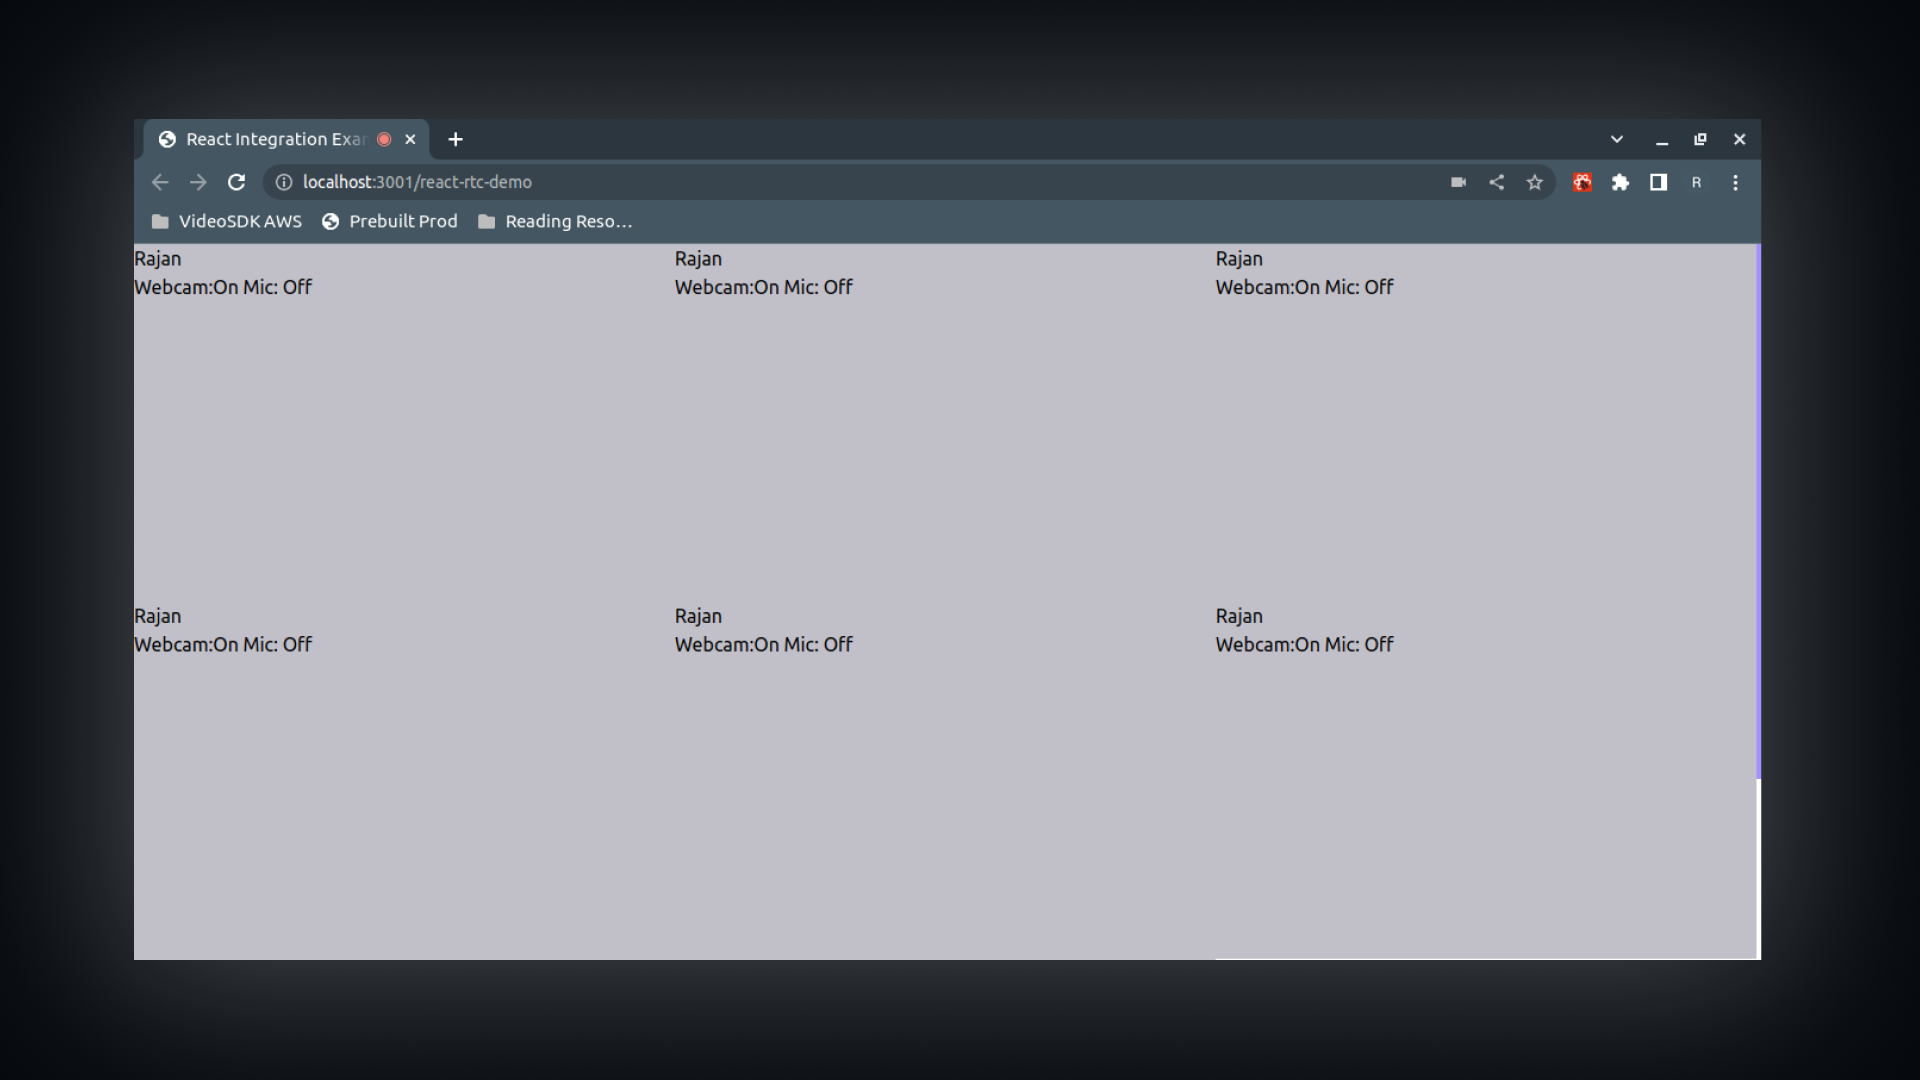
Step 1: First, retrieve every participant from the useMeeting hook and create a simple box with each of their names.
const MeetingView = () => {
  //Getting all the participants
  const { participants } = useMeeting();

  //Looping over the participants and rendering a simple box
  return (
    <div style={{ display: "grid", gridTemplateColumns: "repeat(3,1fr)" }}>
      {[...participants.keys()].map((participantId, index) => (
        <ParticipantView key={index} participantId={participantId} />
      ))}
    </div>
  );
};

// This will render a single participant's view
const ParticipantView = ({ participantId }) => {
  const { displayName } = useParticipant(participantId);
  return (
    <div
      style={{
        height: "300px",
        background: "#C0C2C9",
      }}
    >
      <p>{displayName}</p>
    </div>
  );
};
Step 2: To display the status of each participant's microphone and webcam in the grid, you can use the micOn and webcamOn properties of the useParticipant hook.
Here's a code snippet of rendering mic and webcam status:
const ParticipantView = ({ participantId }) => {
  //Getting the micOn and webcamOn property
  const { displayName, micOn, webcamOn } = useParticipant(participantId);
  return (
    <div
      style={{
        height: "300px",
        background: "#C0C2C9",
      }}
    >
      <p>{displayName}</p>
      <p>
        Webcam:{webcamOn ? "On" : "Off"} Mic: {micOn ? "On" : "Off"}
      </p>
    </div>
  );
};
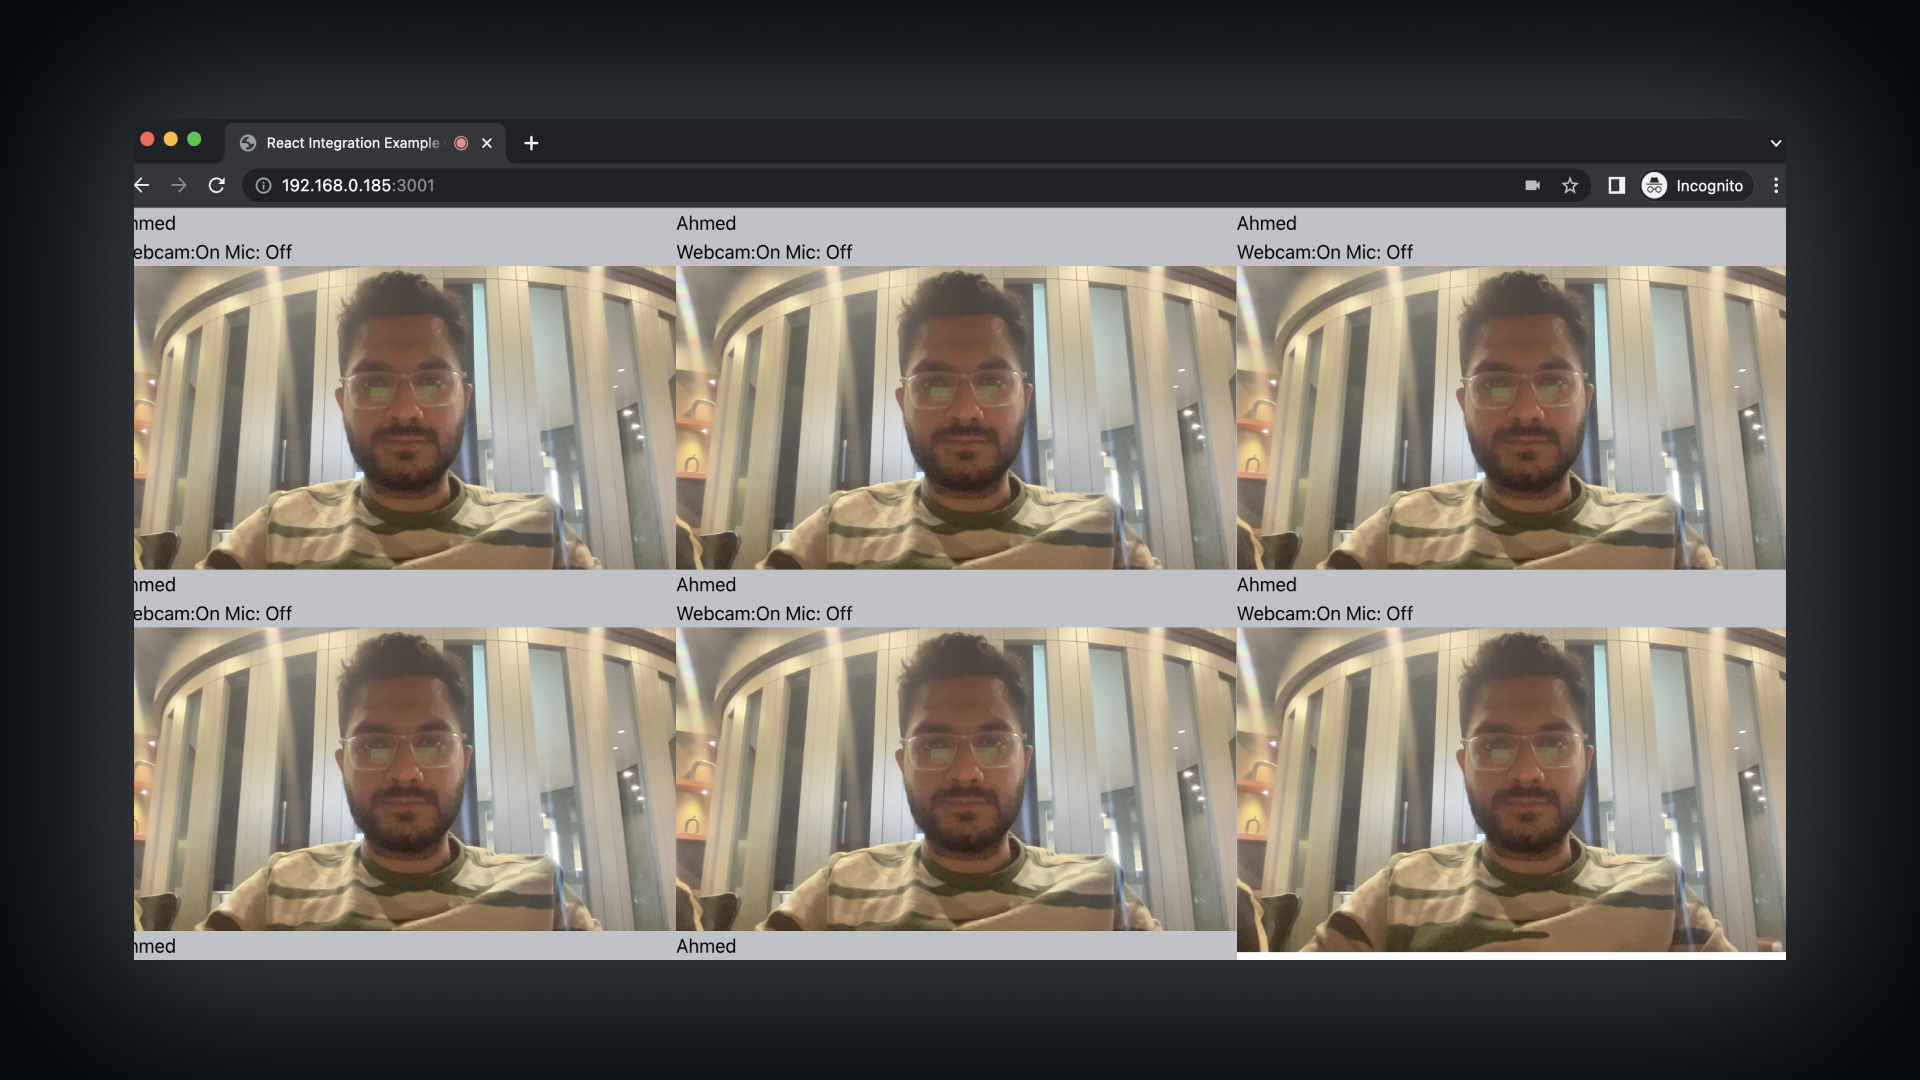
2. Rendering Video
The status of the webcam and mic is now displayed.
Instead of manually attaching a webcam stream to a <video> element, VideoSDK provides a VideoPlayer component that handles video rendering, stream attachment, and optimizations internally.
Using ReactPlayer can cause rendering and performance issues with video streams. We recommend using the VideoPlayer component from VideoSDK for optimal results.
import { useParticipant, VideoPlayer } from "@videosdk.live/react-sdk";

const ParticipantView = ({ participantId }) => {
  const { displayName, micOn, webcamOn } = useParticipant(participantId);

  return (
    <div
      style={{
        height: "300px",
        background: "#C0C2C9",
      }}
    >
      <p>...</p>
      <VideoPlayer
        participantId={participantId} // Required
        type="video" // "video" or "share"
        containerStyle={{
          height: "100%",
          width: "100%",
        }}
        className="h-full"
        classNameVideo="h-full"
        videoStyle={{}}
      />
    </div>
  );
};
2.1 Maintaining the aspect ratio
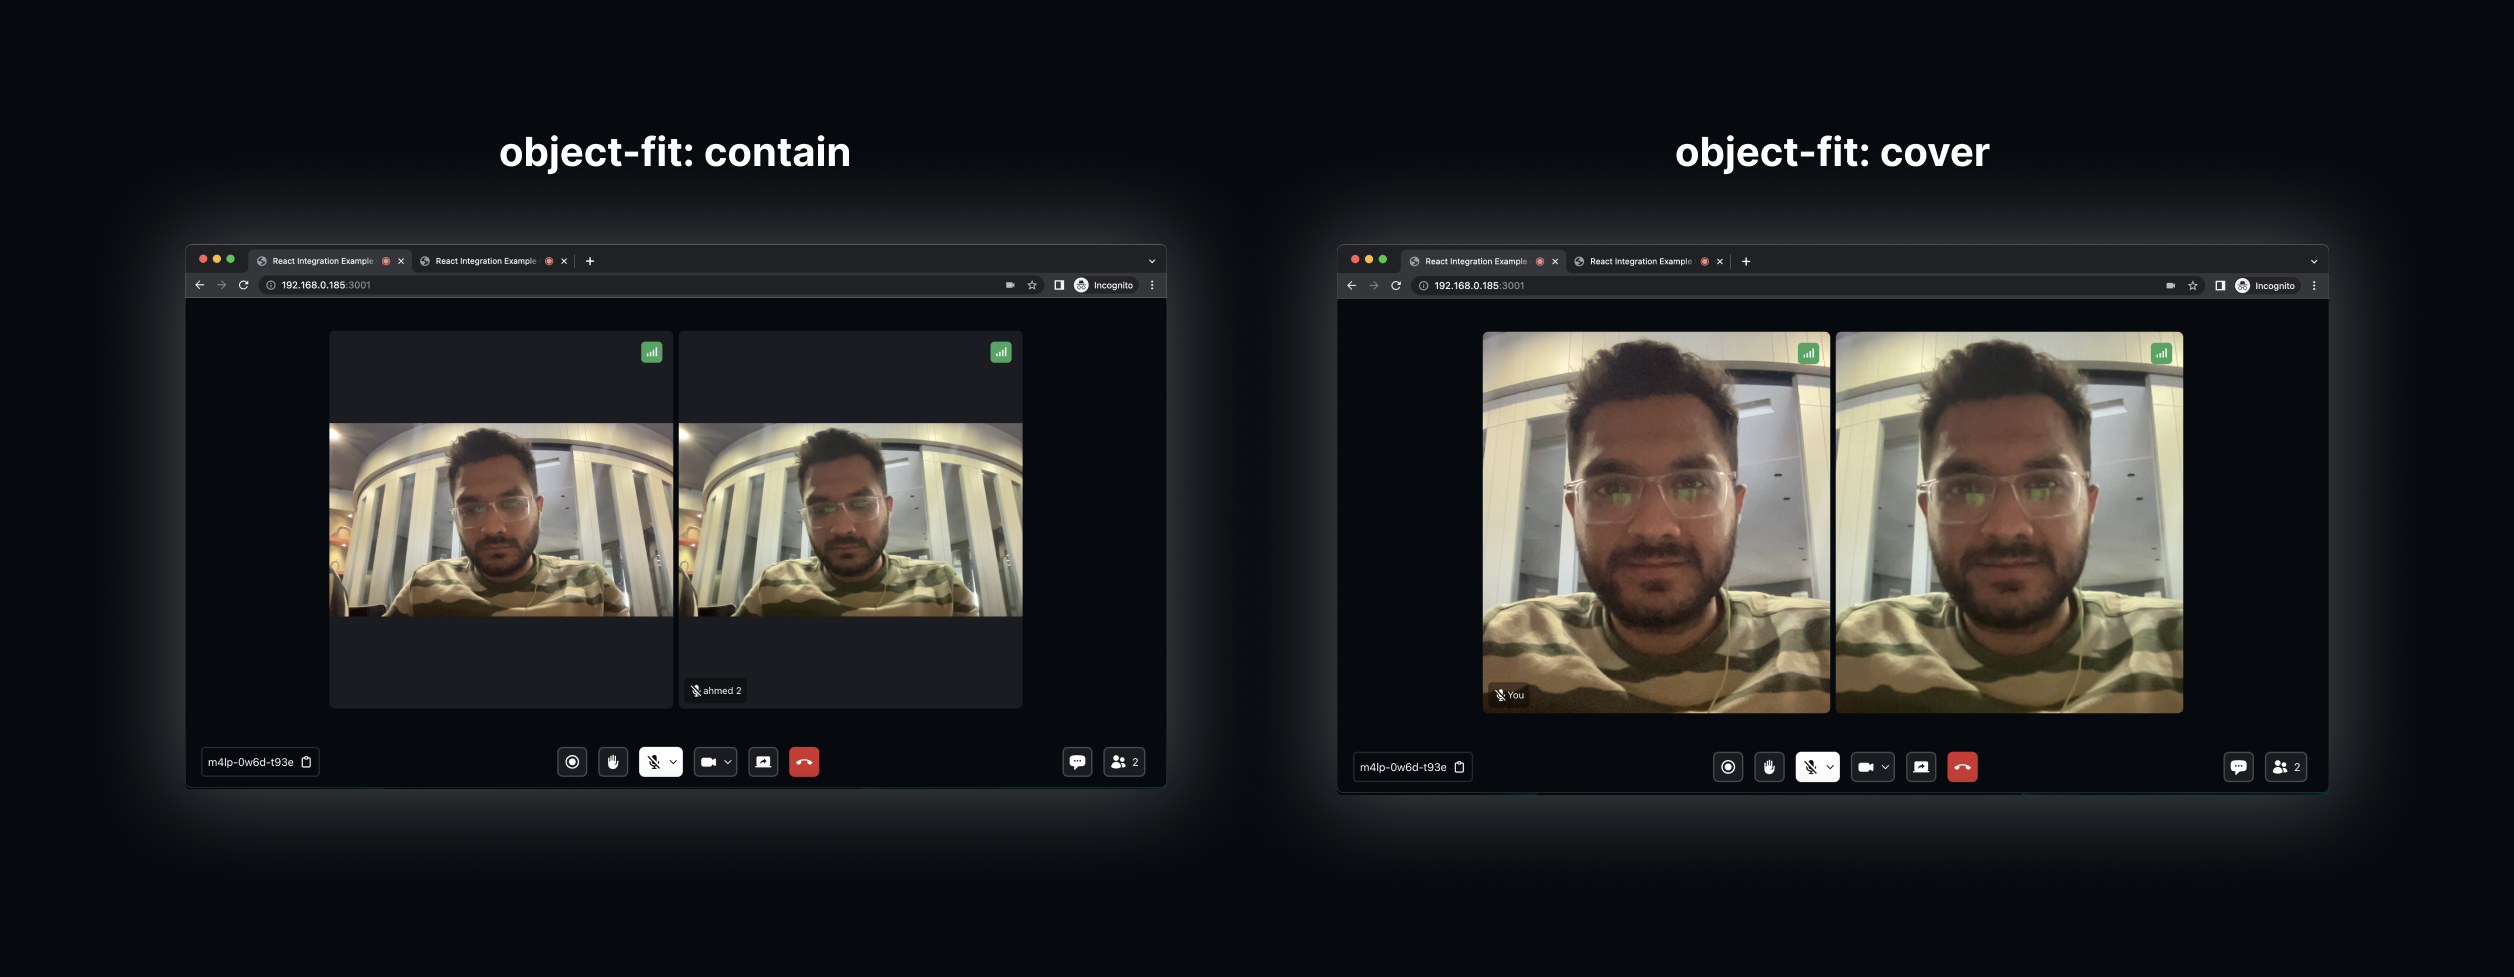
If you want to maintain the aspect ratio of the video, displaying it vertically without filling the entire view, you can use object-fit:contain.
However, if you prefer to always fill the view regardless of the video resolution you can use object-fit:cover.
const ParticipantView = ({ participantId }) => {
  //... Other video configurations

  return (
    <div
      style={{
        height: "300px",
        background: "#C0C2C9",
        objectFit: "contain",
      }}
    >
      ...
    </div>
  );
};
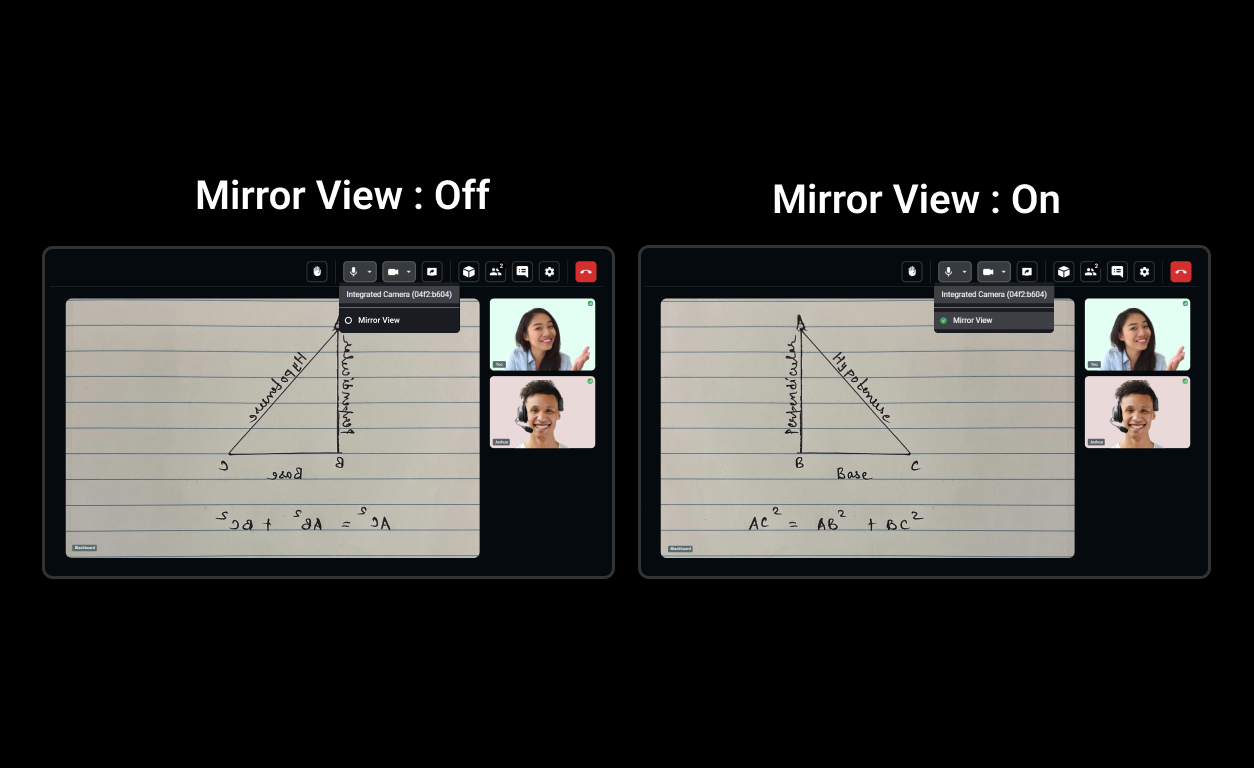
2.2 Mirror Local Video View
You don’t need to manually add mirroring logic for the local participant. The VideoPlayer component automatically handles mirroring for local video streams.
Sample of mirror view video
3. Rendering Audio
You have succesfully displayed the webcam and mic status along with the participant's video. Now, whenever a participant's mic is turned on, to play their audio. you will require their micStream which can be obtained from the useParticipant hook
Step 1: Obtain the micStream and define a <audio> tag which will render the audio of the participant. You need to use the useRef hook to create a reference to this audio tag.
import { useRef } from "react";

const ParticipantView = ({ participantId }) => {
  //Getting the micStream property
  const { displayName, micOn, webcamOn, webcamStream, micStream } =
    useParticipant(participantId);

  const audioRef = useRef(null);

  return (
    <div
      style={{
        height: "300px",
        background: "#C0C2C9",
      }}
    >
      <p>...</p>
      <audio ref={audioRef} autoPlay />
    </div>
  );
};
Step 2: Now that you have the <audio> element in place, you need to add a useEffect hook so that, when the micStream is discovered, it will be immediately added to the <audio> element.
const ParticipantView = ({ participantId }) => {
  //Getting the micStream property
  const { displayName, micOn, webcamOn, webcamStream } =
    useParticipant(participantId);

  // ... mic stream dispalying here

  const micRef = useRef(null);

  useEffect(() => {
    if (micRef.current) {
      if (micOn && micStream) {
        const mediaStream = new MediaStream();
        mediaStream.addTrack(micStream.track);

        micRef.current.srcObject = mediaStream;
        micRef.current
          .play()
          .catch((error) =>
            console.error("videoElem.current.play() failed", error)
          );
      } else {
        micRef.current.srcObject = null;
      }
    }
  }, [micStream, micOn]);

  return (
    <div
      style={{
        height: "300px",
        background: "#C0C2C9",
      }}
    >
      ...
    </div>
  );
};
While rendering the audio, you should not render the audio of the local participant as it will create echo.
So to avoid that, mute the audio of the localParticipant, by setting the muted property as follows.
const ParticipantView = ({ participantId }) => {
  //Getting the isLocal property
  const { displayName, micOn, webcamOn, webcamStream, micStream, isLocal } =
    useParticipant(participantId);

  const audioRef = useRef(null);

  return (
    <div
      style={{
        height: "300px",
        background: "#C0C2C9",
      }}
    >
      <p>...</p>
      <audio ref={audioRef} autoPlay muted={isLocal} />
    </div>
  );
};
Autoplay Audio and Video
autoplay is a parameter passed to <audio> and <video> elements, indicating that their media should play automatically without requiring the user to click on the video or hit the play button.
When developing an audio-video calling app, ensure that the autoplay flag is set to true, allowing any loaded media to play even if the play() method was not explicitly called.
You can learn more about the autoplay flag in the official documentation.
API Reference
The API references for all the methods and events utilized in this guide are provided below.
Got a Question? ![]() Ask us on discord
Ask us on discord

