AI Telephony Agent Quick Start
This guide will walk you through creating a fully functional AI telephony agent using VideoSDK Agent SDK. You'll learn how to run the agent locally, connect it to the global telephone network using SIP, and enable it to handle both inbound and outbound phone calls. By the end, you'll have a working AI assistant that you can talk to from any phone.
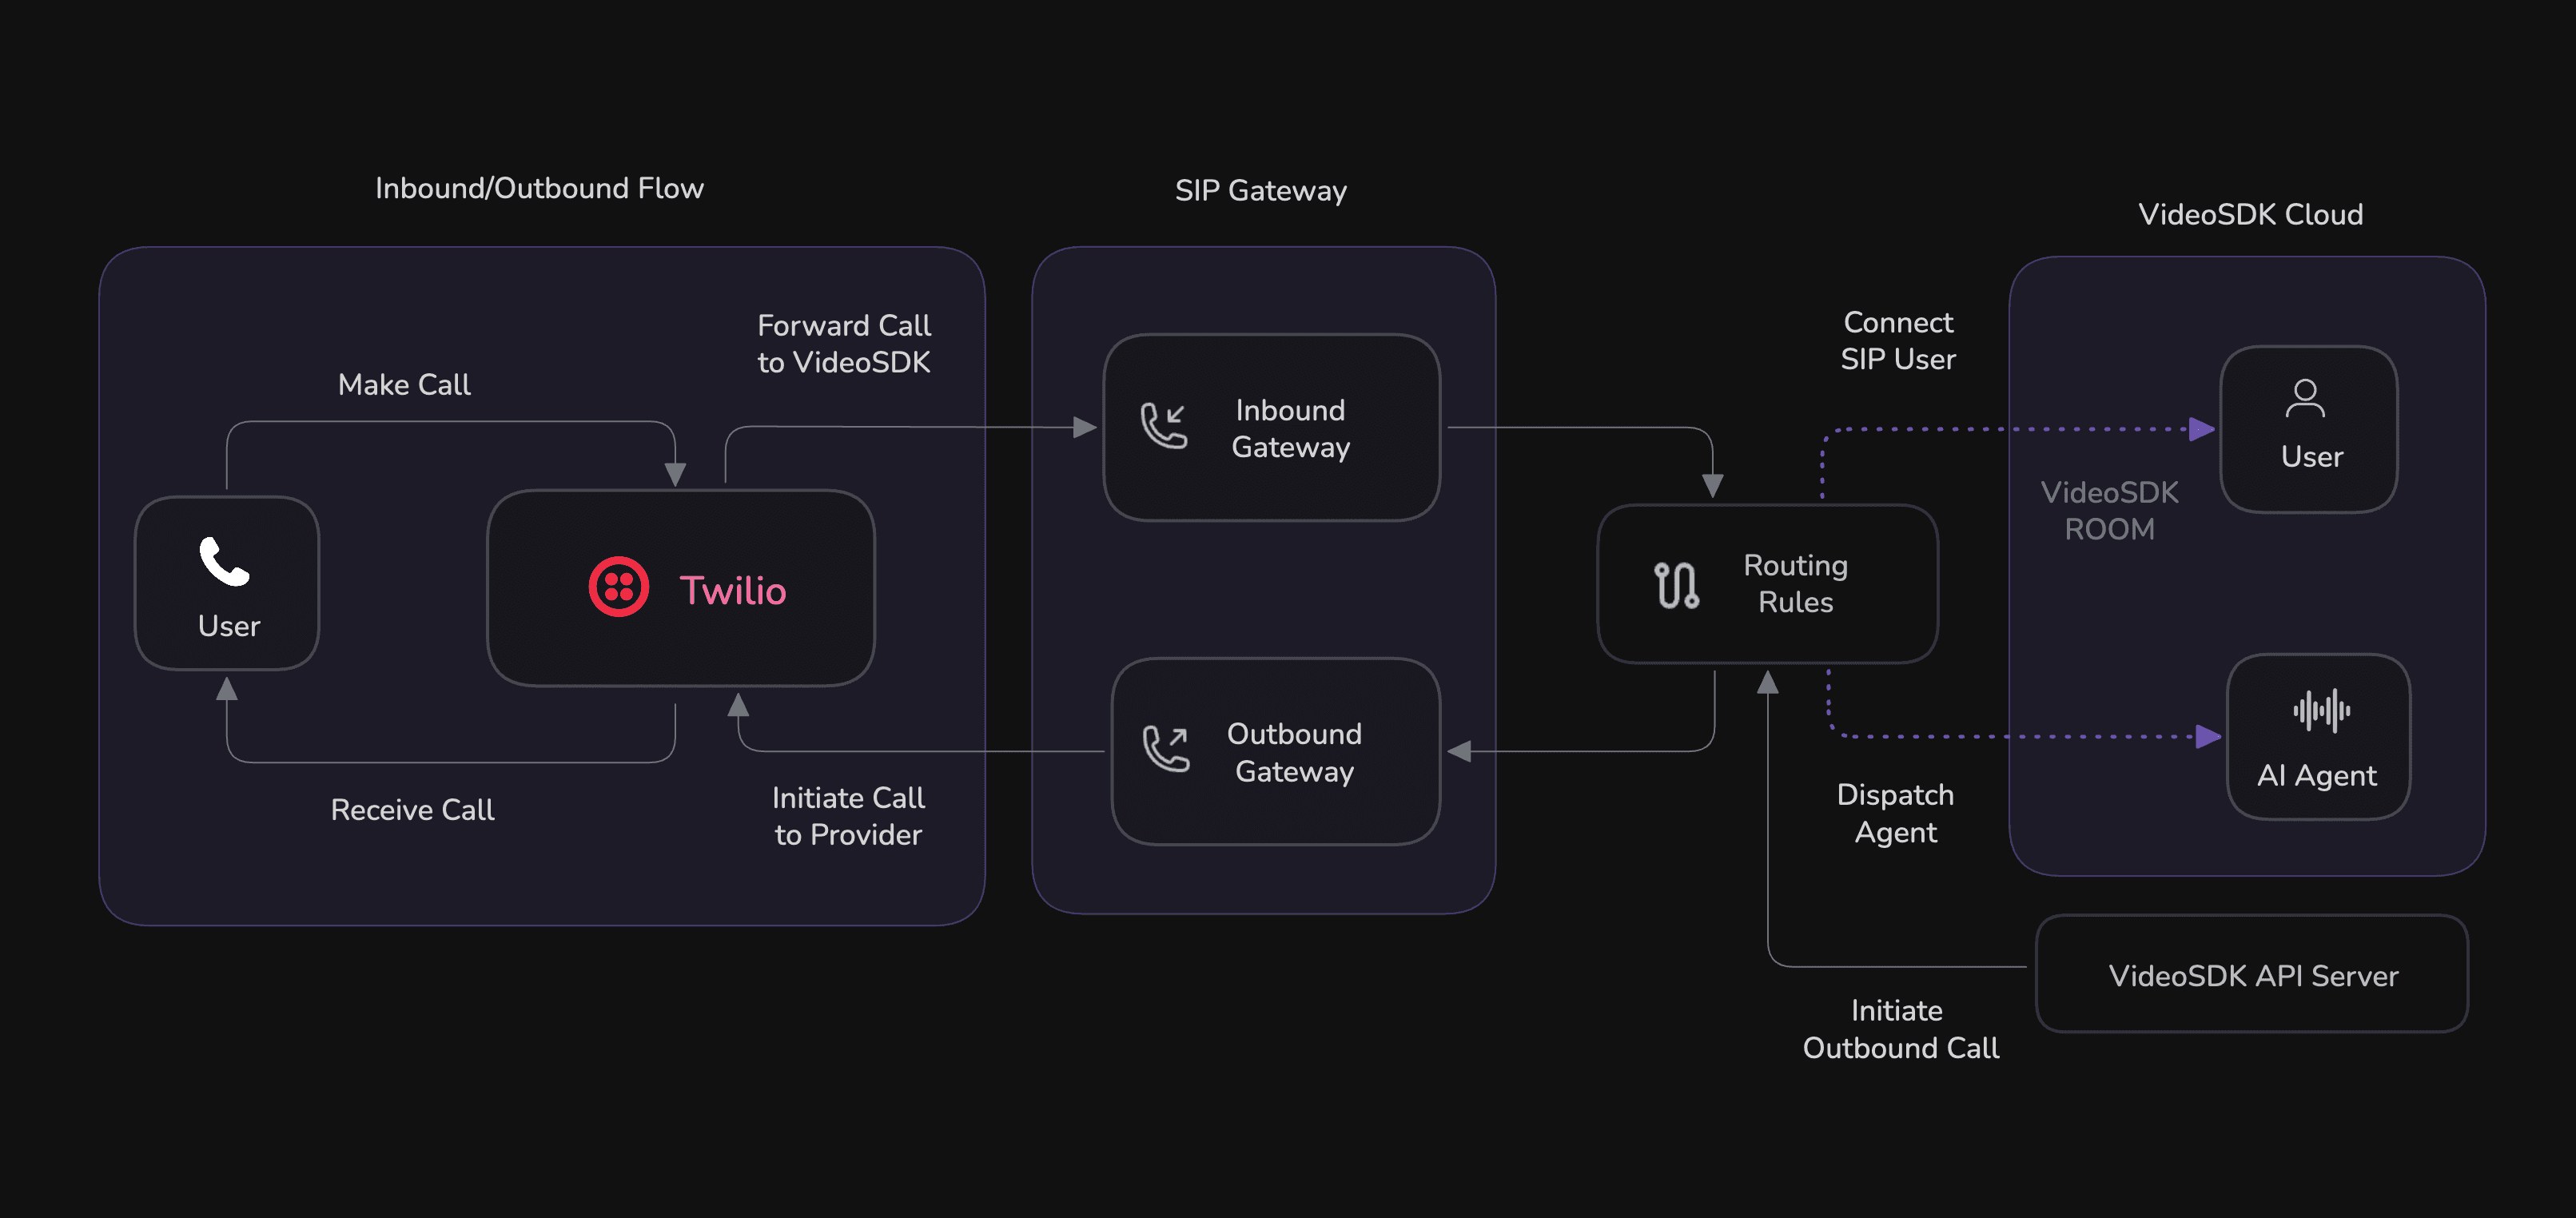
The Architecture
Before we dive in, let's look at the high-level architecture. A call from the phone network is directed by a SIP provider (like Twilio) to VideoSDK's telephony infrastructure. A Routing Rule then intelligently dispatches the call to your self-hosted AI agent, which processes the audio and responds in real-time.
What You'll Build
We'll create a simple yet powerful project with the following structure:
├── main.py                 # The core logic for your AI voice agent
├── requirements.txt        # Python package dependencies
└── .env                    # Your secret credentials
Prerequisites
To get started, you'll need a few things:
- Python 3.12+: Ensure you have a modern version of Python installed.
- VideoSDK Account: Sign up for a free VideoSDK account to get your
VIDEOSDK_TOKEN. This token is used to authenticate your agent and manage telephony settings.
Part 1: Build and Run the AI Agent Locally
First, let's get the AI agent running on your machine.
Step 1: Set Up Your Project
-
Create a
.envfile to store your secret keys. Add your credentials:- Realtime Mode
- Cascading Mode
.envVIDEOSDK_AUTH_TOKEN="your_videosdk_token_here"
GOOGLE_API_KEY="your_google_api_key_here"API Keys - Get API keys: Google API Key ↗ & Create your VideoSDK Account ↗ and follow this guide to generate videosdk token
.envVIDEOSDK_AUTH_TOKEN="your_videosdk_token_here"
DEEPGRAM_API_KEY="your_deepgram_api_key_here"
OPENAI_API_KEY="your_openai_api_key_here"
ELEVENLABS_API_KEY="your_elevenlabs_api_key_here"API Keys - Get API keys: Deepgram ↗, OpenAI ↗, ElevenLabs ↗ & Create your VideoSDK Account ↗ and follow this guide to generate videosdk token
-
Create a
requirements.txtfile and paste in the necessary dependencies:- Realtime Mode
- Cascading Mode
requirements.txtvideosdk-agents
videosdk-plugins-google
python-dotenvrequirements.txtvideosdk-agents[deepgram,openai,elevenlabs,silero,turn_detector]
python-dotenvLatest Version: Check the latest videosdk-agents version on PyPI for the most recent release.
-
Finally, create the
main.pyfile. This script defines your agent's personality and handles the connection to VideoSDK.- Realtime Mode
- Cascading Mode
main.pyimport asyncio
import traceback
from videosdk.agents import Agent, AgentSession, Pipeline, JobContext, RoomOptions, WorkerJob, Options
from videosdk.agents.plugins import GeminiRealtime, GeminiLiveConfig
from dotenv import load_dotenv
import os
import logging
logging.basicConfig(level=logging.INFO)
load_dotenv()
# Define the agent's behavior and personality
class MyVoiceAgent(Agent):
def __init__(self):
super().__init__(
instructions="You are a helpful AI assistant that answers phone calls. Keep your responses concise and friendly.",
)
async def on_enter(self) -> None:
await self.session.say("Hello! I'm your real-time assistant. How can I help you today?")
async def on_exit(self) -> None:
await self.session.say("Goodbye! It was great talking with you!")
async def start_session(context: JobContext):
# Configure the Gemini model for real-time voice
model = GeminiRealtime(
model="gemini-3.1-flash-live-preview",
api_key=os.getenv("GOOGLE_API_KEY"),
config=GeminiLiveConfig(
voice="Leda",
response_modalities=["AUDIO"]
)
)
pipeline = Pipeline(llm=model)
session = AgentSession(agent=MyVoiceAgent(), pipeline=pipeline)
await session.start(wait_for_participant=True, run_until_shutdown=True)
def make_context() -> JobContext:
room_options = RoomOptions()
return JobContext(room_options=room_options)
if __name__ == "__main__":
try:
# Register the agent with a unique ID
options = Options(
agent_id="MyTelephonyAgent", # CRITICAL: Unique identifier for routing
register=True, # REQUIRED: Register with VideoSDK for telephony
max_processes=10, # Concurrent calls to handle
host="localhost",
port=8081,
)
job = WorkerJob(entrypoint=start_session, jobctx=make_context, options=options)
job.start()
except Exception as e:
traceback.print_exc()main.pyimport asyncio
import traceback
from videosdk.agents import Agent, AgentSession, Pipeline, JobContext, RoomOptions, WorkerJob, Options
from videosdk.agents.plugins import SileroVAD, TurnDetector, pre_download_model, DeepgramSTT, OpenAILLM, ElevenLabsTTS
from dotenv import load_dotenv
import os
import logging
logging.basicConfig(level=logging.INFO)
load_dotenv()
# Pre-downloading the Turn Detector model
pre_download_model()
# Define the agent's behavior and personality
class MyVoiceAgent(Agent):
def __init__(self):
super().__init__(
instructions="You are a helpful AI assistant that answers phone calls. Keep your responses concise and friendly.",
)
async def on_enter(self) -> None:
await self.session.say("Hello! I'm your AI telephony assistant. How can I help you today?")
async def on_exit(self) -> None:
await self.session.say("Goodbye! It was great talking with you!")
async def start_session(context: JobContext):
# Create agent and conversation flow
agent = MyVoiceAgent()
# Create pipeline
pipeline = Pipeline(
stt=DeepgramSTT(model="nova-2", language="en"),
llm=OpenAILLM(model="gpt-4o"),
tts=ElevenLabsTTS(model="eleven_flash_v2_5"),
vad=SileroVAD(threshold=0.35),
turn_detector=TurnDetector(threshold=0.8)
)
session = AgentSession(
agent=agent,
pipeline=pipeline
)
await session.start(wait_for_participant=True, run_until_shutdown=True)
def make_context() -> JobContext:
room_options = RoomOptions()
return JobContext(room_options=room_options)
if __name__ == "__main__":
try:
# Register the agent with a unique ID
options = Options(
agent_id="MyTelephonyAgent", # CRITICAL: Unique identifier for routing
register=True, # REQUIRED: Register with VideoSDK for telephony
max_processes=10, # Concurrent calls to handle
host="localhost",
port=8081,
)
job = WorkerJob(entrypoint=start_session, jobctx=make_context, options=options)
job.start()
except Exception as e:
traceback.print_exc()
Step 2: Set Up Your Environment and Install Dependencies
Create and activate a virtual environment to keep your project dependencies isolated.
# Create the virtual environment
python3 -m venv .venv

# Activate it (macOS/Linux)
source .venv/bin/activate
# On Windows, use: .venv\Scripts\activate

# Install the required packages
pip install -r requirements.txt
Step 3: Run the Agent
Now, start your agent by running the Python script.
python main.py
Your terminal will show that the agent is running and has registered itself with VideoSDK using the ID MyTelephonyAgent. This ID is crucial for routing calls to it later.
Important: Keep this terminal window open. Your agent must remain running to accept connections.
Part 2: Connect Your Agent to the Phone Network
With your agent running locally, it's time to connect it to the outside world. This involves setting up gateways and routing rules in your VideoSDK dashboard or via the VideoSDK API.
- Via Dashboard
- Via API
Step 1: Add SIP Configuration
- Go to the VideoSDK Dashboard.
- Click on Add Number.
- Click on Configure SIP.
- Give a name and add your phone number.
Step 2: Setup Inbound Gateway
- Copy the Inbound URL from the VideoSDK dashboard.
- Go to Twilio and create a new SIP Trunk.
- Go to the Origination section, paste the Inbound URL there, and save it.
Step 3: Setup Outbound Gateway
- Go to the Termination section in Twilio, create a URI, and paste it into the outbound section in the VideoSDK dashboard.
- Create a username and password in Twilio and add it to the VideoSDK outbound section.
Step 4: Setup Routing Rules
- Click on Configure rule then Create new routing rule.
- Add Routing Rule Name.
- Select API Key.
- Add Call Direction (Inbound or Outbound).
- Add Phone Number.
- Add Room Type.
- Add Agent ID.
- Click Save.
Step 1: Create Phone Number
Register your phone numbers and provision inbound and outbound SIP gateways in a single request. Replace $YOUR_TOKEN and update the phone numbers, SIP region, and outbound gateway settings for your provider.
curl -H 'Authorization: $YOUR_TOKEN' \
  -H 'Content-Type: application/json' \
  -d '{
    "name": "My SIP Setup",
    "phoneNumbers": [
      "+14155551234",
      "+14155555678"
    ],
    "isShared": true,
    "mediaEncryption": "disable",
    "inbound": {
      "sipRegion": "us002"
    },
    "outbound": {
      "sipRegion": "us002",
      "address": "sip.telnyx.com:5061",
      "transport": "tls",
      "auth": {
        "username": "sip-user",
        "password": "sip-pass"
      }
    }
  }' \
  -X POST https://api.videosdk.live/v2/sip/phone-numbers
API Reference: Create Phone Numbers + SIP Gateways API
Step 2: Create Routing Rule
Create a routing rule to dispatch inbound calls to your agent. Set agentId to MyTelephonyAgent (the ID from Part 1) and replace $YOUR_TOKEN, $YOUR_API_KEY, and the phone numbers with your own values.
curl -H 'Authorization: $YOUR_TOKEN' \
  -H 'Content-Type: application/json' \
  -d '{
    "name": "Inbound support rule",
    "type": "inbound",
    "phoneNumbers": [
      "+14155551234"
    ],
    "apiKey": "$YOUR_API_KEY",
    "agentId": "$YOUR_AGENT_ID",
    "agentMetadata": {
      "team": "support"
    },
    "room": {
      "type": "dynamic",
      "prefix": "blank"
    },
    "includeHeaders": "SIP_X_HEADERS",
    "headersToAttributes": {
      "X-Caller-Id": "callerId"
    },
    "headers": {
      "X-Customer-Id": "cust_42"
    },
    "allowedNumbers": [],
    "allowedIpAddresses": [],
    "tags": [
      "support",
      "v2"
    ],
    "recording": false,
    "dtmf": false,
    "noiseCancellation": false,
    "hidePhoneNumber": true
  }' \
  -X POST https://api.videosdk.live/v2/sip/routing-rule
API Reference: Create Routing Rule
You have now configured VideoSDK to route inbound calls from your configured phone number(s) to your running Python agent.
Part 3: Time to Talk! Make and Receive Calls
Your setup is complete! Let's test it out.
Make sure your AI agent is running locally before configuring the telephony settings. The agent must be active to receive incoming calls.
Making an Inbound Call
- Using any phone, dial the SIP number you configured.
- Your local Python agent will automatically answer.
- You'll hear the greeting: "Hello! I'm your real-time assistant. How can I help you today?"
- Start talking! The agent will listen and respond in real-time.
Making an Outbound Call
You can trigger an outbound call from your agent using a simple API request.
Use curl or any API client to make a POST request to the VideoSDK API. Replace $YOUR_TOKEN and the routingRuleId with your own.
curl -H 'Authorization: $YOUR_TOKEN' \
  -H 'Content-Type: application/json' \
  -d '{
    "sipCallFrom" : "+14155550100",
    "sipCallTo" : "+14155550199",
    "routingRuleId" : "rr_2554md"
  }' \
  -X POST https://api.videosdk.live/v2/sip/call
This will command your MyTelephonyAgent to dial the specified number and start a conversation.
For optimal performance, run your agent in the same geographic region as your SIP provider (e.g., US East for Twilio, US West for Telnyx, Europe for Plivo). This reduces latency and improves call quality.
Next Steps
Congratulations! You've built and deployed a sophisticated AI telephony agent. You've seen how to run it locally and connect it to the global phone network for both inbound and outbound communication.
Got a Question? ![]() Ask us on discord
Ask us on discord

