Interactive Livestream (HLS) - React Native
Interactive live streaming (HLS) refers to a type of live streaming where viewers can actively engage with the content being streamed and with other viewers in real-time.
In an interactive live stream (HLS), viewers can participate in various activities, such as live polling, Q&A sessions, and even sending virtual gifts to the content creator or each other.
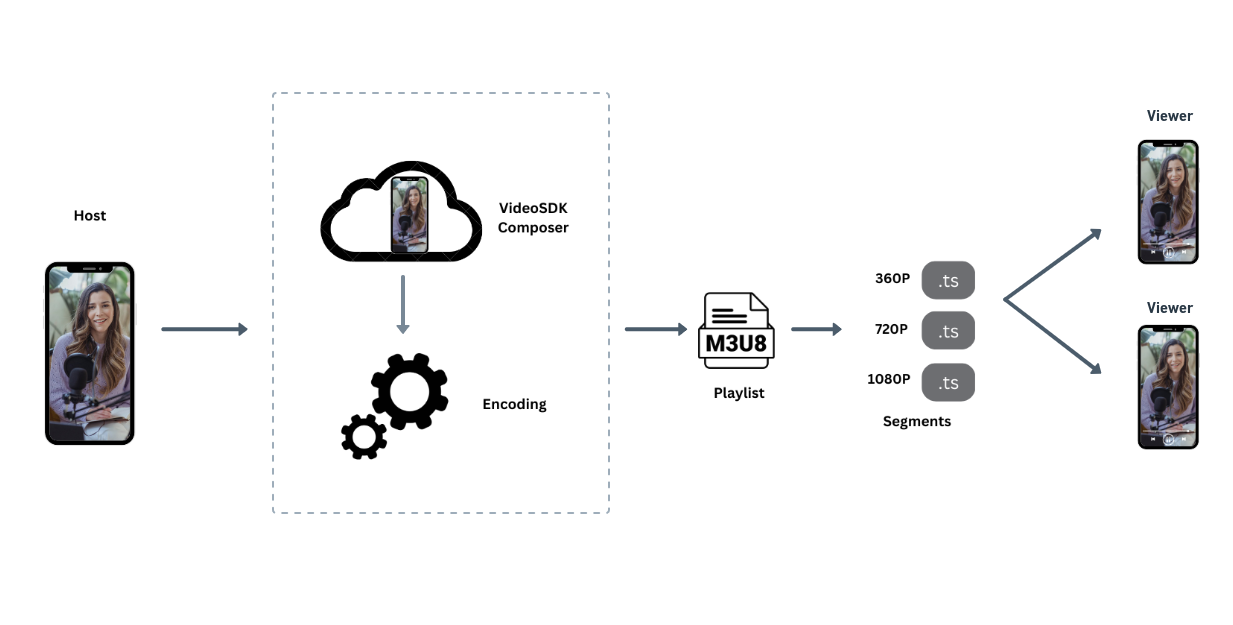
VideoSDK enables you to configure the interactive livestream layout in various ways, either by setting different prebuilt layouts in the configuration or by providing your own custom template for livestreaming according to your layout choice.
This guide provides an overview of how to implement starting and stopping Http Live Streaming (HLS).
To initiate automatic Interactive live streaming (HLS) at the beginning of a session, simply provide the autoStartConfig feature hls during room creation. For more information on configuring the autoStartConfig, please refer to the provided documentation here.
startHls()
The startHls() method, accessible from the useMeeting hook, is used to initiate interactive livestream of a meeting. This method accepts the following parameter:
-
config (optional): This parameter defines how the interactive livestream layout should look like. const config = {
// Layout Configuration
layout: {
type: "GRID", // "SPOTLIGHT" | "SIDEBAR", Default : "GRID"
priority: "SPEAKER", // "PIN", Default : "SPEAKER"
gridSize: 4, // MAX : 25
},
// Theme of interactive livestream layout
theme: "DARK", // "LIGHT" | "DEFAULT"
// `mode` is used to either interactive livestream video & audio both or only audio.
mode: "video-and-audio", // "audio", Default : "video-and-audio"
// Quality of interactive livestream and is only applicable to `video-and-audio` type mode.
quality: "high", /* Default : "med"
"low" (SD HLS) | "med" (HD HLS) | "high" (FHD HLS) */
// This mode refers to orientation of interactive livestream.
// landscape : Start interactive livestream of the meeting in horizontally
// portrait : Start interactive livestream of the meeting in vertically (Best for mobile view)
orientation: "portrait", // "portrait", Default : "landscape"
};
// Post Transcription Configuration
const transcription = {
enabled: true, // Enables post transcription
summary: {
enabled: true, // Enables summary generation
// Guides summary generation
prompt:
"Write summary in sections like Title, Agenda, Speakers, Action Items, Outlines, Notes and Summary",
},
};
startHls(config, transcription);
stopHls()
- The
stopHls()method, accessible from theuseMeetinghook, is used to stop the interactive livestream of a meeting.
Example
import { useMeeting } from "@videosdk.live/react-native-sdk";
import { TouchableOpacity, Text } from "react-native";

const MeetingView = () => {
  const { startHls, stopHls } = useMeeting();

  const handleStartHls = () => {
    // Start Hls
    startHls({
      layout: {
        type: "GRID",
        priority: "SPEAKER",
        gridSize: 4,
      },
      theme: "DARK",
      mode: "video-and-audio",
      quality: "high",
      orientation: "portrait",
    });
  };

  const handleStopHls = () => {
    // Stop Hls
    stopHls();
  };

  return (
    <>
      <TouchableOpacity
        onPress={() => {
          handleStartLivestream();
        }}
      >
        <Text>Start Hls</Text>
      </TouchableOpacity>

      <TouchableOpacity
        onPress={() => {
          handleStopHls();
        }}
      >
        <Text>Stop Hls</Text>
      </TouchableOpacity>
    </>
  );
};
If you want to learn more about the Interactive Livestream and how to implement it on your own platform, you can checkout this guide.
Event associated with HLS
-
onHlsStateChanged - The
onHlsStateChanged()event is triggered whenever the state of meeting HLS changes. -
You can get the
playbaclHlsUrlandlivestreamUrlof the HLS to play it on the Viewer side when the state changes toConstants.hlsEvents.HLS_STARTEDplaybackHlsUrl- Live HLS with playback supportlivestreamUrl- Live HLS without playback support
downstreamUrl is now depecated. Use playbackHlsUrl or livestreamUrl in place of downstreamUrl
import { Constants, useMeeting } from "@videosdk.live/react-native-sdk";

function onHlsStateChanged(data) {
   const { status } = data;

  if (status === Constants.hlsEvents.HLS_STARTING) {
    console.log("Meeting Hls is starting");
  } else if (status === Constants.hlsEvents.HLS_STARTED) {
    // on hlsStateChanged you will receive downstreamUrl
    const { downstreamUrl } = data;
    console.log("Meeting Hls is started");
  } else if (status === Constants.hlsEvents.HLS_STOPPING) {
    console.log("Meeting Hls is stopping");
  } else if (status === Constants.hlsEvents.HLS_STOPPED) {
    console.log("Meeting Hls is stopped");
  } else {
    //
  }
 }

const {
  meetingId
  ...
} = useMeeting({
  onHlsStateChanged,
  ...
});
Custom Template
With VideoSDK, you have the option to employ your own custom-designed layout template for meeting recordings. To use a custom template, follow this guide to create and set up the template. Once the template is configured, you can initiate recording using the REST API, specifying the templateURL parameter.
API Reference
The API references for all the methods utilised in this guide are provided below.
Got a Question? ![]() Ask us on discord
Ask us on discord

