Quick Start for Conference in Android
VideoSDK enables you to embed the video calling feature into your Android application in minutes.
In this quickstart, we are going to explore group calling feature of Video SDK. We will go through step by step guide of integrating video calling with Android Video SDK.
This guide will get you running with the VideoSDK video & audio calling in minutes.
Prerequisites
Before proceeding, ensure that your development environment meets the following requirements:
- Java Development Kit.
- Android Studio 3.0 or later.
- Android SDK API Level 21 or higher.
- A mobile device that runs Android 5.0 or later.
One should have a VideoSDK account to generate token. Visit VideoSDK dashboard to generate token
Getting Started with the Code!
Follow the steps to create the environment necessary to add video calls into your app. Also you can find the code sample for quickstart here.
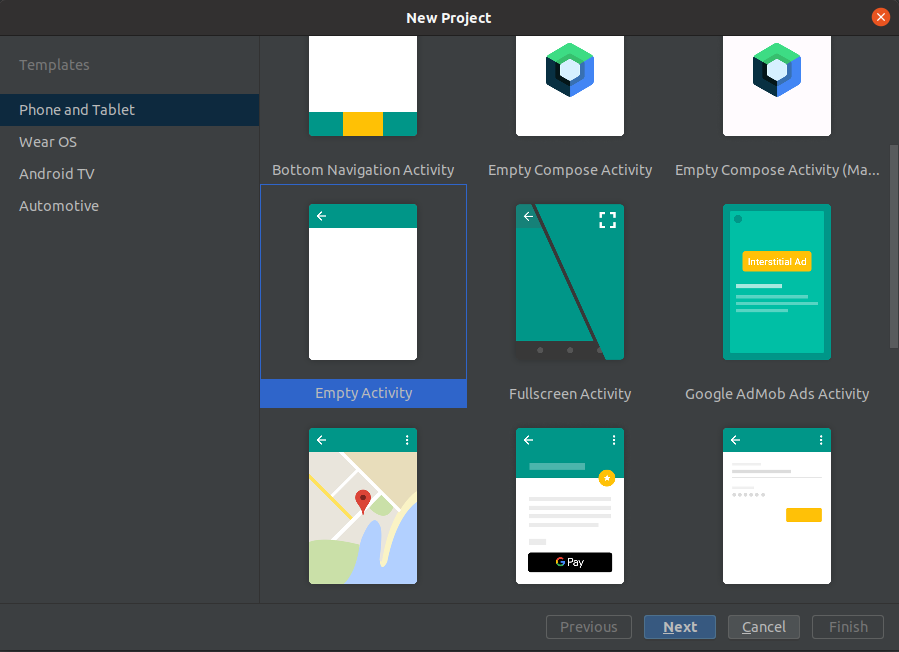
Create new Android Project
For a new project in Android Studio, create a Phone and Tablet Android project with an Empty Activity.
After creating the project, Android Studio automatically starts gradle sync. Ensure that the sync succeeds before you continue.
Integrate Video SDK
- Maven Central
- Jitpack
dependencyResolutionManagement{
  repositories {
    // ...
    google()
    mavenCentral()
    maven { url "https://maven.aliyun.com/repository/jcenter" }
  }
}
dependencyResolutionManagement{
  repositories {
    // ...
    google()
    maven { url 'https://jitpack.io' }
    mavenCentral()
    maven { url "https://maven.aliyun.com/repository/jcenter" }
  }
}
- Add the following dependency in your app's
app/build.gradle.
dependencies {
  implementation 'live.videosdk:rtc-android-sdk:0.3.0'

  // library to perform Network call to generate a meeting id
  implementation 'com.amitshekhar.android:android-networking:1.0.2'

  // other app dependencies
  }
Android SDK compatible with armeabi-v7a, arm64-v8a, x86_64 architectures. If you want to run the application in an emulator, choose ABI x86_64 when creating a device.
Add permissions into your project
- In
/app/Manifests/AndroidManifest.xml, add the following permissions after</application>.
<uses-permission android:name="android.permission.RECORD_AUDIO" />
<uses-permission android:name="android.permission.MODIFY_AUDIO_SETTINGS" />
<uses-permission android:name="android.permission.INTERNET" />
<uses-permission android:name="android.permission.CAMERA" />
If your project has set android.useAndroidX=true, then set android.enableJetifier=true in the gradle.properties file to migrate your project to AndroidX and avoid duplicate class conflict.
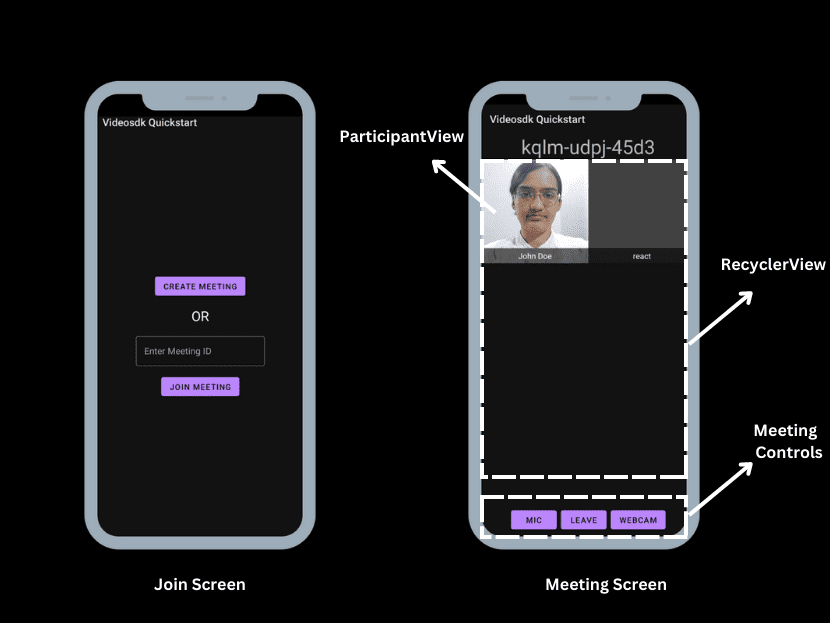
Structure of the project
Your project structure should look like this.
   app
   ├── java
   │    ├── packagename
   │         ├── JoinActivity
   │         ├── MainApplication
   │         ├── MeetingActivity
   │         ├── ParticipantAdapter
   ├── res
   │    ├── layout
   │    │    ├── activity_join.xml
   │    │    ├── activity_meeting.xml
   │    │    ├── item_remote_peer.xml
You have to set JoinActivity as Launcher activity.
App Architecture
Step 1: Initialize VideoSDK
- Create
MainApplicationclass which will extend theandroid.app.Application.
- Kotlin
- Java
import live.videosdk.rtc.android.VideoSDK

class MainApplication : Application() {
  override fun onCreate() {
      super.onCreate()
      VideoSDK.initialize(applicationContext)
  }
}
import android.app.Application;
import live.videosdk.rtc.android.VideoSDK;

public class MainApplication extends Application {
  @Override
  public void onCreate() {
    super.onCreate();
    VideoSDK.initialize(getApplicationContext());
  }
}
- Add
MainApplicationtoAndroidManifest.xml
<application
    android:name=".MainApplication" >
   <!-- ... -->
</application>
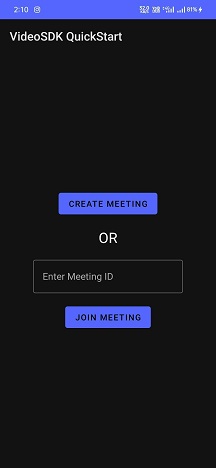
Step 2: Creating Joining Screen
Create a new Activity named JoinActivity. The Joining screen will include :
- Create Button - This button will create a new meeting for you.
- TextField for Meeting Id - This text field will contain the meeting Id you want to join.
- Join Button - This button will join the meeting with
meetingIdyou provided.
In /app/res/layout/activity_join.xml file, replace the content with the following.
<?xml version="1.0" encoding="utf-8"?>
<LinearLayout xmlns:android="http://schemas.android.com/apk/res/android"
    xmlns:tools="http://schemas.android.com/tools"
    android:layout_width="match_parent"
    android:layout_height="match_parent"
    android:gravity="center"
    android:orientation="vertical"
    tools:context=".JoinActivity">

    <Button
        android:id="@+id/btnCreateMeeting"
        android:layout_width="wrap_content"
        android:layout_height="wrap_content"
        android:layout_marginBottom="16dp"
        android:text="Create Meeting" />

    <TextView
        style="@style/TextAppearance.AppCompat.Headline"
        android:layout_width="wrap_content"
        android:layout_height="wrap_content"
        android:text="OR" />

    <com.google.android.material.textfield.TextInputLayout
        style="@style/Widget.MaterialComponents.TextInputLayout.OutlinedBox"
        android:layout_width="wrap_content"
        android:layout_height="wrap_content"
        android:layout_marginVertical="16dp"
        android:hint="Enter Meeting ID">

        <EditText
            android:id="@+id/etMeetingId"
            android:layout_width="250dp"
      android:layout_height="wrap_content" />
    </com.google.android.material.textfield.TextInputLayout>

    <Button
        android:id="@+id/btnJoinMeeting"
        android:layout_width="wrap_content"
        android:layout_height="wrap_content"
        android:text="Join Meeting" />
</LinearLayout>
Here is the implementation for the Join Activity:
- Create field
sampleTokeninJoinActivitywhich will hold the generated token from the VideoSDK dashboard. This token will use in VideoSDK config as well as in generating meetingId.
- Kotlin
- Java
class JoinActivity : AppCompatActivity() {

  //Replace with the token you generated from the VideoSDK Dashboard
  private var sampleToken = ""

  override fun onCreate(savedInstanceState: Bundle?) {
    //...
  }
}
public class JoinActivity extends AppCompatActivity {

  //Replace with the token you generated from the VideoSDK Dashboard
  private String sampleToken ="";

  @Override
  protected void onCreate(Bundle savedInstanceState) {
    //...
  }
}
- On Join Button
onClickevents, we will naviagte toMeetingActivitywith token and meetingId.
- Kotlin
- Java
class JoinActivity : AppCompatActivity() {

   //Replace with the token you generated from the VideoSDK Dashboard
   private var sampleToken = ""

   override fun onCreate(savedInstanceState: Bundle?) {
        super.onCreate(savedInstanceState)
        setContentView(R.layout.activity_join)

        val btnCreate = findViewById<Button>(R.id.btnCreateMeeting)
        val btnJoin = findViewById<Button>(R.id.btnJoinMeeting)
        val etMeetingId = findViewById<EditText>(R.id.etMeetingId)

        btnCreate.setOnClickListener { v: View? ->
            createMeeting(sampleToken)
        }
        btnJoin.setOnClickListener { v: View? ->
            val intent = Intent(this@JoinActivity, MeetingActivity::class.java)
            intent.putExtra("token", sampleToken)
            intent.putExtra("meetingId", etMeetingId.text.toString())
            startActivity(intent)
        }
    }

    private fun createMeeting(token: String) {
      // we will explore this method in the next step
    }
}
public class JoinActivity extends AppCompatActivity {

  //Replace with the token you generated from the VideoSDK Dashboard
  private String sampleToken ="";

  @Override
  protected void onCreate(Bundle savedInstanceState) {
    super.onCreate(savedInstanceState);
    setContentView(R.layout.activity_join);

    final Button btnCreate = findViewById(R.id.btnCreateMeeting);
    final Button btnJoin = findViewById(R.id.btnJoinMeeting);
    final EditText etMeetingId = findViewById(R.id.etMeetingId);

    btnCreate.setOnClickListener(v -> {
      createMeeting(sampleToken);
    });

    btnJoin.setOnClickListener(v -> {
      Intent intent = new Intent(JoinActivity.this, MeetingActivity.class);
      intent.putExtra("token", sampleToken);
      intent.putExtra("meetingId", etMeetingId.getText().toString());
      startActivity(intent);
    });
  }

  private void createMeeting(String token) {
    // we will explore this method in the next step
  }
}
- For Create Button, under
createMeetingmethod we will generate meetingId by calling API and navigate toMeetingActivitywith token and generated meetingId.
- Kotlin
- Java
class JoinActivity : AppCompatActivity() {
  //...onCreate
 private fun createMeeting(token: String) {
    // we will make an API call to VideoSDK Server to get a roomId
    AndroidNetworking.post("https://api.videosdk.live/v2/rooms")
      .addHeaders("Authorization", token) //we will pass the token in the Headers
      .build()
      .getAsJSONObject(object : JSONObjectRequestListener {
          override fun onResponse(response: JSONObject) {
              try {
                  // response will contain `roomId`
                  val meetingId = response.getString("roomId")

                  // starting the MeetingActivity with received roomId and our sampleToken
                  val intent = Intent(this@JoinActivity, MeetingActivity::class.java)
                  intent.putExtra("token", sampleToken)
                  intent.putExtra("meetingId", meetingId)
                  startActivity(intent)
              } catch (e: JSONException) {
                  e.printStackTrace()
              }
          }

          override fun onError(anError: ANError) {
              anError.printStackTrace()
                    Toast.makeText(
                        this@JoinActivity, anError.message,
                        Toast.LENGTH_SHORT
                    ).show()
          }
      })
  }
}
public class JoinActivity extends AppCompatActivity {
  //...onCreate

  private void createMeeting(String token) {
      // we will make an API call to VideoSDK Server to get a roomId
      AndroidNetworking.post("https://api.videosdk.live/v2/rooms")
        .addHeaders("Authorization", token) //we will pass the token in the Headers
        .build()
        .getAsJSONObject(new JSONObjectRequestListener() {
            @Override
            public void onResponse(JSONObject response) {
                try {
                    // response will contain `roomId`
                    final String meetingId = response.getString("roomId");

                    // starting the MeetingActivity with received roomId and our sampleToken
                    Intent intent = new Intent(JoinActivity.this, MeetingActivity.class);
                    intent.putExtra("token", sampleToken);
                    intent.putExtra("meetingId", meetingId);
                    startActivity(intent);
                } catch (JSONException e) {
                    e.printStackTrace();
                }
            }

            @Override
            public void onError(ANError anError) {
                anError.printStackTrace();
                Toast.makeText(JoinActivity.this, anError.getMessage(), Toast.LENGTH_SHORT).show();
            }
        });
  }
}
Don't confuse with Room and Meeting keyword, both are same thing 😃
- Our App is completely based on audio and video commutation, that's why we need to ask for runtime permissions
RECORD_AUDIOandCAMERA. So, we will implement permission logic onJoinActivity.
- Kotlin
- Java
class JoinActivity : AppCompatActivity() {
    companion object {
        private const val PERMISSION_REQ_ID = 22
        private val REQUESTED_PERMISSIONS = arrayOf(
            Manifest.permission.RECORD_AUDIO,
            Manifest.permission.CAMERA
        )
    }

  private fun checkSelfPermission(permission: String, requestCode: Int): Boolean {
        if (ContextCompat.checkSelfPermission(this, permission) !=
            PackageManager.PERMISSION_GRANTED)
        {
            ActivityCompat.requestPermissions(this, REQUESTED_PERMISSIONS, requestCode)
            return false
        }
        return true
    }

  override fun onCreate(savedInstanceState: Bundle?) {
    //... button listeneres
    checkSelfPermission(REQUESTED_PERMISSIONS[0], PERMISSION_REQ_ID)
    checkSelfPermission(REQUESTED_PERMISSIONS[1], PERMISSION_REQ_ID)
  }
}
public class JoinActivity extends AppCompatActivity {
  private static final int PERMISSION_REQ_ID = 22;

  private static final String[] REQUESTED_PERMISSIONS = {
    Manifest.permission.RECORD_AUDIO,
    Manifest.permission.CAMERA
  };

  private boolean checkSelfPermission(String permission, int requestCode) {
    if (ContextCompat.checkSelfPermission(this, permission) != PackageManager.PERMISSION_GRANTED) {
      ActivityCompat.requestPermissions(this, REQUESTED_PERMISSIONS, requestCode);
      return false;
    }
    return true;
  }

  @Override
  protected void onCreate(Bundle savedInstanceState) {
    //... button listeneres
    checkSelfPermission(REQUESTED_PERMISSIONS[0], PERMISSION_REQ_ID);
    checkSelfPermission(REQUESTED_PERMISSIONS[1], PERMISSION_REQ_ID);
  }
}
Output
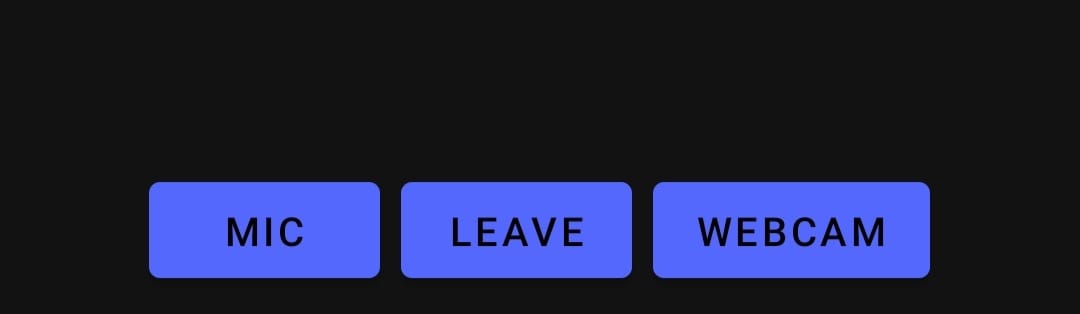
Step 3: Creating Meeting Screen
Create a new Activity named MeetingActivity.
In /app/res/layout/activity_meeting.xml file, replace the content with the following.
<?xml version="1.0" encoding="utf-8"?>
<LinearLayout xmlns:android="http://schemas.android.com/apk/res/android"
    xmlns:app="http://schemas.android.com/apk/res-auto"
    xmlns:tools="http://schemas.android.com/tools"
    android:layout_width="match_parent"
    android:layout_height="match_parent"
    android:gravity="center"
    android:orientation="vertical"
    tools:context=".MeetingActivity">

    <TextView
        android:id="@+id/tvMeetingId"
        style="@style/TextAppearance.AppCompat.Display1"
        android:layout_width="wrap_content"
        android:layout_height="wrap_content"
        android:text="Meeting Id" />

    <androidx.recyclerview.widget.RecyclerView
        android:id="@+id/rvParticipants"
        android:layout_width="match_parent"
        android:layout_height="0dp"
        android:layout_weight="1" />

    <LinearLayout
        android:layout_width="wrap_content"
        android:layout_height="wrap_content">

        <Button
            android:id="@+id/btnMic"
            android:layout_width="wrap_content"
            android:layout_height="wrap_content"
            android:layout_marginVertical="8dp"
            android:text="Mic"/>

        <Button
            android:id="@+id/btnLeave"
            android:layout_width="wrap_content"
            android:layout_height="wrap_content"
            android:layout_marginVertical="8dp"
            android:layout_marginHorizontal="8dp"
            android:text="Leave"/>

        <Button
            android:id="@+id/btnWebcam"
            android:layout_width="wrap_content"
            android:layout_height="wrap_content"
            android:layout_marginVertical="8dp"
            android:text="Webcam" />

    </LinearLayout>

</LinearLayout>
The next step is to initialize a meeting, After getting token and meetigId from JoinActivity:
- Configure VideoSDK with token.
- Initialize the meeting with required params such as
meetingId,participantName,micEnabled,webcamEnabledand more. - Add
MeetingEventListenerfor listening events such as Meeting Join/Left and Participant Join/Left. - Join the room with
meeting.join()method.
- Kotlin
- Java
class MeetingActivity : AppCompatActivity() {
  // declare the variables we will be using to handle the meeting
  private var meeting: Meeting? = null
  private var micEnabled = true
  private var webcamEnabled = true

  override fun onCreate(savedInstanceState: Bundle?) {
    super.onCreate(savedInstanceState)
    setContentView(R.layout.activity_meeting)

    val token = intent.getStringExtra("token")
    val meetingId = intent.getStringExtra("meetingId")
    val participantName = "John Doe"

    // 1. Configuration VideoSDK with Token
    VideoSDK.config(token)

    // 2. Initialize VideoSDK Meeting
    meeting = VideoSDK.initMeeting(
      this@MeetingActivity, meetingId, participantName,
      micEnabled, webcamEnabled, null, null, false, null, null)

    // 3. Add event listener for listening upcoming events
    meeting!!.addEventListener(meetingEventListener)

    //4. Join VideoSDK Meeting
    meeting!!.join()

    (findViewById<View>(R.id.tvMeetingId) as TextView).text = meetingId
  }

  // creating the MeetingEventListener
  private val meetingEventListener: MeetingEventListener = object : MeetingEventListener() {
    override fun onMeetingJoined() {
      Log.d("#meeting", "onMeetingJoined()")
    }

    override fun onMeetingLeft() {
      Log.d("#meeting", "onMeetingLeft()")
      meeting = null
      if (!isDestroyed) finish()
    }

    override fun onParticipantJoined(participant: Participant) {
      Toast.makeText(
        this@MeetingActivity, participant.displayName + " joined",
        Toast.LENGTH_SHORT
      ).show()
    }

    override fun onParticipantLeft(participant: Participant) {
      Toast.makeText(
         this@MeetingActivity, participant.displayName + " left",
         Toast.LENGTH_SHORT
      ).show()
    }
  }
}
public class MeetingActivity extends AppCompatActivity {
  // declare the variables we will be using to handle the meeting
  private Meeting meeting;
  private boolean micEnabled = true;
  private boolean webcamEnabled = true;

  @Override
  protected void onCreate(Bundle savedInstanceState) {
    super.onCreate(savedInstanceState);
    setContentView(R.layout.activity_meeting);

    final String token = getIntent().getStringExtra("token");
    final String meetingId = getIntent().getStringExtra("meetingId");
    final String participantName = "John Doe";

    // 1. Configuration VideoSDK with Token
    VideoSDK.config(token);

    // 2. Initialize VideoSDK Meeting
    meeting = VideoSDK.initMeeting(
            MeetingActivity.this, meetingId, participantName,
            micEnabled, webcamEnabled, null, null, false, null, null);

    // 3. Add event listener for listening upcoming events
    meeting.addEventListener(meetingEventListener);

    //4. Join VideoSDK Meeting
    meeting.join();

    ((TextView)findViewById(R.id.tvMeetingId)).setText(meetingId);
  }

  // creating the MeetingEventListener
  private final MeetingEventListener meetingEventListener = new MeetingEventListener() {
    @Override
    public void onMeetingJoined() {
      Log.d("#meeting", "onMeetingJoined()");
    }

    @Override
    public void onMeetingLeft() {
      Log.d("#meeting", "onMeetingLeft()");
      meeting = null;
      if (!isDestroyed()) finish();
    }

    @Override
    public void onParticipantJoined(Participant participant) {
      Toast.makeText(MeetingActivity.this, participant.getDisplayName() + " joined", Toast.LENGTH_SHORT).show();
    }

    @Override
    public void onParticipantLeft(Participant participant) {
      Toast.makeText(MeetingActivity.this, participant.getDisplayName() + " left", Toast.LENGTH_SHORT).show();
    }
  };
}
Step 4: Handle Local Participant Media
After successfully enter into the meeting, it's time to enable/disable local participant(You) webcam and mic, for that we will use Meeting class method enableWebcam / disableWebcam for camera and muteMic / unmuteMic for mic.
- Kotlin
- Java
class MeetingActivity : AppCompatActivity() {
  override fun onCreate(savedInstanceState: Bundle?) {
    super.onCreate(savedInstanceState)
    setContentView(R.layout.activity_meeting)
    //...Meeting Setup is Here

    // actions
    setActionListeners()
  }

  private fun setActionListeners() {
    // toggle mic
    findViewById<View>(R.id.btnMic).setOnClickListener { view: View? ->
      if (micEnabled) {
        // this will mute the local participant's mic
        meeting!!.muteMic()
        Toast.makeText(this@MeetingActivity, "Mic Muted", Toast.LENGTH_SHORT).show()
      } else {
        // this will unmute the local participant's mic
        meeting!!.unmuteMic()
        Toast.makeText(this@MeetingActivity, "Mic Enabled", Toast.LENGTH_SHORT).show()
      }
        micEnabled=!micEnabled
    }

    // toggle webcam
    findViewById<View>(R.id.btnWebcam).setOnClickListener { view: View? ->
      if (webcamEnabled) {
        // this will disable the local participant webcam
        meeting!!.disableWebcam()
        Toast.makeText(this@MeetingActivity, "Webcam Disabled", Toast.LENGTH_SHORT).show()
      } else {
        // this will enable the local participant webcam
        meeting!!.enableWebcam()
        Toast.makeText(this@MeetingActivity, "Webcam Enabled", Toast.LENGTH_SHORT).show()
      }
       webcamEnabled=!webcamEnabled
    }

    // leave meeting
    findViewById<View>(R.id.btnLeave).setOnClickListener { view: View? ->
      // this will make the local participant leave the meeting
      meeting!!.leave()
    }
  }
}
public class MeetingActivity extends AppCompatActivity {
  @Override
  protected void onCreate(Bundle savedInstanceState) {
    super.onCreate(savedInstanceState);
    setContentView(R.layout.activity_meeting);
    //...Meeting Setup is Here

    // actions
    setActionListeners();
  }

  private void setActionListeners() {
    // toggle mic
    findViewById(R.id.btnMic).setOnClickListener(view -> {
      if (micEnabled) {
        // this will mute the local participant's mic
        meeting.muteMic();
        Toast.makeText(MeetingActivity.this, "Mic Disabled", Toast.LENGTH_SHORT).show();
      } else {
        // this will unmute the local participant's mic
        meeting.unmuteMic();
        Toast.makeText(MeetingActivity.this, "Mic Enabled", Toast.LENGTH_SHORT).show();
      }
      micEnabled=!micEnabled;
    });

    // toggle webcam
    findViewById(R.id.btnWebcam).setOnClickListener(view -> {
      if (webcamEnabled) {
        // this will disable the local participant webcam
        meeting.disableWebcam();
        Toast.makeText(MeetingActivity.this, "Webcam Disabled", Toast.LENGTH_SHORT).show();
      } else {
        // this will enable the local participant webcam
        meeting.enableWebcam();
        Toast.makeText(MeetingActivity.this, "Webcam Enabled", Toast.LENGTH_SHORT).show();
      }
      webcamEnabled=!webcamEnabled;
    });

    // leave meeting
    findViewById(R.id.btnLeave).setOnClickListener(view -> {
      // this will make the local participant leave the meeting
      meeting.leave();
    });
  }
}
Output
Step 5: Handling the Participants View
We will be showing the list of participant in a RecyclerView.
- Here the participant's video is displayed using
VideoView, but you may also useSurfaceViewRenderfor the same. - For
VideoView, SDK version should be0.1.13or higher. - To know more about
VideoView, please visit here
- Create a new layout for the participant view named
item_remote_peer.xmlin theres/layoutfolder.
<?xml version="1.0" encoding="utf-8"?>
<FrameLayout xmlns:android="http://schemas.android.com/apk/res/android"
    xmlns:app="http://schemas.android.com/apk/res-auto"
    xmlns:tools="http://schemas.android.com/tools"
    android:layout_width="match_parent"
    android:layout_height="200dp"
    android:background="@color/cardview_dark_background"
    tools:layout_height="200dp">

    <live.videosdk.rtc.android.VideoView
        android:id="@+id/participantView"
        android:layout_width="match_parent"
        android:layout_height="match_parent"
        android:visibility="gone" />

    <LinearLayout
        android:layout_width="match_parent"
        android:layout_height="wrap_content"
        android:layout_gravity="bottom"
        android:background="#99000000"
        android:orientation="horizontal">

        <TextView
            android:id="@+id/tvName"
            android:layout_width="0dp"
            android:layout_height="wrap_content"
            android:layout_weight="1"
            android:gravity="center"
            android:padding="4dp"
            android:textColor="@color/white" />

    </LinearLayout>

</FrameLayout>
- Create a recycler view adapter named
ParticipantAdapterwhich will show the participant list. CreatePeerViewHolderin the adapter which will extendRecyclerView.ViewHolder.
- Kotlin
- Java
class ParticipantAdapter(meeting: Meeting) : RecyclerView.Adapter<ParticipantAdapter.PeerViewHolder>() {

  override fun onCreateViewHolder(parent: ViewGroup, viewType: Int): PeerViewHolder {
    return PeerViewHolder(
      LayoutInflater.from(parent.context)
        .inflate(R.layout.item_remote_peer, parent, false)
    )
  }

  override fun onBindViewHolder(holder: PeerViewHolder, position: Int) {
  }

  override fun getItemCount(): Int {
    return 0
  }

  class PeerViewHolder(view: View) : RecyclerView.ViewHolder(view) {
    // 'VideoView' to show Video Stream
    var participantView: VideoView
    var tvName: TextView

    init {
        tvName = view.findViewById(R.id.tvName)
        participantView = view.findViewById(R.id.participantView)
    }
  }
}
public class ParticipantAdapter extends RecyclerView.Adapter<ParticipantAdapter.PeerViewHolder> {

  @NonNull
  @Override
  public PeerViewHolder onCreateViewHolder(@NonNull ViewGroup parent, int viewType) {
      return new PeerViewHolder(LayoutInflater.from(parent.getContext()).inflate(R.layout.item_remote_peer, parent, false));
  }

  @Override
  public void onBindViewHolder(@NonNull PeerViewHolder holder, int position) {
  }

  @Override
  public int getItemCount() {
      return 0;
  }

  static class PeerViewHolder extends RecyclerView.ViewHolder {
    // 'VideoView' to show Video Stream
    public VideoView participantView;
    public TextView tvName;
    public View itemView;

    PeerViewHolder(@NonNull View view) {
        super(view);
        itemView = view;
        tvName = view.findViewById(R.id.tvName);
        participantView = view.findViewById(R.id.participantView);
    }
  }
}
- Now, we will render a list of
Participantfor the meeting. We will initialize this list in the constructor of theParticipantAdapter
- Kotlin
- Java
class ParticipantAdapter(meeting: Meeting) :
    RecyclerView.Adapter<ParticipantAdapter.PeerViewHolder>() {

  // creating a empty list which will store all participants
  private val participants: MutableList<Participant> = ArrayList()

  init {
    // adding the local participant(You) to the list
    participants.add(meeting.localParticipant)

    // adding Meeting Event listener to get the participant join/leave event in the meeting.
    meeting.addEventListener(object : MeetingEventListener() {
      override fun onParticipantJoined(participant: Participant) {
        // add participant to the list
        participants.add(participant)
        notifyItemInserted(participants.size - 1)
      }

      override fun onParticipantLeft(participant: Participant) {
        var pos = -1
        for (i in participants.indices) {
          if (participants[i].id == participant.id) {
            pos = i
            break
          }
        }
        // remove participant from the list
        participants.remove(participant)
        if (pos >= 0) {
          notifyItemRemoved(pos)
        }
      }
    })
  }

  // replace getItemCount() method with following.
  // this method returns the size of total number of participants
  override fun getItemCount(): Int {
    return participants.size
  }
  //...
}
public class ParticipantAdapter extends RecyclerView.Adapter<ParticipantAdapter.PeerViewHolder> {

  // creating a empty list which will store all participants
  private final List<Participant> participants = new ArrayList<>();

  public ParticipantAdapter(Meeting meeting) {
    // adding the local participant(You) to the list
    participants.add(meeting.getLocalParticipant());

    // adding Meeting Event listener to get the participant join/leave event in the meeting.
    meeting.addEventListener(new MeetingEventListener() {
      @Override
      public void onParticipantJoined(Participant participant) {
        // add participant to the list
        participants.add(participant);
        notifyItemInserted(participants.size() - 1);
      }

      @Override
      public void onParticipantLeft(Participant participant) {
        int pos = -1;
        for (int i = 0; i < participants.size(); i++) {
          if (participants.get(i).getId().equals(participant.getId())) {
            pos = i;
            break;
          }
        }
        // remove participant from the list
        participants.remove(participant);

        if (pos >= 0) {
          notifyItemRemoved(pos);
        }
      }
    });
  }

  // replace getItemCount() method with following.
  // this method returns the size of total number of participants
  @Override
  public int getItemCount() {
    return participants.size();
  }
  //...
}
- We have listed our participants. Let's set up the view holder to display a participant video.
- Kotlin
- Java
class ParticipantAdapter(meeting: Meeting) :
    RecyclerView.Adapter<ParticipantAdapter.PeerViewHolder>() {

  // replace onBindViewHolder() method with following.
  override fun onBindViewHolder(holder: PeerViewHolder, position: Int) {
    val participant = participants[position]

    holder.tvName.text = participant.displayName

    // adding the initial video stream for the participant into the 'VideoView'
    for ((_, stream) in participant.streams) {
      if (stream.kind.equals("video", ignoreCase = true)) {
        holder.participantView.visibility = View.VISIBLE
        val videoTrack = stream.track as VideoTrack
        holder.participantView.addTrack(videoTrack)
        break
      }
    }

    // add Listener to the participant which will update start or stop the video stream of that participant
    participant.addEventListener(object : ParticipantEventListener() {
      override fun onStreamEnabled(stream: Stream) {
        if (stream.kind.equals("video", ignoreCase = true)) {
          holder.participantView.visibility = View.VISIBLE
          val videoTrack = stream.track as VideoTrack
          holder.participantView.addTrack(videoTrack)
       }
      }

      override fun onStreamDisabled(stream: Stream) {
        if (stream.kind.equals("video", ignoreCase = true)) {
          holder.participantView.removeTrack()
          holder.participantView.visibility = View.GONE
        }
      }
    })
  }
}
public class ParticipantAdapter extends RecyclerView.Adapter<ParticipantAdapter.PeerViewHolder> {

  // replace onBindViewHolder() method with following.
  @Override
  public void onBindViewHolder(@NonNull PeerViewHolder holder, int position) {
    Participant participant = participants.get(position);

    holder.tvName.setText(participant.getDisplayName());

    // adding the initial video stream for the participant into the 'VideoView'
    for (Map.Entry<String, Stream> entry : participant.getStreams().entrySet()) {
      Stream stream = entry.getValue();
      if (stream.getKind().equalsIgnoreCase("video")) {
        holder.participantView.setVisibility(View.VISIBLE);
        VideoTrack videoTrack = (VideoTrack) stream.getTrack();
        holder.participantView.addTrack(videoTrack)
        break;
      }
    }
    // add Listener to the participant which will update start or stop the video stream of that participant
    participant.addEventListener(new ParticipantEventListener() {
      @Override
      public void onStreamEnabled(Stream stream) {
        if (stream.getKind().equalsIgnoreCase("video")) {
          holder.participantView.setVisibility(View.VISIBLE);
          VideoTrack videoTrack = (VideoTrack) stream.getTrack();
          holder.participantView.addTrack(videoTrack)
        }
      }

      @Override
      public void onStreamDisabled(Stream stream) {
        if (stream.getKind().equalsIgnoreCase("video")) {
          holder.participantView.removeTrack();
          holder.participantView.setVisibility(View.GONE);
        }
      }
    });
  }
}
- Add this adapter to the
MeetingActivity
- Kotlin
- Java
override fun onCreate(savedInstanceState: Bundle?) {
  //Meeting Setup...
  //...
  val rvParticipants = findViewById<RecyclerView>(R.id.rvParticipants)
  rvParticipants.layoutManager = GridLayoutManager(this, 2)
  rvParticipants.adapter = ParticipantAdapter(meeting!!)
}
@Override
protected void onCreate(Bundle savedInstanceState) {
  //Meeting Setup...
  //...
  final RecyclerView rvParticipants = findViewById(R.id.rvParticipants);
  rvParticipants.setLayoutManager(new GridLayoutManager(this, 2));
  rvParticipants.setAdapter(new ParticipantAdapter(meeting));
}
Stuck anywhere? Check out this example code on GitHub.
Final Output
We are done with implementation of customised video calling app in Android using Video SDK. To explore more features go through Basic and Advanced features.
You can checkout the complete quick start example here.
Got a Question? ![]() Ask us on discord
Ask us on discord

