Picture-in-Picture Mode - iOS
Overview
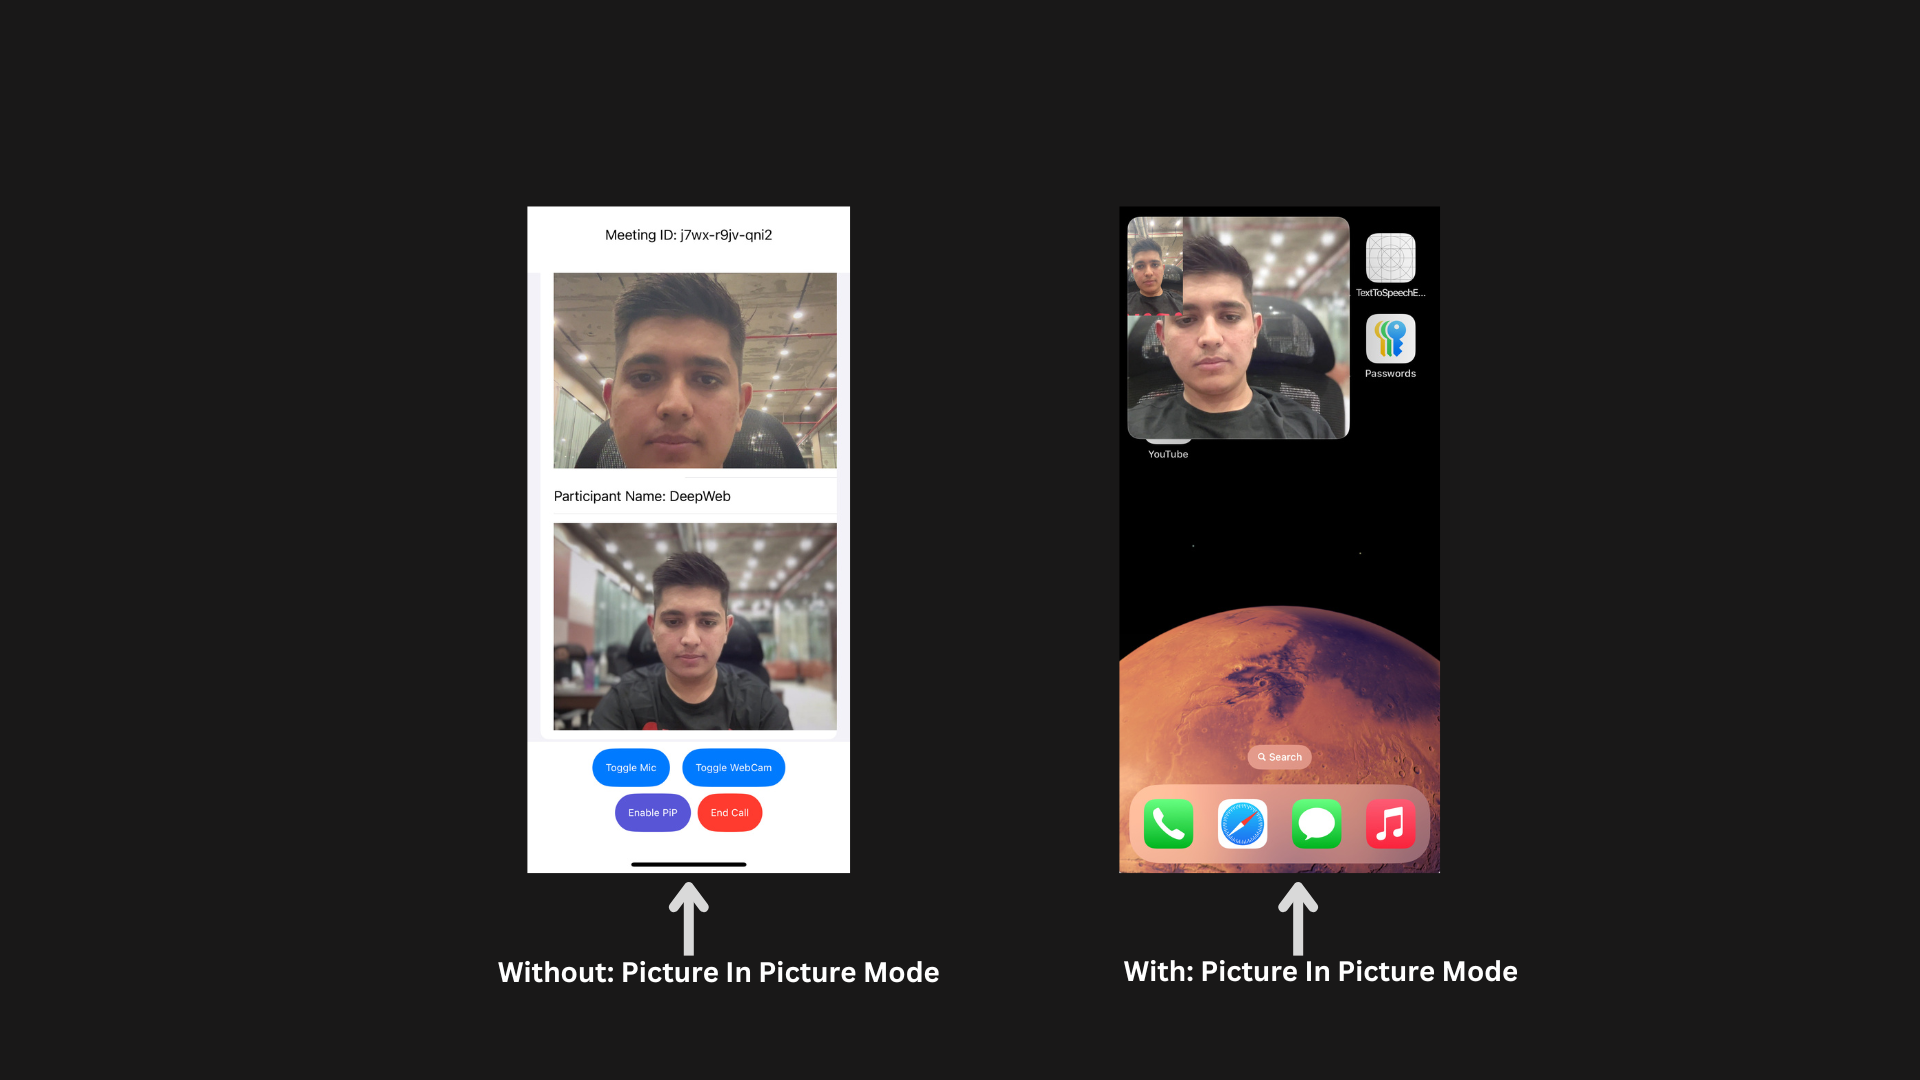
Picture-in-picture (PiP) is a commonly used feature in video conferencing software, enabling users to simultaneously engage in a video conference and perform other tasks on their device. With PiP, you can keep the video conference window open, resize it to a smaller size, and continue working on other tasks while still seeing and hearing the other participants in the conference. This feature proves beneficial when you need to take notes, send an email, or look up information during the conference.
This guide explains the steps to implement the Picture-in-Picture (PiP) feature in a SwiftUI iOS application using VideoSDK. without relying on any third-party packages.
Prerequisites
To implement this feature, you need to setup your own example with videosdk or you clone this Quick Start Repository and run the app. Once the app is running, we will start integrating PiP mode in the iOS app.
Info.plist Configuration
<key>NSCameraUsageDescription</key>
<string>Camera permission description</string>
<key>NSMicrophoneUsageDescription</key>
<string>Microphone permission description</string>
Xcode Capabilities
Enable the following capabilities in Xcode:
- Go to your target settings.
- Select the "Signing & Capabilities" tab.
- Click the "+" button to add capabilities.
- Add Background Modes
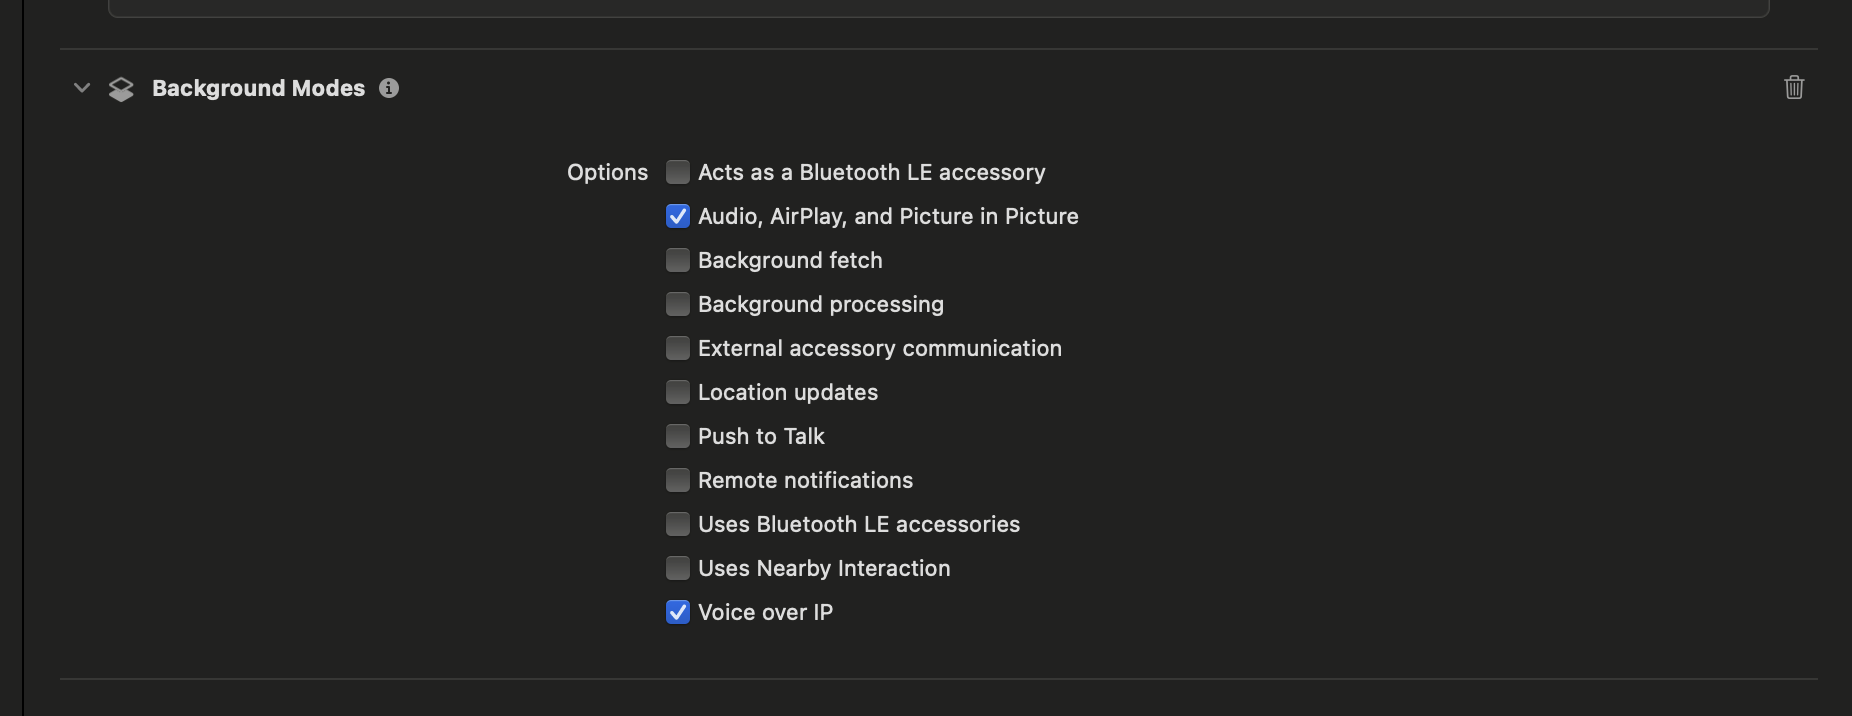
For Background Modes, ensure the following options are checked:
- Audio, AirPlay, and Picture in Picture
- Voice over IP
Adding a PiP Toggle Button and Functions in MeetingViewController
Ensure that a button is added to the UI in MeetingViewController to enable and disable the PiP (Picture-in-Picture) feature.
- Swift
Button {
    meetingViewController.checkPiPStatus()

    if meetingViewController.isPiPActive {
        meetingViewController.stopPiP()
    } else {
        meetingViewController.startPiP()
    }
} label: {
    Text(meetingViewController.isPiPActive ? "Disable PiP" : "Enable PiP")
        .foregroundStyle(Color.white)
        .font(.caption)
        .padding()
        .background(RoundedRectangle(cornerRadius: 25).fill(Color.indigo))
}
Inside the cloned project, in MeetingViewController.swift, we need to add functions to handle PiP mode activation and manage foreground/background states.
Key Functions:
startPiP(): Initializes and starts PiP mode.stopPiP(): Stops PiP mode and restores the main UI.handleEnterBackground(): Ensures PiP remains active when the app goes into the background.handleEnterForeground(): Reconfigures PiP when the app returns to the foreground.
You can also copy the file from Here
- Swift
func startPiP() {
    if pipVideoCallViewController == nil {
        pipVideoCallViewController = PiPVideoCallViewController(meetingViewController: self)
    }
    pipVideoCallViewController?.startPiP()
}
func stopPiP() {
    pipVideoCallViewController?.stopPiP()
    isPiPActive = false
}
Implementing PiP Mode
PiP implementation consists of the following four key files:
PiPContainerView.swiftPiPVideoCallViewController.swiftPiPFrameProcessor.swiftPiPVideoView.swift
You can copy these files from github pip mode example and add them to your project.
Architecture Diagram
Below is the which will explaining the PiP workflow:
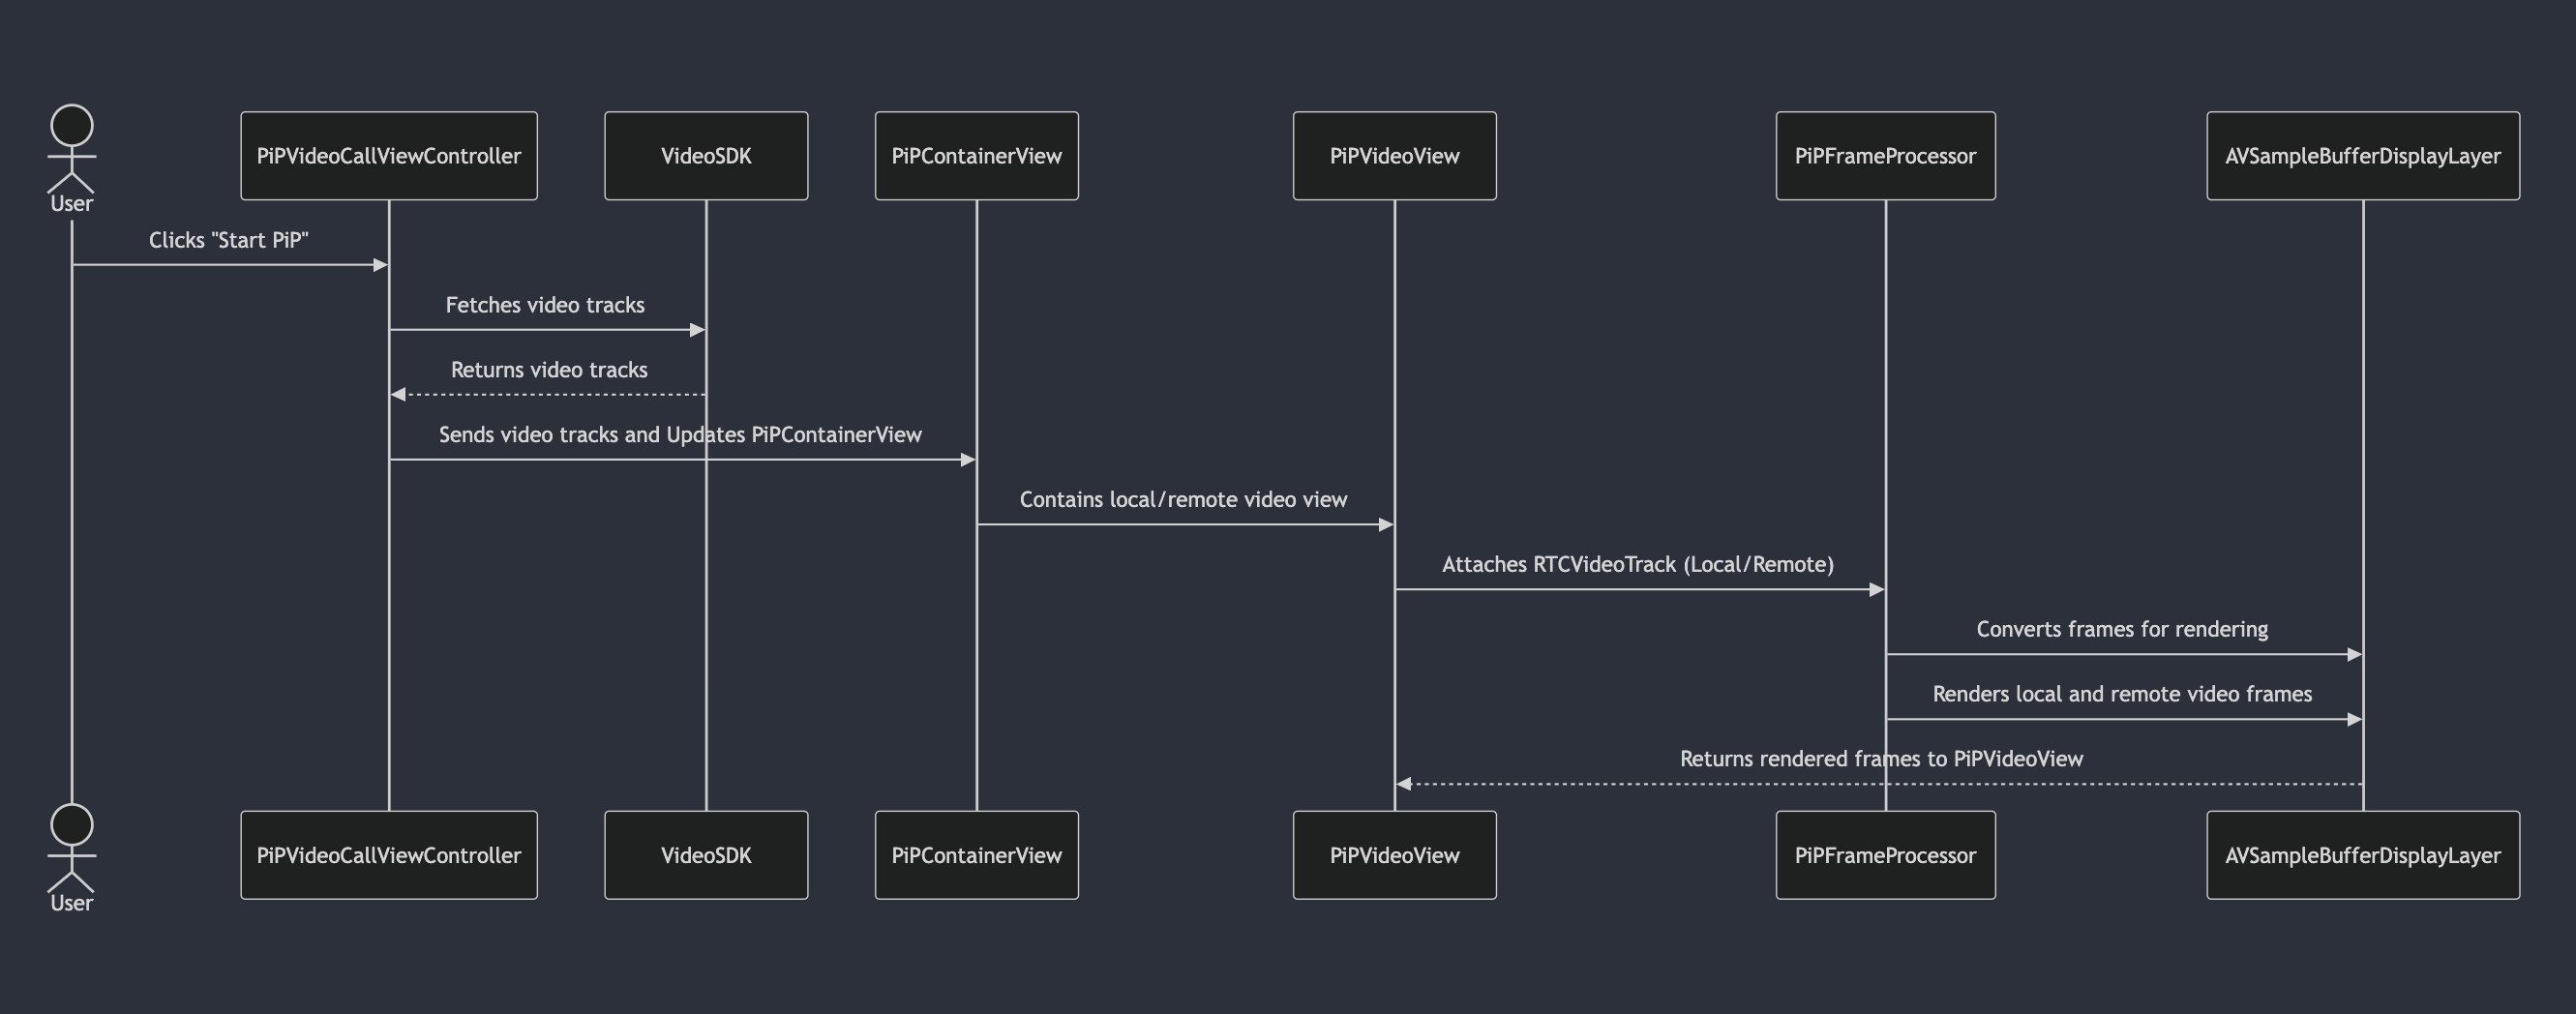
When the user clicks "Start PiP ",(In Our Case Enable PiP) the PiPVideoCallViewController fetches video tracks from VideoSDK and sends them to PiPContainerView, which manages the local and remote video views. These tracks are processed by PiPFrameProcessor, and the frames are rendered using AVSampleBufferDisplayLayer within PiPVideoView for real-time video display.
File Breakdown
Each of the four files serves a specific purpose in enabling PiP mode.
PiPVideoCallViewController.swift (PiP Video Call Manager)
When the user clicks "Enable PiP". PiPVideoCallViewController fetches the video tracks from the VideoSDK meeting and sends them to the PiPContainerView. And also manages the state of AVPictureInPictureControllerDelegate.
- Key Responsibilities:
- Initializes a PiPContainerView that contains both local and remote video views.
- Creates an AVPictureInPictureController to handle PiP behavior.
- Updates video tracks dynamically based on users activity.
- How It Connects:
- Receives video tracks from Videosdk's meeting and updates PiPContainerView.
- Uses PiPContainerView to display the video.
- Calls updateVideoTracks() whenever video state changes.
PiPContainerView.swift (Container for PiP Video Views)
- Purpose: Acts as a container for the local and remote video views inside PiP mode.and you can customize the PiPContainerView.swift. as per you requirement.
- Key Responsibilities:
- Manages two PiPVideoView instances: localVideoView and remoteVideoView.
- Updates video tracks when they change.
- Arranges views properly using constraints.
- How It Connects:
- Receives video tracks from PiPVideoCallViewController.
- Calls addVideoTrack() on PiPVideoView to render video frames.
- Uses PiPFrameProcessor inside PiPVideoView to process and render frames.
PiPVideoView.swift (Individual Video View)
- Purpose: PiPVideoView.swift Handles rendering of an individual video track (either local or remote).
- Key Responsibilities:
- Uses AVSampleBufferDisplayLayer to display video frames.
- Receives an RTCVideoTrack and processes frames using WebRTCFrameProcessor.
- Ensures real-time rendering of WebRTC video.
- How It Connects:
- Receives an RTCVideoTrack from PiPContainerView.
- Passes the video track to PiPFrameProcessor for frame processing.
PiPFrameProcessor.swift (Frame Processing)
- Purpose: PiPFrameProcessor.swift Converts Videosdk's RTC video frames into a format that can be displayed in AVSampleBufferDisplayLayer.
- Key Responsibilities:
- Converts RTCVideoFrame into CVPixelBuffer for rendering.
- Handles frame rate and performance optimizations.
- Uses a pixel buffer pool for efficient memory management.
- How It Connects:
- Receives video frames from PiPVideoView.
- Converts and renders frames into AVSampleBufferDisplayLayer
Final Output
We have successfully implemented Picture-in-Picture (PiP) Mode for an iOS application using VideoSDK without any third-party packages. You can customize the view and optimize it as needed.
Stuck anywhere? Check out this example code on GitHub
Got a Question? ![]() Ask us on discord
Ask us on discord

